2018-11-10
Red Dead Redemption 2 is finally here. Rockstar's new open-world western game is now available on both PS4 and Xbox One, and it presents players with a massive, deep open world to explore. The main story alone will take you in the neighborhood of 50 hours to complete, and that's before engaging in much of its side content--and all of this is to be followed by Red Dead Online in November, the game's online multiplayer component.To help you make the most of the experience, we've put together numerous guides and tips, tackling both specific aspects of the game and a broader array of things you should be aware of before starting. Rockstar has opted not to hold your hand with many features in the game, leaving it to you to either discover them or find them hidden away in menus. We'll also be taking a look at some of these examples to ensure you're aware of everything the game has to offer.We've got plenty of other guides and tips on the way, and we'll continue to update the list below with all of them. While you wait to actually get your hands on the game, be sure to check out our RDR 2 review.CheatsOne potentially big aspect of the new game is cheat codes. Like GTA V before it, RDR 2 allows you to use cheats and even has an entire menu available for the feature. However, at this early stage, we don't actually know what all of them are; at least some are cleverly hidden in newspapers in-game. We'll be doing our best to hunt these down and will report back as they are uncovered--you can see those we've been able to confirm in our list of all the Red Dead 2 cheats. In the meantime, we've also got a rundown on the best RDR2 cheats that are worth a try.Do You Need To Play Red Dead Redemption First?Red Dead Redemption 2 is the third game in the Red Dead series, though it's only closely connected to its direct predecessor. However, RDR 2 is a prequel, taking place years before the events of the first RDR. If you've played the previous game, you'll recognize the names and faces of many of its characters, including RDR protagonist John Marston. We dive into whether you should play RDR first in our feature, but whatever choice you make, you should give our Red Dead Redemption story recap a look to refresh your memory--or fill in the holes for the first time.Tips To Know Before StartingAs with any game, it can be useful to start with certain knowledge in hand. That's certainly true of RDR 2, which is a dense game full of various systems that interact with each other. With that in mind, we've put together a list of key tips you should know before booting up the game for the first time. We've kept spoilers to a minimum, but you'll want to be aware, for instance, that side missions can expire if you don't get to them quickly enough.How To Make Money FastAs an outlaw, you're after money, but not necessarily out of sheer greed. Whether your motivation is the betterment of your gang and its members or because you simply want a new gun and horse, you're going to want to get your hands on as much money as possible. With that in mind, we've put together a guide on how to make money quickly.Outfits And ClimatesAmong the ways Red Dead 2 tries to immerse you in its world is with its climates. You'll have to account for temperatures if you want to maximize your performance, wearing appropriate clothing depending on where in the world you are. We've rounded up all of the outfits we've come across so far to give you an idea of what you can find.Things The Game Doesn't Tell YouAs you play and share stories with friends, you may come to realize there are any number of things the game doesn't tell you. There are various interesting details and tidbits you could miss because Rockstar isn't throwing them in your face, so we've done our best to round up a number of these so you don't miss out on some opportunities during the course of your adventures.How Do Morality And Honor Work?Among the many systems you'll find in Red Dead 2 is honor. Arthur Morgan may be a criminal no matter what choices you make, but there are degrees to which he is a bad guy. That comes into play with morality and honor, as your actions will either boost or lower your honor. Pressing down on the D-pad allows you to see this at any time, and something as simple as greeting a passerby will allow you to build it up. Aside from how people react to you, it's worth being aware of the implications of your honor--Good Guy Arthur will get discounts at stores, which is one way to save some cash.Some Side Missions Can ExpireIf you're a completionist, the thought of optional missions disappearing is downright awful. But whatever your approach to playing games like Red Dead 2, you should absolutely engage with some of the optional content involving your gang. These sequences feature some of the best character moment in the game, but if you advance far enough in the story, some of these missions will go away whether or not you've done them. You can find out more about how this works in our PSA on side missions expiring.How Do I Fast Travel?Fast travel does exist in RDR2, although it's not something you'll do by selecting a point on your map and warping there. The means for quickly moving around involve using actual modes of transportation, such as stagecoaches. Provided you have the patience, you're much better off running or taking your horse, because you'll encounter some of the game's most interesting content that way. But if speed is of the essence, consult our explanation of how fast travel works.All The GunsAs noted above, money is at a premium, so you don't necessarily want to buy every weapon you lay your eyes on. You may want to plan ahead, so we've rounded up all of the guns we've discovered so far in order to give you a sense of what awaits.Health, Stamina, Dead Eye, And Horse Cores And Bars ExplainedOne of the many new wrinkles in Red Dead 2 is the Core system, which dictates a variety of aspects of your character. It can be a bit complex to wrap your head around, with Cores influencing bars but bars being used before Cores, among other thing. Do yourself a favor and get a good grasp on this key system by checking out our guide to how Cores work.Fishing TipsEarly in the game, you'll gain the ability to fish, which can be a fun mini-game to kill some time with. You can get by without much strategy, but if you're interested in getting the biggest, legendary fish that existing in Red Dead's world, you should consult our fishing guide for tips and legendary fish locations.How To Find The Legendary Animals And PeltsDuring Chapter 2, you'll encounter your first Legendary Animal--an enormous Grizzly Bear. From here, you'll be able to track and hunt the game's rarest animals, some of which will require added firepower. If you want to know the location of every single elusive animal in Red Dead 2's world, go check out our Legendary animal sand pets guide for guidance on how to find them, and what to do with that legendary bear pelt.Perks Guide: Trinkets, Talismans, And The Crafting Components You NeedPerks offer improvements to Arthur's overall abilities that are unlocked by obtaining Talismans and Trinkets, which are primarily crafted at Fences. You'll need parts from Legendary Animals to craft them. Others are rewarded to you by completing specific missions under special conditions. Check out our Perks guide offering a detailed run down all of the Talismans we've found so far, what they do, and what you need to unlock them.The Best Horses And Where To Find ThemThere is no singular "best horse" in the game. There are only strong breeds that fair much better than the standard breeds you encounter early on. Speaking on the different types: the Arabian, Turkoman, and Missouri Fox Trotter breeds stand out as the most well-rounded and top-tier. Here's our best horses guide offering details on each.Hidden Weapons You May Have MissedThere are a number of weapons to find in the massive world of Red Dead 2. However, some of these can't be bought from weapon shops, and they can be easily missed if you aren't paying attention. With this in mind, we pulled together a list of weapons that can take some extra effort to find, but are among the game's most interesting tools for combat. In addition to personalized six-shooters from legendary Gunslingers, there are also melee weapons that can be traced back to ancient cultures lost to time. Go check out our guide on how to find these hidden weapons.Where To Sell Stolen Items: Every Fence Location In Red Dead Redemption 2Fences--merchants, not boundary markers--in Red Dead Redemption 2 are the only businesses that will buy goods you've found while looting strangers and rifling through private property, and by gum, they sure are hard to find. Considering the size of RDR2's map, and that there are only four fences in all the land, odds are you may be wondering where they're hiding. We've got a handy reference guide to help locate the black-market traders that peddle in illicit goods.How To Start All The ChallengesAs you play Red Dead 2, you'll start to see notifications informing you that you've completed a challenge. Now this all sounds fine and dandy, but you're likely asking yourself: "What does completing challenges do? Heck, why should I even bother completing them?" That's a fair question, and we're here to answer it. Here's our challenge guide containing details our each, as well as specifics on what you earn.Info from Gamespot.com
2018-11-10
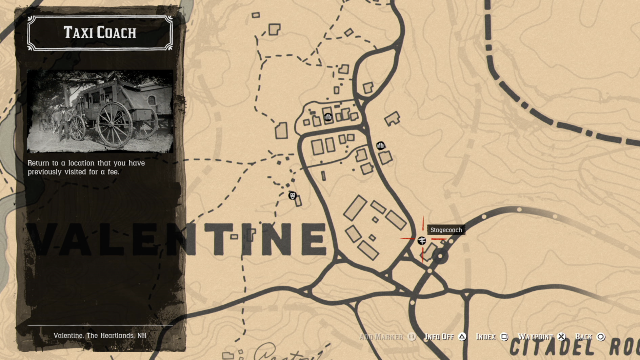
In Red Dead Redemption 2, you're going to be spending a lot of time riding your horse. There's nothing but land, and lots of it, in Rockstar's latest open-world so journeying on horseback is a reality you're going to have to accept during the game's opening hours. Fortunately for you, there are ways to expedite your travels.There's a fast travel system hidden in Red Dead Redemption 2. Better yet, there's a couple ways you can go about doing it. Below we highlight the two main methods, but before you seek them out, we do highly recommend making horse riding your primary means of travel. After all, it's your time spent out in the world where you can better discover all the game has to offer, as well as author your own unique adventures.If you're looking for more guides, you'd be remiss not to check out our feature highlighting all the tips you should know before playing. Though, we also have guides on more specific subjects, like gun customization and money making. Be sure to read our Red Dead 2 review if you haven't already. Otherwise, read on!Method 1: Stagecoaches And TrainsIt makes sense that transportation technology of the day would be a form of fast travel in the game. Both stagecoaches and trains can get you places you want to go quickly. However, you'll have to pay a small fee to use them, and they require you to physically travel to them first--you can't just warp around by picking an icon on your map.Stagecoaches appear on the map as an icon that resembles a wooden sign pointing in two different directions. Labeled as "Taxi Coach" in the game, you can use these to take a stagecoach to locations you've previously visited. The fee increases based on the distance travelled, so make sure you've got enough on you to cover the charge.If you're looking to ride a train, you'll to need to purchase a ticket. These are sold at post offices in town, which are icons on the map with an envelope on them. Trains will take you to previously visited towns that have stations with train tracks running by them.Method 2: Camp Fast TravelIt's possible to fast travel from your camp after unlocking the upgrade, “Next in Line." You can find the camp upgrades page by approaching the donation box at your camp. The fast travel upgrade is the second option in the list and costs about $325, so make sure you've saved up enough and find this upgrade worthwhile in general as you may want to refocus your funds on more fruitful endeavors.Once you've unlocked the upgrade, you'll find a map on the back of the stagecoach next to Arthur's bed. You can use it to travel to a variety of locations, which includes certain towns and other significant locations in the game. Be wary, your camp fast travel only works one way, so if you use it to go to a town on the other side of the map, you'll need to either ride your horse, hire a stagecoach, or take a train to get back. Info from Gamespot.com
2018-11-10

If you're going to survive in Red Dead Redemption 2's world, you're going to need cash. Previously we've highlighted several ways to earn money relatively quickly by working many of the game's core systems and mechanics, but there exists a secret method that can give a significant bump to your wallet without much effort.The method in question is none other than the Poisonous Trail treasure map side mission, which by its end rewards you with four gold bars that equate to about $2,000 when sold. As you explore, you'll often find treasure maps that lead you to all manner of valuable items, but none are as lucrative as the Poisonous Trail maps, which you can complete early on. Of course, if you're more into cheating the system, you can try out this newly discovered glitch that can net you 30 gold bars. But we all know that's nowhere near as fun!Below are directions leading you to all the treasure maps in the Poisonous Trail side mission. We've also included screenshots to aid you in your journey. It's worth noting that you cannot simply head to the final location to cash in on the gold. You need to find every single treasure map first before the gold appears in its associated location.If this guide was helpful to you, be sure to check out our features highlighting all the tips you should know before playing and things the game doesn't tell you. We also have guides on more specific subjects, like top horse breeds and fishing. Though, if you want to have some extra fun instead, be sure to read our feature detailing the game's cheat codes.Treasure Map 1: Cairn Lake CabinThe first map is found at Cairn Lake, which is located north of Valentine up in the mountains. It's snowy up there, so make sure to bring a thick jacket with you before heading up that direction. If you've triggered "The Noblest of Men, and a Woman" Stranger mission, you'll notice that this is the exact location of legendary gunslinger Flaco Hernandez.Once you make it to Cairn Lake, you should find a small abandoned cabin--the one that Hernandez is staying in. Approach the bed to the right and uncover the lock box underneath it, which holds the first treasure map along some extra valuables.Treasure Map 2: Face Rock and an Unassuming Tree TrunkThe first treasure map is attempting to clue you in on a location with a rock that seemingly resembles a face. If you haven't spent much time exploring, this natural formation may seem a mystery to you. Fortunately, we know exactly where it is. Simply proceed down to the Lemoyne region, which is located just South of New Hanover. You can find the rock just north of the "E" in "Scarlett" on the map; check the screenshot in the gallery above for visual clarification.You'll spot Face Rock on a hill. To find the map, go past the tree directly next to Face Rock. You'll want to run further back to the hill's rear where there's a thin tree trunk right beside a fallen tree. The map is located in this thin tree trunk.Final Treasure Map: The Mysterious Snake MoundThe second treasure map has you searching for a snake-like land formation. Yet again, an oddity that you're likely to have missed if you haven't spent significant time taking note of every curiosity out in the world. This bizarre mound is located southeast of Van Horn, a reasonable distance south of the "R" in "New Hanover" on the map.As the treasure map indicates, you're going to want to search for a pile of rocks near the snake-like mound. It's pretty easy to spot as it's literally just a clumped-up pile of rocks with a hole at the center. Search the hole to find the final treasure map. Onward to the treasure!The Treasure: Gold! Gold! Gold!The final treasure map points to a waterfall and what appears to be a pathway in a cave. You'll find this waterfall at the Elysian Pond, which is located directly northeast of the "E" in "Hanover" on the map. When you arrive, walk through the waterfall to discover the entrance of a hidden cave.It's dark in the cave, so bust out your lantern. Proceed through the cave until you find a section in the path where you can drop down. When you land, proceed through the crawl space on the right, which will lead you to the fork in the road pictured on the map. Take the right path, but before you do hug right to find a makeshift camp with a lockbox containing a Large Jewelry Bag.Continue the path forward until you reach what appears to be a pit into certain doom. Instead of falling to your death, proceed left until you reach another edge. If you look closely, your lantern will illuminate some solid ground below that you can land on. But take a few steps back; you're going to want a running start in order to make this jump. If you're acrobatics are sufficient, head down the slope to the left. You'll slip down into some water; once you gain your balance, look to your left for a rock platform to climb up. Search this area and you'll be rewarded with four bars of gold.If this is the first time you've obtained gold, know that you can sell them at Fences for direct profit. Though, if you're feeling particularly generous, it's possible to donate it directly to your camp.Info from Gamespot.com
2018-11-10

Red Dead Redemption 2 lets you fish, and it's a robust, enjoyable, and rewarding pursuit that's a perfect for the game at large. It's also somewhat involved, so we've put together a guide to help you learn the basics, so you can quickly start to catch fish and have a fun time. This guide also goes into depth on the different types of fish in the game and where to find them, while we've also provided a the map to help you find all 13 of the game's Legendary fish.Starting off, fishing in Red Dead Redemption 2 is unlocked by playing the Chapter 2 story mission "A Fisher Of Men," in which you teach young Jack Marston to fish. You take little Jack down to the river for a fishing lesson, and this serves as your introduction to the system.How To Fish:The first step is to select your Fishing Rod from the Items menu. Next, you must attach bait to it, and this is divided into two categories: Bobber and Lure (more on that later).Hold LT/L2 to grip the rod and then RT/R2 to cast. How long you hold down RT/R2 will determine how far the cast goes. It might take you a few times to get a feel for it, but it's rewarding to land a cast precisely where you want it. Once you've cast your line out, what happens next depends on the bait you used. With a bobber, all of you have to do is sit and wait to get a bite You can tap RT/R2 to attract a nearby fish (if you're standing close enough to shore you might even see the fish in the water), but do it too much and you'll spook them. With a lure, you have to reel in until you feel a bite. If you see a fish, cast beyond it and reel in the lure so the fish sees it coming by. Be sure to wait until you feel a strong bite before "striking"--with a bobber or a lure--as fish will often nibble a few times before biting down the hook. Once you've landed a fish, the real work begins.The fish will immediately pull back, and you'll feel your line get tight, with your rod bending in reaction to the tugging. Wait until the fish becomes tired before reeling in; trying to reel as a fish is tugging will cause your line to break. With a fish on the line, push the left stick in the opposite direction the fishing is moving to tire it out faster. You can also click in the right stick and push it in any direction to prevent the fish from taking more line out. However, you must be careful with this approach as you can snap your line very easily. You will also snap your line if a fish pulls away and gets behind a rock or other object.You reel in by rotating the right stick counter clockwise. You'll want to reel in as fast as possible when the fish grows tired, while also being mindful of how much line you have out, how taut the line is, and where the fish is in the water. Pushing the left stick down as you reel in speeds up the process because it brings the fish directly in towards you. I found it was helpful, if not a little embarrassing, to use my thumb and index finger at the same time to reel in even faster.The amount of fight a fish puts in is directly related to its size and type. You'll be able to reel in smaller fish such as bluegills, rock bass, and smallmouth bass with relative ease. But catching larger fish, like Sturgeon and Sockeye Salmon, can entail fights that take multiple minutes to complete. If you snap your line, you'll lose your bait or your lure, but don't get discouraged as they are plenty of fish available in Red Dead Redemption 2's numerous lakes, rivers, and swamps.Bait Types:Just like in real life, selecting the right bait is critically important if you want to reel in a big one. You can purchase basic bait types like bread, corn, and cheese, or spend more money on worms and crayfish that help you land bigger fish. There are also lures specific to rivers, lakes, and swamps, as well as "special" lures that you'll need to catch the biggest fish and the Legendary ones. Here is a rundown of the bait types we've come across so far.Bobber:Bread: good for smaller fishCorn: good for smaller fish.Cheese: good for smaller fish.Worms: excellent for medium sized lake fish.Crayfish: good for larger size fish in deeper parts of rivers and lakes.Crickets: excellent for attracting medium-sized river fish.Lure:River lure: attracts all small and medium size fish in rivers.Lake lure: attracts larger lake dwelling fish.Swamp lure: attracts swamp dwelling medium and large size fishSpecial River lure: increases your chances of catching medium to large river fish.Special Lake lure: increases your chances of catching medium to large lake fish.Special Swamp lure: increases your chances of catching medium to large swap fish.Bait And Tackle Shops:The Bait And Tackle shop in Lagras sells everything you need for fishing, including live worms, crayfish, and all lure types. It's the only Bait And Tackle shop we've found so far in the game.Types Of Fish And What To Use To Catch ThemThere are many different types of fish that can be found in Red Dead Redemption 2's lakes, ponds, rivers, and swamps. Here are the ones we've caught so far, as well as the bait type that provided the highest likelihood of reeling them in successfully.Bluegill -- CheeseChain Pickerel -- CornRedfin Pickerel -- BreadRock Bass -- Cheese or other natural baitsSmallmouth Bass -- Any type of natural baitBullhead Catfish -- Cheese or cornPerch -- BreadLake Sturgeon -- Lake lureLargemouth Bass -- CrayfishSteelhead Trout -- WormsMuskie -- Lake lureSockeye Salmon -- river lureWhen To FishThe time of day matters if you want to have the best success fishing. Early morning and afternoon are when fish bite the most, due to bugs flying close to the surface. You should also try to fish when it's raining, because the drops on the water make fish believe bugs are around.Where To Fish And Specific ConditionsTo find the fish you're after, you'll have to fish in the right spot. Here's a rundown of the locations where we've found the following fish.Bluegill -- All lakes and rivers; most active during rain.Chain Pickerel -- Lakes, rivers, and swamps; most active in sunny weather.Redfin Pickerel -- Rivers in the south; most active on warm, sunny days.Rock Bass -- All clear water in the country; most active on sunny days.Smallmouth Bass -- Northern rivers; most active during rain.Bullhead Catfish -- Swamps; most active during rain.Perch -- Rivers and lakes across the country; most active during sunny weather.Lake Sturgeon -- Southern lakes and swamps; most active during overcast weather.Largemouth Bass -- All waters in the south; most active during rainy weather.Steelhead Trout -- Lakes, mostly in the south; most active during rainy weather.Muskie -- Northern lakes; most active during overcast days.Sockeye Salmon -- Rivers in the north; most active during overcast weather.One further note is that fish, particularly bigger ones, loooovvvvve to hang out at the mouths of waterfalls, as the water there is more oxygenated than other areas. Try there if you're struggling.Legendary Fish:Head to the shore of Flat Iron Lake in the Heartlands to a place called Gill Landing. Here, you'll meet a stranger named...Gill, who is a world-renowned fisherman, or at least that's what he wants you to believe. He'll hand you a map with the locations of 13 epic-sized fish you'll find throughout the game. Snag them all and report back to Gill for your prize. These are indeed mighty fish, so expect the toughest fishing battles the game has to offer. You will need to use the "special" lures mentioned above to bag these big ones. The best advice I can give is to try to catch them when they're already close to shore, so as to cut down on your reeling time significantly and improve the odds of landing the fish. Here's the map:Watch Out For GoatsThere are unpenned billy goats throughout Lagras that can cause problems while fishing. On multiple occasions, I was fishing near the swamp and a goat smacked me in the rear, breaking my fishing line while I was reeling in. It was frustrating, and I thought it might have been a bug. But it happened three times, so the lesson here is to watch out for goats while fishing in Lagras.BoatsAt a certain point a few hours into the game, you will steal a boat and bring it to camp. At this point you can use it to head further into a lake to go after the bigger fish that tend to live in deeper water. You can also steal boats you find on your journey to fish anywhere you'd like.No Ice FishingRed Dead Redemption 2 has snowy, cold locations with frozen lakes and ponds, and one of the Legendary fish is located in a lake that is partially frozen over. However, there doesn't appear to be any true ice fishing where you drill through the ice and drop a line in. Here's to hoping Red Dead Redemption 2 gets the guaranteed-seller "Ice Fishing Expansion" down the road… Info from Gamespot.com
2018-11-10

Compared to its predecessor, horses play a much bigger role in Red Dead Redemption 2 than you might think. So much so that it can be overwhelming if you haven’t been paying close attention to the tutorial messages. Horses have been made to feel like living, breathing creatures this time around, and as such, you need to commit to taking care of them and being cautious of their temperament.To help you wrap your head around Red Dead Redemption 2's horses, we detail below and in the video above everything you need to know to properly care for your steed. If you're more of an experienced rider and want to know what are the best horses out there, we've gathered that information in our best horses guide.For more guides like this, be sure to check out our guides roundup containing features highlighting all the tips you should know before playing and things the game doesn't tell you. And if you want to have some extra fun, be sure to read our feature detailing the game's cheat codes. Though, if you're a curious outsider looking in and want to know whether or not this game for you, then read our Red Dead 2 review if you haven't already.How To Ride Your Horse And Maintain Its CoresHorse controls are relatively simple. Tap the X or A button repeatedly to speed up and R1 or RB to slow down. You can double tap and hold X or A to match a companion's speed, and if you tap X or A in rhythm with your horse's gallop you will conserve stamina.As you ride your horse, you’ll want to keep an eye on its Cores. Like Arthur's Cores, the heart is your horse's Health Core and the lightning bolt is its Stamina Core--they've just got fancy little horseshoes in them. The symbol at the center of the circle represents the Core, while the ring meter that surrounds it is known as a bar.The more you push your horse, the quicker the Stamina bar will deplete. And if you don’t feed your horse every now and then, its Cores will drain and it won’t have as much Stamina or Health in its associated bars. It will also look sad and run with its head down, so try to stock up on horse foods and revival items from the General Store to keep your horse well.Your horse will get dirty over time as you ride it. If this happens, its meters will drain 25% quicker. You can clean it with your brush or by riding it through water. The former is acquired after completing the story mission, "Exit Pursued by a Bruised Ego." It's also worth noting that your horse's cores will refill when you sleep.There are ways to notice when something is awry with your horse. A flashing red exclamation point in the Stamina Core indicates your horse is scared/stressed (you need to press L3 to calm it) while a flashing red brush in the health core means your horse is dirty.Leveling Your HorseWhile mostly identical to how Arthur's Cores work, where horse Cores differ is how you increase their level. Instead of leveling them up by moving and withstanding damage, you develop your horse's Cores and bars by forming a stronger bond with them. As you ride, feed, and clean your horse, your bond will strengthen. And as that bond grows, your horse's Health and Stamina bars will increase.Your horse will even learn advanced maneuvers. At level 2, you can rear your horse back by pressing R1 or RB with square or X. There isn't really a use for this other than to look threatening from time to time--that or to just feel like a cool cowboy from an old western film. At level 3 you learn how to skid. While sprinting, press R1 or RB and you can either bring your horse to a halt or change directions at a moment's notice. Finally at level 4 you learn how to drift and piaffe, which is a fancy word for strafe. As your bond increases your horse will also respond to your call from greater and greater distances, and its stats, including speed, will get a slight bump. If you wanna see how close you are to the next level, you can check the player menu when you the press the pause button.You can expedite bonding by feeding your horse treats. And the stronger your bond is with a horse, the longer it will take to bleed out if it gets knocked down. It takes 60 minutes real time for a level 4 horse to die, so that gives you plenty of time to get to town and purchase a horse reviver from the General Store.Horse Stables And Upgrading Your Horse's StatsIf you wanna get the most out of your level 4 horse, you’ll want to stop at a stable and upgrade its saddle. Most items for sale are cosmetics, but there are a few things that can improve your horse's stats, like the stirrups and the saddles.But WAIT, you say! I can’t seem to enter the stable, and I can’t find a stupid brush to clean my horse. Well that probably means you’re screwing around too much and not doing any story missions. Once you complete "Exit Pursued by a Bruised Ego," you will have access to stables across the map and your horse brush.While at the stables, you can also rename, sell, and buy horses. You can sell both stolen horses and horses you’ve acquired legally. Stolen horses won’t fetch as good a price at stables, but at a certain point in the story you will meet some characters willing to purchase stolen horses for a better profit. Level 4 horses will also fetch a higher price, so if you plan on flipping a horse, so we recommend leveling it up first.Breaking HorsesIf you are looking to buy a horse, the first thing you’ll probably notice is that good horses ain’t cheap. As attached as you'll become with your first, Tennessee Walker, he's not exactly the powerhouse you’ll want by your side throughout the entire game. And if the best horses are too expensive, that means you'll have to find some out in the wild and break 'em yourself. Lucky for you, one of the best horses in the game can be acquired for free at the beginning of chapter 2 and onward. But before we get to that, let’s learn how to break a horse.As you explore the world, you’ll find wild horses everywhere. Big horses, little horses, painted horses, black horses, and so on. There are a dozen different breeds roaming the frontier, all with unique stats and attributes. If you see a horse you’re interested in, first take out your binoculars. Once you study the horse you will be given a prompt to “show info." Hit that, and you can check out the horses stats and its breed details.There are two ways to go about breaking a horse. You can chase it down, lasso it, and hop on its back, or you can approach it slowly, calming it if it gets spooked. Once you get close enough, you can hop on its back. While you might be inclined to take on the first method, it's much easier to break a horse if you approach it slowly. Once you’re on its back, pull back the left stick and subtly tilt the right stick to balance while calming it with square or X. If it bucks you, chase it down. When it calms down a bit, you can repeat the process.How To Find One Of The Best Horses Early: The White-Maned ArabianOnce you feel comfortable breaking horses, pack up a thick jacket and head up to the Grizzlies to find the White-Maned Arabian. This snow-white beauty wanders around Lake Isabella and can be found early on. It's quite difficult to tame, so you're going to need to be persistent in following it around and calming it down enough before you can approach it. If it bucks you and escapes, well, it’s gonna be a while before another one respawns.Once you do break it, put your saddle on it and take it to the nearest stable. Technically the horse will be yours once you put the saddle on, but take it back to a stable just in case--you can never be too careful!Info from Gamespot.com
2018-11-10

As you explore Red Dead Redemption 2's vast open world, you'll come across a lot of interesting (and slightly disturbing) things. Sometimes it's a wailing snake-bite victim in need of assistance; other times, it's a creepy abandoned building with a story to tell. But there's one set of chance encounters more gruesome than the rest, and once you find the first, you'll be on the lookout for a very messed-up serial killer.You'll likely find the first murder scene early in the game. While the other two murder victims are a bit of a ride from the opening areas, you can find them at any time as long as you can freely roam the map. For this guide, we've kept location spoilers to a minimum, and all the screenshots are from an early save with little unlocked--so no worries if you want to play detective for a bit before you really dig into the rest of the game. Of course, this does contain spoilers for the American Dreams Stranger Mission.For more guides, check out our features highlighting all the tips you should know before playing and things the game doesn't tell you. We also have specific guides on things like money making and gun customization to help you be the best outlaw out there. Be sure to read our Red Dead 2 review if you haven't already, and if you want to have some extra fun, be sure to read our feature detailing the game's cheat codes.Step 1: Completing the MapThere are three murder scenes to be found, with a piece of a map hidden at each. In order to initiate the Stranger Mission itself, you first have to put the map back together. In general, you're looking for an area that sticks out in some way--maybe you see blood stains on the road or vultures in the distance. You can also zoom in on the map when you get close, since an X marking the corpse will appear and show you the way.Murder 1: South of ValentineThe first murder scene is just outside of Valentine. Follow the railroad tracks going south out of town; you'll have to ride directly on the tracks at one point to get over a gap, and then you'll find the body under the next overpass. The "front" of the scene faces west. You'll find creepy words written in paint on the right, and to the left, the victim's severed head is stuck to a support beam. In its mouth is the first of three map pieces.Murder 2: West of Shady BelleThe second crime scene can be found in the Scarlett Meadows region, which is a decent ride southeast of Valentine. It's just west of Shady Belle or a bit south of Rhodes, depending on your angle of approach. It's easiest to spot coming from Shady Belle; take the road west, go straight at the first fork, and keep going straight for a bit until you reach a second major fork. Turn right here, then go straight until you reach another fork in the road. The corpse will be strung up in a large tree to your left; on your map, it will be right around where the "S" in "meadows" is. Go around the back of the tree to find the severed head and map piece.Murder 3: Southwest of Wallace StationThe final murder victim can be found strapped to a large rock just southwest of Wallace Station in the West Elizabeth region (it's west and a bit south of Valentine, across the river). Cross the stream and you'll see the rock up the hill, likely with vultures perched on top of it. The head and final map piece are on a smaller rock to the left.Step 2: Locating the KillerOnce complete, the map will give you vague instructions on where to go and what to do when you get there. It shows a bridge with arrows leading into a forest, a dilapidated log cabin, and a code for a combination lock: 6-34-32. As any true crime fan knows, murderers usually kill in areas they know and perhaps live in, which is as good a place to start as any. (If you'd rather solve the mystery yourself from here on out, don't keep reading!)As it turns out, it ends where it all began: Valentine, or technically southwest of Valentine at a place called Lucky's Cabin. If you're coming straight from the Wallace Station murder scene, cross the river and follow the main road northeast--this is the direction shown on the map, and you'll turn left just after you cross the bridge to reach the cabin. If you're instead coming from Valentine, just follow the road out of town to the west.With the pieced-together map, you'll be able to open the basement doors and see the horrors within. A white ? icon indicating a Stranger Mission should appear on the map around the cabin--if not, you might have an active mission you need to complete first. After taking a good look around the killer's hideout (use your lantern if you really want to see every grisly detail), head to the back and inspect the knife. This will trigger a cutscene, so all you need to do is follow the prompts.Once you've hogtied and delivered the killer to the Sheriff's office in Valentine, he'll attack the Sheriff. Use Dead Eye to kill him and save the Sheriff for a reward, which will complete the American Dreams Stranger Mission. Hopefully Arthur isn't too creeped out. Info from Gamespot.com
2018-11-10

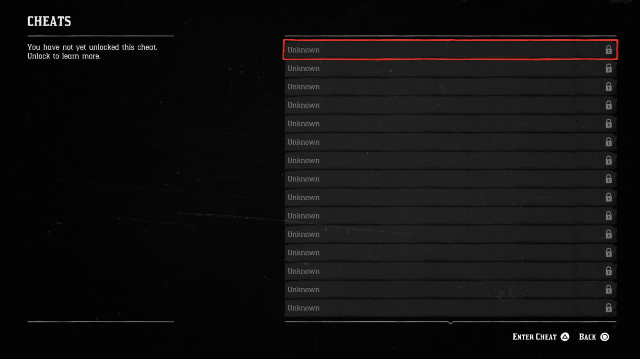
While Red Dead Redemption 2 for PlayStation 4 and Xbox One takes place in a very realistic world where many dynamic, and engrossing systems play off one another, this is a Rockstar game. As such, there are plenty of opportunities to engage in dumb and ridiculous fun. Beyond what you can make happen on your own, much like the original game, you can access a variety of cheat codes in the game to enhance and fundamentally alter aspects of your to suit your needs. Though we strongly recommend finishing the main story and seeing all the key events before trying out these codes out, you're free to use those to your liking at any time (though some codes do require advancing to a certain point in the story first).In order to start messing around with these codes, you'll need to input the key phrases into the Cheats menu--which is accessible in the Settings option in the pause menu. While many of these codes can be used at any time, many of these options will require some extra effort to unlock. As of now, we haven't discovered all of them, and several of them will needed to be unlocked after acquiring specific newspapers from the various towns throughout the game. However, before you activate these cheats, you'll need to know that doing so will deactivate all Achievements and Trophies for your save game after the initial use. So before you go crazy with these codes, be sure to make a separate save file.And with that, here's our quick list of some of the best codes to use. Though if you want to know more about Rockstar's open world western, go check out our Red Dead Redemption 2 review. Though if you're looking for tips and other details to learn, check our essential guide for newcomers, and along with our round up of interesting details that the game doesn't tell you about.Drunk On CommandBy inputting the phrase "A fool on command" in the cheats menu, you'll unlock the Drunk option. This will instantly make Arthur intoxicated, resulting in him wobble about as he struggles to stand up straight. You'll even get an occasional odd comment from him as he wanders down the street or insolation while in the wilderness. While enabled, this will keep the main character perpetually drunk. But if you've had enough, you can deselect the option to return Arthur to his sober self--and all without the nasty hangover.A Horse Ride Is Only A Whistle AwayAs you're gradually building a bond with your new steed, you'll notice that whistling for your horse will only work within fairly short distances. If you don't have time to invest in building up your bond to increase the distance, you can input the code "Better than my dog" to get it to come to you at anytime, regardless of where you are on the map. This can be quite handy when you're traveling the great distances and you can't be bothered to backtrack to where you last left them.That New Horse SmellHowever, if you feel you deserve a stronger and more able-bodied stallion to help you cover great distances, the code "Run! Run! Run!" will do just the trick. After activating this code, you'll instantly spawn a prized race horse for Arthur to ride. As Red Dead Redemption 2 features a large variety of different horses, this particular mare is naturally adept at getting from A to B quickly.A New, Rejuvenated YouAfter spending so much time traveling in the wilderness and getting into dangerous scrapes with many of the gangs roaming the land, you'll often find yourself in rough shape. If you need a pick-me-up fast, then enter the cheat "You flourish before you die" to fully restore Arthur's main cores. Once you're top shape, you'll be able to dive right back into your adventure in no time.Guns, Lots Of GunsWhen you're living life as a bandit, the difference between seeing another day and laying face-first in the dirt could down to what weapon you're holding in your hand. So if you want to upgrade your own hardware to even the odds, use the code "Greed is American Virtue" to unlock a new set of weapons for the traveling outlaw. Once activated you'll find the Pump-Action Shotgun, Mauser Pistol, Semi-Automatic Pistol, and Bolt-Action Rifle sitting in your inventory. To unlock this cheat for use, you'll need to finish the Advertising, the New American Art mission in Chapter 3, and then acquire a newspaper in the town of Rhodes.All The Ammo You NeedRed Dead Redemption 2 prides itself on on offering semi-realistic world where survival is dependent on the resources you have. However, there may come a time where you wish that ammo was in more plentiful supply. If that ever happens, all you'll need to do is use the cheat "Abundance is the dullest desire" in the menu, which is unlocked after picking up the newspaper in Valentine during Chapter 2. Once activated, all ammo will come in unlimited supply, and you can keep firing off your weapons without worrying to count your bullets.Info from Gamespot.com
2018-11-10

In Red Dead Redemption 2, hunting is an important part of exploration and survival in the vast open world. In addition to finding food and other necessary supplies, you'll be able to use materials taken from fallen prey to craft outfits and talismans, which unlock special perks that amplify Arthur's main attributes. As you travel, you may even stumble upon an elusive animal that other explorers have rarely seen. Your first encounter with such a beast will be the Legendary Grizzly Bear, which can offer up a legendary bear pelt if you're able take it down.These Legendary Animals can be found across the many regions of the map and take some extra effort to hunt. While some of these are small in stature, there are many that tower in size over Arthur and are quite dangerous in a fight. But if you're able to take them out, you'll acquire the means to craft some of the game's most valuable accessories and outfits. These particular animals offer the rarest pelts and materials you can find, which can be turned in to the local Trappers and Fences--those shady, black market dealers offering up some of the rarest goods. But rest assured, any materials that can't fit in your bags will be sent straight to the respective merchants.In this feature, we're giving you all the details you need in order to track and hunt each of the game's Legendary Animals. If you want some extra tips for general survival and even fishing--which has its own set of Legendary Fish--be sure to check out our guides and features relating to each of Red Dead 2's most involved gameplay systems. Furthermore, be sure to check out our new weekly series QuickDraw, which focuses on the game's numerous gameplay features and along with a broader look on the impact of the Red Dead series.Table of Contents [hide]Legendary Bharati Grizzly BearLegendary BeaverLegendary Bighorn RamLegendary BoarLegendary BuckLegendary BullgatorLegendary CougarLegendary CoyoteLegendary ElkLegendary FoxLegendary Giaguaro PantherLegendary MooseLegendary Tatanka BisonLegendary White BisonLegendary WolfLegendary Bharati Grizzly BearLocation: During the Chapter 2 story mission Exit Pursued By A Bruised Ego, you'll encounter your first Legendary Animal. While it's possible to take down the bear at this time, you can return later if you want better firepower. You can find it in Grizzlies East, north of the lake O'creah's Run.Crafting:Fence: Bear Claw Talisman (Decreases health core drain by 10%) -- Legendary Bear Claw, Silver Chain Bracelet, Quartz ChunkLegendary BeaverLocation: This rare beaver is known to wander southwest of Butcher Creek, which is directly to the west of Van Horn Trading Post.Crafting:Fence: Beaver Tooth Trinket (Slows weapon degradation by 10%) -- Legendary Beaver ToothLegendary Bighorn RamLocation: Living up to its name, this unusual ram can be found at Cattail Pond, just west of Valentine--the first town you come across in Chapter 2.Crafting:Fence: Ram Horn Trinket (Doubles amount of Creeping Thyme, Oregano, and Wild Mint collected): Legendary Ram HornLegendary BoarLocation: The rare boar can be found in Bluewater Marsh, north of Lagras in the Lemoyne region.Crafting:Fence: Boar Tusk Talisman (Decreases drain speed of horse health and stamina by 10%) -- Legendary Boar Tusk, Cobalt Petrified Wood, Gold EarringLegendary BuckLocation: In the mountains northwest of Strawberry, you'll encounter this large buck.Crafting:Fence: Buck Antler Trinket (Receive higher quality parts when skinning animals) -- Legendary Buck AntlerLegendary BullgatorLocation: First, you'll need to complete the Chapter 4 story mission Country Pursuits, which introduces you to the beast while showing you why it's so dangerous. Afterwards, you'll be able to encounter the massive gator in Bayou Nwa, west of Lakay--which is north of Saint Denis.Crafting:Fence: Alligator Tooth Talisman (Decrease dead eye drain speed by 10%) -- Legendary Alligator Tooth, Gold Jointed Bracelet, Vintage Civil War HandcuffsLegendary CougarLocation: This fearsome feline can be found in Gaptooth Ridge, west of Tumbleweed.Crafting:Fence: Cougar Fang Trinket (Increase stamina XP by 10%) -- Legendary Cougar FangLegendary CoyoteLocation: The hunting grounds for this dangerous coyote can be found in Scarlett Meadows, northwest of Northwest of Rhodes and Southeast of the Old Mill.Crafting:Fence: Coyote Fang Trinket (Increase dead eye XP by 10%) -- Legendary Coyote FangLegendary ElkLocation: You can find this animal east of Bacchus Station in the Ambarino region--the northern section of the map.Crafting:Fence: Elk Antler Trinket (Increase money from looting by 10%) -- Legendary Elk AntlerLegendary FoxLocation: The fox can be found near Mattock Pond, just north of Rhodes in the Lemoyne region.Crafting:Fence: Fox Claw Trinket (Increases eagle eye duration by five seconds) -- Legendary Fox ClawLegendary Giaguaro PantherLocation: To encounter this incredibly dangerous animal, you'll first need to prove yourself as hunter by reaching the rank 9 challenge for Master Hunter. Afterwards, you'll find it roaming west of Shady Belle in Lemoyne. This is directly east of Braithwaite Manor.Crafting:Fence: Panther's Eye Trinket (Decreases dead eye drain speed by 10% for three seconds) -- Legendary Panther EyeLegendary MooseLocation: This massive moose can be seen in the area of Roanoke Ridge, which is near the northeastern corner of the map. Legendary Pronghorn Location: This rare antelope is found wandering in Rio Del Lobo Rock, just east of Fort Mercer in New Austin.Crafting:Fence: Moose Antler Trinket (Increases health exp by 10%) -- Legendary Moose AntlerLegendary Tatanka BisonLocation: In New Austin, you can find this rare bison just southeast of the MacFarlane ranch at Hennigan's Stead.Crafting:Fence: Tatanka Bison Horn Trinket (Decreases received melee damage by 10%) -- Legendary Tatanka Bison HornLegendary White BisonLocation: You can find another rare bison at Lake Isabella, just north of Mount Hagen in Grizzlies West.Crafting:Fence: Bison Horn Talisman (Decreases the speed stamina drains by 10%) -- Legendary Bison HornLegendary WolfLocation: This elusive wolf can be found in Cotorra Springs, west of Bacchus Bridge in Ambarino.Crafting:Fence: Wolf Heart Trinket (Doubles resistance to alcohol) -- Legendary Wolf HeartInfo from Gamespot.com
2018-11-10

Riding on horseback is the primary of getting around in Red Dead Redemption 2's massive world. Before long, you'll find yourself rearing up a multitude of horses in search of the one that'll get you around the quickest. With not much in the way of fast travel, having a horse that's not only fast but can withstand the burdens of exploration is essential.While the question of which horse is the absolute best comes down to preference, there are a few breeds that can be classified as some of the top candidates. Below we discuss these breeds and highlight their locations. If you're looking for a more in-depth guide on horse care and how to boost your trusty steed's performance while making bank along the way, we've got one in the hopper coming soon, so be sure to check back often to get all the information on how to be a proper horse trainer.Be mindful that there are some light location spoilers below given how most of these horses can only be acquired later in the game. You should be good for the White-Maned Arabian breed, but be careful when looking at the details below if you want to steer clear of potential story bits.For more guides, you should check out our features highlighting all the tips you should know before playing and things the game doesn't tell you. Though, we also have guides on more specific subjects, like gun customization and money making. Be sure to read our Red Dead 2 review if you haven't already. And if you want to have some extra fun, be sure to read our feature detailing the game's cheat codes.What Are The Best Breeds?As stated, there is no singular "best horse" in the game. There are only strong breeds that fair much better than the standard breeds you encounter early on. Speaking on the different types: the Arabian, Turkoman, and Missouri Fox Trotter breeds stand out as the most well-rounded and top-tier. Keep in mind that the stats below reflect the horse when you find it and not at its top condition.ArabianArabian breed horses have some of the best stats overall. There are three coat types in total, each with their own unique statistics: White, Black, and Rose Grey Bay.White-Maned ArabianThe White-Maned Arabian can only be found in the wild, which makes it possible to find relatively early on. This snow-white beauty wanders around the edges of Lake Isabella. It's quite difficult to tame, so you're going to need to be persistent in following it around and calming it down enough before you can approach it.Compared to other Arabian horses, it has the lowest base Health and Stamina stats--though, it's still much higher than any of the more standard horse breeds. A worthy compromise for a fantastic horse you can catch and tame so early in the game. Just watch out for the wolves who hang out nearby.SpeedAccelerationHandlingType66EliteSuperiorBlack ArabianThe Black-Maned Arabian horse can be purchased at the Saint Denis Stable during Chapter 4. It has most the well-rounded stats of the Arabian Horses with decent Health and Stamina.SpeedAccelerationHandlingType66EliteSuperiorRose Grey Bay-Maned ArabianThe Rose Grey Bay-Maned Arabian can only be bought at the Blackwater Stable during the Epilogue section of the game. It has the highest Health and Stamina of the three Arabian horses.SpeedAccelerationHandlingType66EliteSuperiorTurkomanTurkoman breed horses make up their lacking acceleration with solid speed, average handling, and a high Health pool. As a cross between War and Racing breeds, they're well worth owning for riders who want a trusty steed who can withstand damage without sacrificing speed. All three Turkoman breeds have the same exact stats, which are reflected below along with a brief breakdown of where you can purchase them and when.SpeedAccelerationHandlingType65StandardRace / WarGold Turkoman: Sold at the Saint Denis Stable during Chapter 4.Dark Bay Turkoman: Sold at the Blackwater Stable during the Epilogue.Silver Turkoman: Sold at the Tumbleweed Stable during the Epilogue.Missouri Fox TrotterThe Missouri Fox Trotter balances the best base speed of all the horse breeds with solid Health and high Stamina. As a mix between the Race and Work breeds, the Missouri Fox Trotter comes highly recommended for those who want all of the perks and benefits of a fast riding horse with resilient Stamina. Like the Turkoman breed, all of the Missouri Fox Trotter coats have the same exact stats, which are reflected below along with a brief breakdown of where you can purchase them and when.SpeedAccelerationHandlingType75StandardRace / WorkAmber Champagne: Sold at Scarlett Meadows Stable during Chapter 4.Silver Dapple Pinto: Sold at Blackwater Stable during the Epilogue.Info from Gamespot.com
2018-11-10

Red Dead Redemption 2 doesn't make a lot of its mechanics known to the player. There are systems buried deep within that you'd be hard-pressed to come in contact with if you're mainlining the game's major story and side missions. Among these mechanics are special Perks that offer improvements to Arthur's overall abilities.We know what you're thinking, though: "Perks? You mean like Perks you unlock from an RPG-like progression tree?" Yes, and no. Red Dead Redemption 2 does in fact offer these sorts of Perks, but they're unlocked by obtaining special items known as Talismans and Trinkets, and not from any special in-game progression screen.Talismans and Trinkets are primarily crafted at Fences--special black market shops that sell all manner of useful items you can't get at any ol' General Shop. You'll need parts from Legendary Animals to craft them. Others are rewarded to you by completing specific missions under special conditions. While Talismans and Trinkets are technically items, know that you don't need to equip them in order for them to be active. Once you acquire one, it'll affect Arthur's abilities permanently, and they can even be equipped as a cosmetic item.Below we run down all of the Talismans we've found so far, what they do, and what you need to unlock them. Any Talismans or Trinkets that have crafting components marked with a "*" are special items that require you to complete specific missions or challenges; a table can be found further below that details their locations.If you're looking for more guides, you'd be remiss not to check out our feature highlighting all the tips you should know before playing. Though, we also have guides on more specific subjects, like cheat codes, gun customization and money making. Be sure to read our Red Dead 2 review if you haven't already.GeneralThe General category has the most Perks affecting a variety of attributes, like weapon degradation, Eagle Eye duration, alcohol resistance, and much more. There are 10 General Perks in total--not including the Eagle Talon Talisman Perk you get from the Special/Ultimate Edition.NamePerk EffectHow To GetBeaver Tooth TrinketSlows weapons degradation by 10%Crafted at Fences with Legendary Beaver ToothBuck Antler TrinketIncreases chances of higher-quality parts from skinning animalsCrafted at Fences using the Legendary Buck AntlerElk Antler TrinketIncreases the money you get from looting by 10%Crafted at Fences using the Legendary Elk AntlerFox Claw TrinketIncreases Eagle Eye duration by five secondsCrafted at Fences using the Legendary Fox ClawPronghorn Horn TrinketStops animals stored on your horse from decomposingCrafted at Fences using the Legendary Pronghorn HornRam Horn TrinketDoubles the amount of herbs you get from picking oregano, creeping thyme, and wild mintCrafted at Fences using the Legendary Ram HornWolf Heart TrinketDoubles resistance to alcoholCrafted at Fences with Legendary Wolf HeartOwl Feather TrinketReduces speed of Health, Stamina, and Dead Eye Core drain by 15%Reward for completing "Archeology for Beginners" without killing a single personBoar Tusk TalismanDecreases Core drain speed of your horse's Health and Stamina by 10%Crafted at Fences using, Cobalt Petrified Wood*, Gold Earring, Legendary Boar TuskRaven Claw TalismanSlows weapon degradation by 20%Crafted at Fences with Old Brass Compass*Eagle Talon TalismanIncreases Eagle Eye duration by five secondsAvailable as a bonus for Special/Ultimate Edition owners onlyHealthNot including the Iguana Scale Trinket Perk you get from the Special/Ultimate Edition, there are five Health Perks to collect. Each affects your Health in different ways. While some help your Health Core and bar drain speed, others are more specific in decreasing the type of damage you receive.NamePerk EffectHow To GetTatanka Bison Horn TrinketDecreases melee damage received by 10%Crafted at Fences using Legendary Tatanka Bison HornMoose Antler TrinketIncreases your health XP gain by 10%Crafted at Fences with Legendary Moose AntlerIguana Scale TrinketReduces the damage received while on horseback by 10%Available as a bonus for Special/Ultimate Edition owners onlyBear Claw TalismanDecreases the drain speed of your Health Core by 10%Crafted at Fences using Silver Chain Bracelet, Quartz Chunk*, Legendary Bear ClawStaminaThere are five Stamina Perks in total--of which we've gathered three thus far. As you'd expect, most of them affect your Stamina gains and drains.NamePerk EffectHow To GetCougar's Paw TrinketIncreases Stamina XP gain by 10%Crafted at Fences with Legendary Cougar's PawLion's Paw TrinketIncreases Stamina XP gain by 10%Crafted at Fences with Lion's Paw*Bison Horn TalismanDecreases the drain speed of your Stamina Core by 10%Crafted at Fences using Abalone Shell Fragment*, Silver Earring, and Legendary Bison HornDead EyeThere are five Dead Eye Perks in total. Below you can find the three we've discovered so far, which focus on decreasing the speed of Dead Eye Core and bar drain, as well as increase the gain speed of Dead Eye XP.NamePerk EffectHow To GetCoyote Fang TrinketIncreases Dead Eye XP gain by 10%Crafted at Fences with Legendary Coyote FangPanther's Eye TrinketDecreases drain speed of Dead Eye bar by 10% for three secondsCrafted at Fences with Legendary Panther's EyeAlligator Tooth TalismanDecreases the drain speed of Dead Eye Core by 10%Crafted at Fences using Vintage Civil War Handcuffs*, Gold Jointed Bracelet, and Legendary Alligator ToothSpecial Crafting MaterialsAs stated, some Talismans and Trinkets require special crafting components you can only get from certain instances in the story or by completing challenges. Below you can find a rundown of where these special components are found.Crafting ItemTalisman/Trinket RecipeHow To GetCobalt Petrified WoodBoar Tusk TalismanLocated in a chest under a rock overhang northwest of Lake IsabellaOld Brass CompassRaven Claw TalismanLocated in Francis Sinclair's cabin after mailing all 10 rock carvings in the "Geology for Beginners" missionQuartz ChunkBear Claw TalismanRecieved by mailing in the first dinosaur bone location in the "Test of Faith" missionLion's PawLion's Paw TrinketTaken from the lion during the Stranger Mission: "He's British, of Course IV"Vintage Civil War HandcuffsAlligator Tooth TalismanMail in a set of Cigarette CardsInfo from Gamespot.com
2018-11-10

Hitman 2 is now available on PC, PS4, and Xbox One, provided you purchase the Gold edition. For everyone else, it releases on November 13. The first Elusive Target, part of the game's free post-launch support, comes later this month and features actor Sean Bean. Read on for our full review, originally published on November 8.Hitman is a game about killing people. Well, killing specific people and trying not to kill other people unless you really have to. But it's also a game about exploring large, real-world-inspired spaces, learning about how they operate, finding multiple solutions to problems, and using that knowledge to improvise and manipulate the environment to hit the people you're hunting. The episodic nature of the Hitman refresh in 2016 saw IO Interactive release one level every month--a contentious move at the time, but one that helped accentuate the potential in each mission. Hitman 2 ditches the episodic model and adds a few new minor mechanics, but the loop of continuously replaying a single location, slowly uncovering the wealth of possibilities, and being able to effectively draw upon that knowledge in new challenges is where Hitman is strongest.Hitman 2 takes you to six new locales, and each poses unique situations to overcome as you attempt to assassinate your targets. Mumbai is a standout with its densely populated streets and labyrinths of tenement buildings--a great environment that makes the most of a new Assassin's Creed-style crowd blending mechanic, allowing you to disappear into big groups of people. A mission in Miami, Florida takes place at an active raceway, a loud and vibrant stage that feels like a theme park with its swaths of attendees, distinct zones, and a concealed backstage underbelly.These levels are overwhelming in the best way possible, and it's exciting to begin peeling away the layers of these large, intricate areas--exploring the spaces, discovering routes, finding tools and disguises, and figuring out the best places to utilize them. If you're familiar with Hitman, you know that each stage and its AI inhabitants run on routines like clockwork, making Hitman a game that rewards social stealth and patience. Eavesdropping, tailing, and passive observation are good first steps to success. Even the Whittleton Creek stage, a small, sparsely populated suburban block in Vermont, feels like a mindmap of interconnected causality when you begin to dig deeper. Having the curiosity to uncover how things operate within levels, stumbling upon minor plotlines and amusing flavor dialog along the way, is interesting in its own right.Hitman does make an upfront effort to help focus your scope and give you some momentum toward your objectives, though thankfully your initiative is still necessary to solve some predicaments. Stumbling across a Mission Story (previously known as Opportunities) might lead you to a machine you can sabotage, for example, but you need to find the tool to do so and work out the best method of either distracting or dispatching the people around it.Mission Stories are a great first step, but Hitman becomes its best when you start to internalize the stages and uncover the more obscure ways things can unfold in subsequent playthroughs, be it through pursuing alternative Mission Stories, Challenges that ask you to perform specific tasks, or your own improvisation. There are few fail states other than your own death, and there are so many approaches and tools at your disposal that the path to victory can be as creative and elegant or as bumbling and messy as it needs to be. Completing a stage typically takes a long time, and there will be plenty of moments when a guard catches you doing something you shouldn't be doing and calls for backup. Unhinged gunfights still feel as futile as ever, but when things get out of control there's almost always the opportunity to escape to a less hostile part of the level, swap your disguises, and come up with an alternative "make do" approach. In fact, Hitman is sometimes more exciting when your initial plans fail.The only problem with being presented with such a staggering array of interactions is that the limitations of the sandbox will eventually reveal themselves if you push the wrong way. For example, while you can stash bodies in dumpsters and closets, I was disappointed to discover I couldn't stash them in one of many vacant portable toilets. While Agent 47 can leap tall fences and shimmy across daringly high ledges, he seemingly can't muster the courage to drop down from certain first-floor balconies. Guard AI behavior is stern but generous--if you're found trespassing in a restricted area they'll give you a chance to find the exit before reacting, but sometimes it's too generous. I was amused to see a target's personal bodyguard decide to go home for the day after his employer "accidentally" fell off a building, even though I was the only other person in the room.Hitman 2 continues to embrace a trial-and-error playstyle in its campaign. The levels are long, but autosaves are generous and manual saving is encouraged, which gives you the freedom to experiment with different ways of approaching a problem. And the closer you get to bending the systems in just the right way--trying to narrowly squeeze past a guard's sightline from different directions, or using coins and cheeseburgers to divert someone's attention--the more thrilling it feels, no matter how goofy it actually looks. Hitman 2's interstitial cinematics are as grim and dramatic as a British espionage drama, and it's hard not to let yourself buy into the clinical overarching conspiracy. But in the field, the series' tongue-in-cheek absurdity happily remains with ridiculous costumes, unlikely weapons, and Agent 47's self-aware deadpan acting, which perfectly accompanies any bumbling improvisation. Both exist distinctly, don't really compliment or detract one another, but are still enjoyable in their own right.Hitman 2 also boasts a few significant modes outside of its campaign, including Sniper Assassin, which adapts the design seen in the Hitman: Sniper smartphone game and tasks you with taking out a series of targets from a single vantage point using only a scoped rifle. It's a straightforward but enjoyable, low-stakes mode that allows for a surprising amount of creative freedom, and it can be played in two-player online co-op. But Hitman 2's most enticing bonus, at least if you own the previous Hitman, is the ability to download the original stages into Hitman 2, which gives you feature-complete versions of them with the addition of new mechanics like functional mirrors (which enemies can spot you in) and the briefcase (which lets you conceal and transport tools discreetly), among other things. These legacy stages are wonderful to revisit under a new light.It should also be mentioned that one of the most compelling elements of the 2016 Hitman was the continuous, free live content updates that occurred after the game's launch. Escalation Missions, where you're given specific conditional challenges of increasing difficulty, and Elusive Targets, limited-time events where you have only one chance to take out unique assassination targets, added tense trials that tested both your knowledge of levels and improvisational skills. IO Interactive has announced that these familiar features will be making a return, along with free content updates to Sniper Assassin and Ghost Mode. We obviously can't judge the quality of this content at launch, but it's surely something to look forward to.The addition of other minor mechanical changes--like concussive weapons, a picture-in-picture enemy activity alert, and visible security camera sightlines--help to improve Hitman 2 overall as a dense and accessible stealth assassination game. But the new locations are the real stars, impressive and inventive sandboxes ripe for picking apart with exciting experiments. Hitman is about experiencing the anticipation of seeing whether a plan will work when you try it for the first time. It's about feeling the tension of briskly walking away from a bad situation, hoping you can lose the suspicious guards. It's the satisfaction of knowing the machinations of a level so well that when a target moves into a particular place at a particular time, you have the perfect way to intervene. Hitman 2 is a familiar experience, but in the Hitman world, familiarity is an incredible strength. Info from Gamespot.com
2018-11-10

Without context, the premise of Tetris Effect won't stop you in your tracks. It's Tetris at heart, and its familiar playfield is presented against fantasy backdrops with songs and sound effects that react to your actions. What that basic description doesn't tell you is how powerful the combination of conducting tetrominos and music at the same time can be. Give Tetris Effect your complete, undivided attention, and you'll form a sympathetic bond to the notes and puzzle pieces alike and lose yourself in the flurry of color and energy that permeates every stage. It's a lofty promise, to be sure, but there's no other way to describe the impact Tetris Effect has once it finally clicks.Though there are a handful of modes--no sign of multiplayer, sadly--with basic twists on the standard formula that are worth exploring at your leisure, the bulk of the Tetris Effect experience takes place in Journey Mode. It's an aptly named trip that will take you to recognizable locations like the moon, but more often to abstract settings that are best defined by a list of adjectives. These dreamscapes can be breezy, electric, stressful, haunting, heavenly, or crunchy, to name a few of the standout qualities. The music in each stage may not always be a predictable pairing, but just because you didn't see a particular harmony coming doesn't mean it can't work.Over time, you will notice that the game not only hooks you with music, but that it gets you hooked on songs that may not traditionally fit within your musical preferences. Odds are you don't listen to chanting in foreign languages nor the complicated beats of the tabla on a daily basis, but Tetris Effect makes these uncommon sounds enticing. It's hard to say what these songs would feel like without first experiencing them during gameplay, but when you're enraptured in their rhythms whilst simultaneously flipping and reconfiguring puzzle pieces in a race against time, they become relentlessly catchy, sticking with you long after you stop playing.Because Tetris Effect is so infectious, it's very difficult to put down once you fall into its rhythm. Tetris has proven itself to be a highly effective game, and one that has an ever-rising skill ceiling that allows it to draw in players who have decades of experience under their belts. Journey mode will ramp up, but in keeping with the sense of going on an adventure, it will also slump down, though rarely for long. The non-linear flow is an important part of the experience that charges you with anticipation and rewards you with relief, and is an unexpected benefit to the standard flow of a session of Tetris.The shift in tone and pace is often determined by your progress within a stage. Most require you to clear 36 lines total (on normal difficulty), with milestones along the way that dictate the present rhythm. You do, however, have a tool at your disposal that is designed explicitly to pump the brakes and give you a chance to salvage a potentially disastrous situation or to build up a high scoring combo. The Zone ability can be triggered with a single button press at any time that you've got some charge in the relevant meter, which is fueled a quarter of the way every time you clear eight lines.With Zone activated, pieces hover rather than fall, and you get to take your time--as allotted by the meter--placing them in your stack. Clear a line, and it will shift to the bottom of the stack, ready to be cleared automatically when Zone disengages. Because lines persist even when "cleared" while in Zone, you can make combos that go beyond the standard four-line Tetris clear if you're skilled enough. They won't count towards your line count for the level, but they will give you extra scoring opportunities that wouldn't otherwise be possible.The new Zone mechanic adds an interesting layer of strategy for new and veteran players alike, but more than this new mechanic, it's the quasi-spiritual bond that forms between you and the game that defines Tetris Effect. Even though you don't need a PlayStation VR headset to get a taste, there's no question that Tetris Effect is best played in VR with headphones turned up loud.With your vision and hearing cut off from the outside world, you fade into the game. You feel things that you'd never imagine a game of Tetris could make you feel. Don't be surprised if you catch yourself bursting with joy, or on the verge of tears, all because the confluence of gameplay and sensory stimulation works so well. There is no extra physical movement asked of you--the opposite of almost every other VR game in recent memory. Tetris Effect wants your mind, rather than your body, and even though we all dream of one day being completely immersed in a high-end VR game. In truth, Tetris Effect achieves the base goal--belief in your connection to the game.Tetris Effect is a transformative game that will more than likely be overlooked by people who think it's "just Tetris." Well, it is and it isn't. Anyone who knows Tetris can pick up Tetris Effect and begin playing right away. The fundamentals remain the same; it is a time-tested formula that continues to work, after all. But Tetris is just the beginning of Tetris Effect. It provides the foundation for a complex emotional journey that defies expectations. Its a vector for meditation. It's a driving force that pushes you beyond your presumed limits. It is the definition of awesome, and if you have an open heart and an open mind, you owe it to yourself to take the plunge and see why it's anything but "just Tetris."Info from Gamespot.com
2018-11-10

It's difficult to define which exact genre Cellar Door Games' Full Metal Furies belongs to. On a cursory glance, the co-op game appears to be no more than a well-structured brawler, and you'd be forgiven if you completed its 15-hour campaign thinking that's all it is. However, if you dig a little deeper into the optional hidden content, there's another five to seven hours of complex, multi-layered riddles to find. There's a fascinating meta narrative interwoven into Full Metal Furies' puzzles, and journeying to its end makes for a satisfying cooperative experience.In Full Metal Furies, each player takes control of one of four adventurers. If played solo, the game puts you in control of two and you can switch between them at will. There's Triss, the leader whose penchant for sassily drinking tea often leads to hilarious spit-takes; Meg, the lazy, nearsighted sniper with a poor sense of direction; Erin, the brainy tinkerer who desperately wants to be cool; and Alex, the air-headed soldier who wholeheartedly believes bashing in the skulls of the arrogant men she and her friends run into should be both a first and last resort to solving all their problems.Collectively known as the Furies, the four girls are on a quest to cross the monster-infested wasteland that humanity once called its home in order to find and destroy god-like entities known as the Titans. The sons and daughters of the mad tyrant Cronus, each of the four Titans desires a better world, and their conflicting ideologies as to how to bring about that dream have led to a war that threatens to destroy all life.This seemingly straightforward battle between good and evil hides a surprising number of twists and turns. With every step forward, the Furies notice more signs that their efforts might be actually causing more problems than they're solving. But the team keeps pushing onwards, hoping that in the long run, their efforts will have a positive effect on the world. The narrative plays out in a series of sprite-based conversations, both during and in between combat missions. For the most part, these are tongue-in-cheek skits--some even throw in the occasional pun or reference to the fact that this is all a video game--but a few also focus on Triss' growth. Despite putting on airs, she struggles with the responsibilities of leadership and the morality of the Furies' quest. Unfortunately, her teammates don't receive the same treatment, and are fairly two-dimensional throughout the main campaign.In combat, each of the four ladies handle and attack in their own way. For example, Meg can use a grappling hook to maneuver out of danger and snipe opponents from afar, while Triss can defend her teammates and herself with a near indestructible shield and also clear out enemies by screaming at the top of her lungs. Each of the girls fulfills a unique role seen in many other team-based brawlers--with Triss as the tank, Alex as the fighter, Meg as the archer/sniper, and Erin as the summoner.Full Metal Furies supports couch co-op and online multiplayer. As of publishing this review, the Switch servers are fairly empty, but we did manage to test online play using two copies of the game and can confirm it works relatively smoothly. There were some brief stutters at the start of a few levels, but none of them negatively impacted gameplay. However, my game did completely crash at one point.It's unfortunate the servers are so empty as playing with an incomplete team puts you at an immediate disadvantage. So unless you recruit some friends for couch co-op, you're in for a fairly tough time. Even Erin and Meg are crucial, as Triss and Alex rely on their teammates' supportive attacks to give them both time to recharge their special abilities. Button-mashing with the two melee fighters can be an effective strategy early on, but it will only get your team so far. Mid- and late-game enemies and bosses require a certain degree of tactical assessment, and chaining together each character's abilities is the ideal path to success. For example, when confronted with a mob of jumping werewolves that are too quick for the slower fighters, your team might rely on Triss' area-of-effect shout to stun a few, use Alex's dive bomb jump to launch the weakened wolves into the air, and then have Meg shoot their leader out of the sky. All the while, Erin's portable turret and her mid-range pistol can finish off the members of the pack not caught up in the combo.Combat in Full Metal Furies is constantly evolving, with new enemy types appearing almost every third level. It keeps the game from descending into a grindfest of similar foes, while leaving room for you to experiment with new strategies on enemies you've encountered before. Sections of certain levels can get brutal, resulting in dozens of game over screens. But checkpoints are numerous, cutscenes you've seen are skippable, and it's typically very clear which careless mistake resulted in the failed mission. If anything, the game's combat seems content to really only punish those who play with less than four people, which presents an interesting way of making the game easier or more difficult for yourself at any point in the game. If things are still too hard with a full team of four, or you can't scrounge up a full team but don't want to make the game more difficult, there's an easier Story Mode too.Despite being labeled as a brawler, only about half of Full Metal Furies is regulated to combat. The other half is a series of interlacing puzzles and riddles, and it's here where the co-op nature of Full Metal Furies truly shines.None of the puzzles or riddles in Full Metal Furies are obvious to find, and the game doesn't teach you how to solve them either. It's completely dependent on the player to be curious enough to wonder if the symbol-covered stones hidden throughout about two dozen of the game's levels are more than meets the eye. Finding the stones themselves is a challenge, and once discovered, each stone's riddle is typically even tricker to figure out.Eventually, the main campaign reveals that solving these riddles is necessary for gaining access to the game's final area and true ending. The riddles grow more meta as you discover additional stones, some even requiring you to do things outside of the main game, such as watching a YouTube video for a clue or adjusting the game's accessibility settings to perceive colors and sound in a new way. Teaming up with friends to overcome a challenging boss fight is fun, but the most satisfying moments in Full Metal Furies are when you have a eureka moment and are able to figure out the next piece of the overarching mystery. Several of the solutions to certain puzzles and riddles rely on a particular Furies' unique skill as well--some answers even require multiple Furies or the full roster of four--so every player gets to enjoy being a part of the process of figuring something out at some point. Completing this game is very much a team effort, and it successfully makes sure no single player feels left out or useless.So yes, Full Metal Furies is primarily a brawler, and a good one that promotes teamwork instead of button-mashing. But it's also a very hard puzzle game, one that challenges you to perceive each level, as well as the game's mechanics and characters, in new ways. It's a shame most of the Furies are so two-dimensional throughout the main campaign--especially Meg, who's arguably the most lovable of the bunch--but the story is consistently witty with its humor and an absolute joy to watch unfold. And while coming up with strategies to handle new enemies and piecing together the clues for each puzzle is fairly difficult at times, it's a rewarding and deeply satisfying challenge.Info from Gamespot.com
2018-11-09

Attention all Xbox One and Xbox 360 owners. If you have an active Xbox Live Gold subscription, you can now download two of the free Games with Gold for November. You'll have to wait for November 16 to grab the other two, but the ones available now are big blockbuster titles.Anyone with an Xbox One can download Battlefield 1 during the month of November. It brings players back to World War I, placing them in a variety of historical battles around the globe. The campaign is a series of surprisingly touching short stories, while the robust multiplayer modes support up to 64 players at a time. This game ought to keep fans satisfied at least until Battlefield V launches on November 20.Between now and November 15, Xbox One and Xbox 360 owners can also download the original Assassin's Creed. While many installments have appeared between its 2007 release and this year's Assassin's Creed Odyssey, this is where the whole epic saga began. You play as Desmond Miles, who uses a futuristic machine to inhabit the body of his ancestor (and kill lots of people).Also available until November 15 is a holdover from October's Games with Gold: Victor Vran. It's a Diablo-like action-RPG that has you hunting spooky enemies who have invaded the city of Zagoravia.And once November 15 rolls around, you'll be able to download for free the endless flying game Race the Sun for Xbox One and the 360's gory, God of War-style action game Dante's Inferno.November 2018 Games with GoldXbox OneBattlefield 1 (November 1-30)Race the Sun (November 16-December 15)Victor Vran (September 16-November 15)Xbox 360Assassin's Creed (November 1-15)Dante's Inferno (November 16-30)Info from Gamespot.com
2018-11-09
It's November, so a whole new set of PC games is available for free to anyone with an Amazon Prime account. All you have to do is link your account to Twitch, and you'll get a new batch of PC games for free each month. The number of free games varies, but this month you can download four games at no additional cost.The biggest title on the list is Overcooked, a game that involves up to four players working together to prepare meals as orders come in. Each level takes place in a different kitchen, and as you progress the layouts become less and less hospitable for cooking. For instance, one level is set on a slippery iceberg and another on a busy street.Not to be confused with Overcooked is Overload, the next free game for November. It's an exploration-based first-person shooter that's set in zero gravity. Then there's AER: Memories of Old, an adventure game that takes place on a series of islands that are floating in the sky. Luckily, you can turn into a bird to travel between them. Rounding out this month's freebies is the 12th century point-and-click adventure game The Pillars of the Earth.You can claim all of these games here, but note you'll need the Twitch desktop app for Windows to download them. While you're on the site, make sure to grab any other free items for Prime members you might have missed, including cowboy gear for PUBG and a Golden Loot Box for Overwatch.Twitch Prime's Free Games For November 2018OvercookedOverloadAER: Memories of OldThe Pillars of the EarthInfo from Gamespot.com