2018-11-16

Microsoft executive vice-president of gaming Phil Spencer has teased that Xbox has "a lot to share" at E3 2019. Spencer tweeted about the event moments after Sony announced it would not be attending E3 next year."A lot to share with fans at E3 2019. Always a high point of the year to witness the industry's creativity and the energy of the community," Spencer tweeted. An hour later, Xbox followed up by tweeting out to fans that the company "can't wait" to see everyone at E3 2019. Although the company has not confirmed it, one of the announcements that Xbox is looking to share could be the new console teased at E3 2018.Xbox may be presenting at a different time for E3 2019 as well. Xbox business lead for Asia Jeremy Hinton tweeted that Microsoft would be moving its presentation time in consideration of Australian viewers. We've reached out to Microsoft to confirm, as well as whether the company intends to have its E3 presentation outside the event hall, like this past year.The absence of Sony from E3 2019 will be the first time the company won't be attending the event since E3 was founded. Sony has shared the spotlight at E3 with both Microsoft and Nintendo for a number of years, so it's a fairly big surprise to see the company willingly sit out. The first details that Sony wouldn't be in attendance were announced via the ESA. Sony followed-up with a confirmation."As the industry evolves, Sony Interactive Entertainment continues to look for inventive opportunities to engage the community," the company said in a statement to GameSpot. "PlayStation fans mean the world to us and we always want to innovate, think differently and experiment with new ways to delight gamers. As a result, we have decided not to participate in E3 in 2019. We are exploring new and familiar ways to engage our community in 2019 and can't wait to share our plans with you."Info from Gamespot.com
2018-11-16
As you play Red Dead Redemption 2, you'll start to see notifications informing you that you've completed a challenge. Now this all sounds fine and dandy, but you're likely asking yourself: "What does completing challenges do? Heck, why should I even bother completing them?" That's a fair question, and we're here to answer it.Challenges are gameplay feats you complete to earn XP and unlock upgraded equipment for purchase at your local trapper, such as new Gun Belts, Bandoliers, Holsters, and Off-Hand Holsters. Each piece posses its own perks that increase either ammo capacity or decrease weapon degradation rate. Equipping them even improves your general statistics, but more on that in a second. There are nine challenge categories in total, each with ten feats to complete. As you'd expect, the feats vary per category. For example, the Bandit challenges has you working to hold up townsfolk, steal wagons, and amass a sizable bounty, while the Explorer challenges focus on you finding treasure. It's important to note that you must complete challenges in sequential order, so you can't just prioritize completing the seventh challenge over the first few only because it's easier.Completing challenges is a worthwhile endeavor, as the equipment you unlock offer bonus bars around your Health, Stamina, and Dead Eye Cores when you complete the set. You are rewarded an extra bar when you complete one of the three sets associated with that statistic. And you unlock an additional bar to that statistic once you've acquired all three sets associated with it. The table below contains details on which equipment set is associated with which attribute.AttributeEquipment SetHealthHorsemanSharpshooterWeapons ExpertStaminaBanditGamblerMaster HunterDead EyeExplorerHerbalistSurvivalistThere's even an extra bonus in store for you upon completing all 90 challenges. You unlock a special outfit called "Legend of the East," which provides hefty bonuses to Arthur's statistics. If that's something you're aspiring towards, you're in luck as we've compiled every single challenge in the game for your reference, so get crackin'!BanditChallengeDescriptionRewardBandit 1Hold up five townsfolkBandit BandolierBandit 2Rob two stage coaches or complete two stage coach robbery missions$5 + 25 Dead Eye XPBandit 3Rob a cash register in any four shops in one dayBandit HolsterBandit 4Rob three stage coaches in a single day$10 + 50 Dead Eye XPBandit 5Amass a $250 bounty in one State$10 + 50 Dead Eye XPBandit 6Steal five horses and sell them to the horse Fence at Clemens Cove$15 + 100 Dead Eye XPBandit 7Rob $50 worth of cash and valuables from townsfolk and travelersBandit Off-Hand HolsterBandit 8Steal seven wagons and sell them to the Fence at Emerald Ranch$15 + 100 Dead Eye XPBandit 9Hogtie someone and leave them on railroad tracks three times$20 + 150 Dead Eye XPBandit 10Complete five train robberies without dying or getting caughtBandit Gun BeltExplorerChallengeDescriptionRewardExplorer 1Find a treasure mapExplorer HolsterExplorer 2Find a treasure$5 + 25 Stamina XPExplorer 3Find a treasureExplorer BandolierExplorer 4Find a treasure$10 + 50 Stamina XPExplorer 5Find a treasure$10 + 50 Stamina XPExplorer 6Find a treasure$15 + 100 Stamina XPExplorer 7Find a treasureExplorer Gun BeltExplorer 8Find a treasure$15 + 100 Stamina XPExplorer 9Find a treasure$20 + 150 Stamina XPExplorer 10Find a treasureExplorer Off-Hand HolsterGamblerChallengeDescriptionRewardGambler 1Win five hands of pokerGambler HolsterGambler 2In blackjack, double down and win the hand five times$5 + 25 Dead Eye XPGambler 3Win three games of five finger filetGambler BandolierGambler 4Bust a poker opponent out in Flatneck Station, Saint Denis, and Valentine$10 + 50 Dead Eye XPGambler 5Win three rounds of dominoes without drawing any tiles against two or fewer opponents$10 + 50 Dead Eye XPGambler 6Beat a blackjack dealer in Rhodes and Van Horn$15 + 100 Dead Eye XPGambler 7Beat the five finger filet player in Strawberry, Valentine, and Van HornGambler Gun BeltsGambler 8Win three hands of blackjack with three hits or more$15 + 100 Dead Eye XPGambler 9Win three consecutive games of dominoes$20 + 150 Dead Eye XPGambler 10Win three consecutive hands of pokerGambler Off-Hand HolsterHerbalistChallengeDescriptionRewardHerbalist 1Pick six yarrowHerbalist Off-Hand HolsterHerbalist 2Pick and eat four species of berry$5 + 25 health XPHerbalist 3Craft seven items using sage as an ingredientHerbalist Gun BeltHerbalist 4Pick five mushrooms and feed them to your horse$10 + 50 Health XPHerbalist 5Craft nine items using the Indian tobacco as an ingredient$10 + 50 Health XPHerbalist 6Pick 15 different species of herb$15 + 100 Health XPHerbalist 7Craft and use five special miracle TonicsHerbalist HolsterHerbalist 8Use oleander to craft six poison weapons$15 + 100 Health XPHerbalist 9Pick one of each species of herb$20 + 150 Health XPHerbalist 10Season and cook all 11 types of meatHerbalist BandolierHorsemanChallengeDescriptionRewardHorseman 1Kill five rabbits from horsebackHorseman Gun BeltHorseman 2Jump over three obstacles in 15 seconds$5 + 25 Stamina XPHorseman 3Ride from Valentine to Rhodes in less than five minutesHorseman HolsterHorseman 4While mounted, drag a victim for 3,300 feet using your lasso$10 + 50 Stamina XPHorseman 5Trample five animals with your horse$10 + 50 Stamina XPHorseman 6Ride from Strawberry to Saint Denis in less than nine minutes without touching water$15 + 100 Stamina XPHorseman 7Kill seven enemies from horseback without dismountingHorseman BandolierHorseman 8Kill nine predators from horseback$15 + 100 Stamina XPHorseman 9Ride from Van Horn to Blackwater in less than 17 minutes without touching water$20 + 150 Stamina XPHorseman 10Break every single wild horse breedHorseman Off-Hand HolsterMaster HunterChallengeDescriptionRewardMaster Hunter 1Skin three deerMaster Hunter Off-Hand HolsterMaster Hunter 2Get three perfect-quality rabbit pelts$5 + 25 Health XPMaster Hunter 3Track 10 different animal species using your binocularsMaster Hunter BandolierMaster Hunter 4Get a clean kill after calling to an animal five times$10 + 50 Health XPMaster Hunter 5Skin three black bears or grizzly bears$10 + 50 Health XPMaster Hunter 6Kill five cougars with your bow and skin them$15 + 100 Health XPMaster Hunter 7Use a bait to lure and kill both an herbivore and predatorMaster Hunter Gun BeltMaster Hunter 8Catch three fish without using a fishing rod (aka use dynamite)$15 + 100 Health XPMaster Hunter 9Catch an opossum playing possum$20 + 150 Health XPMaster Hunter 10Track and kill a Legendary PantherMaster Hunter HolsterSharpshooterChallengeDescriptionRewardSharpshooter 1Kill three flying birdsSharpshooter BandolierSharpshooter 2Kill two different animal species in the same Dead Eye use$5 + 25 Dead Eye XPSharpshooter 3Kill five flying birds while moving on a trainSharpshooter HolsterSharpshooter 4Kill an enemy at least 80 feet away with a throwing tomahawk$10 + 50 Dead Eye XPSharpshooter 5Kill six animals without switching or reloading your weapon$10 + 50 Dead Eye XPSharpshooter 6Kill someone at least 660 feet away with a long scoped rifle$15 + 100 Dead Eye XPSharpshooter 7Land seven headshots in a rowSharpshooter Off-Hand HolsterSharpshooter 8Disarm three enemies without reloading or switching your weapon$15 + 100 Dead Eye XPSharpshooter 9Shoot three people's hats off in the same Dead Eye use$20 + 150 Dead Eye XPSharpshooter 10Kill three flying birds with three consecutive long scoped rifle shotsSharpshooter Gun BeltSurvivalistChallengeDescriptionRewardSurvivalist 1Catch a bluegillSurvivalist Gun BeltSurvivalist 2Hand five animals to the camp or trapper$5 + 25 StaminaSurvivalist 3Kill five animals using a Varmint rifleSurvivalist Off-Hand HolsterSurvivalist 4Craft dynamite, fire, improved, poison, and small game arrows$10 + 50 StaminaSurvivalist 5Catch a fish in the Bayou from a riverboat and while standing on railroad tracks$10 + 50 StaminaSurvivalist 6Kill a scavenging animal while it is feeding on a corpse five times$15 + 100 StaminaSurvivalist 7Kill eight small game animals using small game arrowsSurvivalist BandolierSurvivalist 8Craft a homing tomahawk, improved tomahawk, volatile dynamite, and volatile fire bottle$15 + 100 StaminaSurvivalist 9Catch a fish that weighs at least 19 pounds$20 + 150 StaminaSurvivalist 10Catch one of each type of fish in the worldSurvivalist Holster Weapons ExpertChallengeDescriptionRewardWeapons Expert 1Kill three enemies with a knifeWeapons Expert HolsterWeapons Expert 2Kill three enemies in 10 seconds with throwing knives$5 + 25 Health XPWeapons Expert 3Kill three birds of prey with a tomahawkWeapons Expert Gun BeltWeapons Expert 4Kill 10 enemies with a shotgun loaded with crafted ammo$10 + 50 Health XPWeapons Expert 5Kill five mounted enemies with one throwing knife per kill$10 + 50 Health XPWeapons Expert 6Kill a group of four enemies with a single stick of dynamite$15 + 100 Health XPWeapons Expert 7Kill four consecutive enemies by throwing and retrieving the same tomahawkWeapons Expert Off-Hand HolsterWeapons Expert 8Kill 15 enemies with a long-barreled sidearm$15 + 100 Health XPWeapons Expert 9Kill nine unaware enemies with a bow$20 + 150 Health XPWeapons Expert 10Kill a grizzly bear with throwing knives without taking damageWeapons Expert BandolierInfo from Gamespot.com
2018-11-16
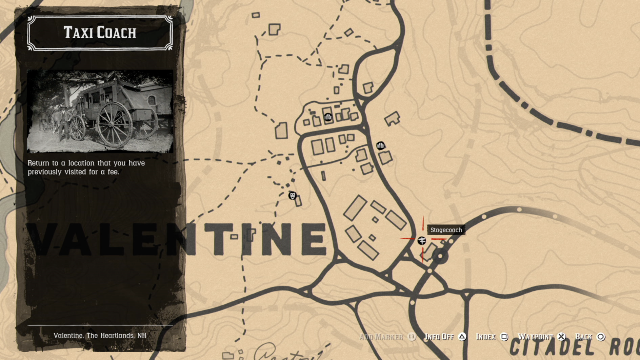
In Red Dead Redemption 2, you're going to be spending a lot of time riding your horse. There's nothing but land, and lots of it, in Rockstar's latest open-world so journeying on horseback is a reality you're going to have to accept during the game's opening hours. Fortunately for you, there are ways to expedite your travels.There's a fast travel system hidden in Red Dead Redemption 2. Better yet, there's a couple ways you can go about doing it. Below we highlight the two main methods, but before you seek them out, we do highly recommend making horse riding your primary means of travel. After all, it's your time spent out in the world where you can better discover all the game has to offer, as well as author your own unique adventures.If you're looking for more guides, you'd be remiss not to check out our feature highlighting all the tips you should know before playing. Though, we also have guides on more specific subjects, like gun customization and money making. Be sure to read our Red Dead 2 review if you haven't already. Otherwise, read on!Method 1: Stagecoaches And TrainsIt makes sense that transportation technology of the day would be a form of fast travel in the game. Both stagecoaches and trains can get you places you want to go quickly. However, you'll have to pay a small fee to use them, and they require you to physically travel to them first--you can't just warp around by picking an icon on your map.Stagecoaches appear on the map as an icon that resembles a wooden sign pointing in two different directions. Labeled as "Taxi Coach" in the game, you can use these to take a stagecoach to locations you've previously visited. The fee increases based on the distance travelled, so make sure you've got enough on you to cover the charge.If you're looking to ride a train, you'll to need to purchase a ticket. These are sold at post offices in town, which are icons on the map with an envelope on them. Trains will take you to previously visited towns that have stations with train tracks running by them.Method 2: Camp Fast TravelIt's possible to fast travel from your camp after unlocking the upgrade, “Next in Line." You can find the camp upgrades page by approaching the donation box at your camp. The fast travel upgrade is the second option in the list and costs about $325, so make sure you've saved up enough and find this upgrade worthwhile in general as you may want to refocus your funds on more fruitful endeavors.Once you've unlocked the upgrade, you'll find a map on the back of the stagecoach next to Arthur's bed. You can use it to travel to a variety of locations, which includes certain towns and other significant locations in the game. Be wary, your camp fast travel only works one way, so if you use it to go to a town on the other side of the map, you'll need to either ride your horse, hire a stagecoach, or take a train to get back. Info from Gamespot.com
2018-11-16
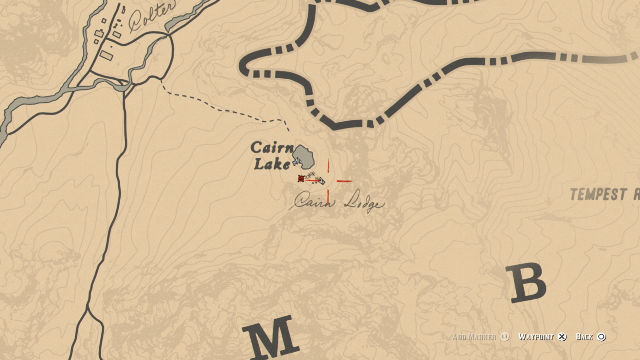
If you're going to survive in Red Dead Redemption 2's world, you're going to need cash. Previously we've highlighted several ways to earn money relatively quickly by working many of the game's core systems and mechanics, but there exists a secret method that can give a significant bump to your wallet without much effort.The method in question is none other than the Poisonous Trail treasure map side mission, which by its end rewards you with four gold bars that equate to about $2,000 when sold. As you explore, you'll often find treasure maps that lead you to all manner of valuable items, but none are as lucrative as the Poisonous Trail maps, which you can complete early on. Of course, if you're more into cheating the system, you can try out this newly discovered glitch that can net you 30 gold bars. But we all know that's nowhere near as fun!Below are directions leading you to all the treasure maps in the Poisonous Trail side mission. We've also included screenshots to aid you in your journey. It's worth noting that you cannot simply head to the final location to cash in on the gold. You need to find every single treasure map first before the gold appears in its associated location.If this guide was helpful to you, be sure to check out our features highlighting all the tips you should know before playing and things the game doesn't tell you. We also have guides on more specific subjects, like top horse breeds and fishing. Though, if you want to have some extra fun instead, be sure to read our feature detailing the game's cheat codes.Treasure Map 1: Cairn Lake CabinThe first map is found at Cairn Lake, which is located north of Valentine up in the mountains. It's snowy up there, so make sure to bring a thick jacket with you before heading up that direction. If you've triggered "The Noblest of Men, and a Woman" Stranger mission, you'll notice that this is the exact location of legendary gunslinger Flaco Hernandez.Once you make it to Cairn Lake, you should find a small abandoned cabin--the one that Hernandez is staying in. Approach the bed to the right and uncover the lock box underneath it, which holds the first treasure map along some extra valuables.Treasure Map 2: Face Rock and an Unassuming Tree TrunkThe first treasure map is attempting to clue you in on a location with a rock that seemingly resembles a face. If you haven't spent much time exploring, this natural formation may seem a mystery to you. Fortunately, we know exactly where it is. Simply proceed down to the Lemoyne region, which is located just South of New Hanover. You can find the rock just north of the "E" in "Scarlett" on the map; check the screenshot in the gallery above for visual clarification.You'll spot Face Rock on a hill. To find the map, go past the tree directly next to Face Rock. You'll want to run further back to the hill's rear where there's a thin tree trunk right beside a fallen tree. The map is located in this thin tree trunk.Final Treasure Map: The Mysterious Snake MoundThe second treasure map has you searching for a snake-like land formation. Yet again, an oddity that you're likely to have missed if you haven't spent significant time taking note of every curiosity out in the world. This bizarre mound is located southeast of Van Horn, a reasonable distance south of the "R" in "New Hanover" on the map.As the treasure map indicates, you're going to want to search for a pile of rocks near the snake-like mound. It's pretty easy to spot as it's literally just a clumped-up pile of rocks with a hole at the center. Search the hole to find the final treasure map. Onward to the treasure!The Treasure: Gold! Gold! Gold!The final treasure map points to a waterfall and what appears to be a pathway in a cave. You'll find this waterfall at the Elysian Pond, which is located directly northeast of the "E" in "Hanover" on the map. When you arrive, walk through the waterfall to discover the entrance of a hidden cave.It's dark in the cave, so bust out your lantern. Proceed through the cave until you find a section in the path where you can drop down. When you land, proceed through the crawl space on the right, which will lead you to the fork in the road pictured on the map. Take the right path, but before you do hug right to find a makeshift camp with a lockbox containing a Large Jewelry Bag.Continue the path forward until you reach what appears to be a pit into certain doom. Instead of falling to your death, proceed left until you reach another edge. If you look closely, your lantern will illuminate some solid ground below that you can land on. But take a few steps back; you're going to want a running start in order to make this jump. If you're acrobatics are sufficient, head down the slope to the left. You'll slip down into some water; once you gain your balance, look to your left for a rock platform to climb up. Search this area and you'll be rewarded with four bars of gold.If this is the first time you've obtained gold, know that you can sell them at Fences for direct profit. Though, if you're feeling particularly generous, it's possible to donate it directly to your camp.Info from Gamespot.com
2018-11-16
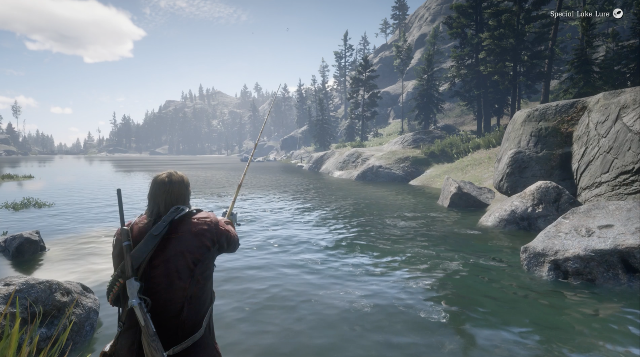
Red Dead Redemption 2 lets you fish, and it's a robust, enjoyable, and rewarding pursuit that's a perfect for the game at large. It's also somewhat involved, so we've put together a guide to help you learn the basics, so you can quickly start to catch fish and have a fun time. This guide also goes into depth on the different types of fish in the game and where to find them, while we've also provided a the map to help you find all 13 of the game's Legendary fish.Starting off, fishing in Red Dead Redemption 2 is unlocked by playing the Chapter 2 story mission "A Fisher Of Men," in which you teach young Jack Marston to fish. You take little Jack down to the river for a fishing lesson, and this serves as your introduction to the system.How To Fish:The first step is to select your Fishing Rod from the Items menu. Next, you must attach bait to it, and this is divided into two categories: Bobber and Lure (more on that later).Hold LT/L2 to grip the rod and then RT/R2 to cast. How long you hold down RT/R2 will determine how far the cast goes. It might take you a few times to get a feel for it, but it's rewarding to land a cast precisely where you want it. Once you've cast your line out, what happens next depends on the bait you used. With a bobber, all of you have to do is sit and wait to get a bite You can tap RT/R2 to attract a nearby fish (if you're standing close enough to shore you might even see the fish in the water), but do it too much and you'll spook them. With a lure, you have to reel in until you feel a bite. If you see a fish, cast beyond it and reel in the lure so the fish sees it coming by. Be sure to wait until you feel a strong bite before "striking"--with a bobber or a lure--as fish will often nibble a few times before biting down the hook. Once you've landed a fish, the real work begins.The fish will immediately pull back, and you'll feel your line get tight, with your rod bending in reaction to the tugging. Wait until the fish becomes tired before reeling in; trying to reel as a fish is tugging will cause your line to break. With a fish on the line, push the left stick in the opposite direction the fishing is moving to tire it out faster. You can also click in the right stick and push it in any direction to prevent the fish from taking more line out. However, you must be careful with this approach as you can snap your line very easily. You will also snap your line if a fish pulls away and gets behind a rock or other object.You reel in by rotating the right stick counter clockwise. You'll want to reel in as fast as possible when the fish grows tired, while also being mindful of how much line you have out, how taut the line is, and where the fish is in the water. Pushing the left stick down as you reel in speeds up the process because it brings the fish directly in towards you. I found it was helpful, if not a little embarrassing, to use my thumb and index finger at the same time to reel in even faster.The amount of fight a fish puts in is directly related to its size and type. You'll be able to reel in smaller fish such as bluegills, rock bass, and smallmouth bass with relative ease. But catching larger fish, like Sturgeon and Sockeye Salmon, can entail fights that take multiple minutes to complete. If you snap your line, you'll lose your bait or your lure, but don't get discouraged as they are plenty of fish available in Red Dead Redemption 2's numerous lakes, rivers, and swamps.Bait Types:Just like in real life, selecting the right bait is critically important if you want to reel in a big one. You can purchase basic bait types like bread, corn, and cheese, or spend more money on worms and crayfish that help you land bigger fish. There are also lures specific to rivers, lakes, and swamps, as well as "special" lures that you'll need to catch the biggest fish and the Legendary ones. Here is a rundown of the bait types we've come across so far.Bobber:Bread: good for smaller fishCorn: good for smaller fish.Cheese: good for smaller fish.Worms: excellent for medium sized lake fish.Crayfish: good for larger size fish in deeper parts of rivers and lakes.Crickets: excellent for attracting medium-sized river fish.Lure:River lure: attracts all small and medium size fish in rivers.Lake lure: attracts larger lake dwelling fish.Swamp lure: attracts swamp dwelling medium and large size fishSpecial River lure: increases your chances of catching medium to large river fish.Special Lake lure: increases your chances of catching medium to large lake fish.Special Swamp lure: increases your chances of catching medium to large swap fish.Bait And Tackle Shops:The Bait And Tackle shop in Lagras sells everything you need for fishing, including live worms, crayfish, and all lure types. It's the only Bait And Tackle shop we've found so far in the game.Types Of Fish And What To Use To Catch ThemThere are many different types of fish that can be found in Red Dead Redemption 2's lakes, ponds, rivers, and swamps. Here are the ones we've caught so far, as well as the bait type that provided the highest likelihood of reeling them in successfully.Bluegill -- CheeseChain Pickerel -- CornRedfin Pickerel -- BreadRock Bass -- Cheese or other natural baitsSmallmouth Bass -- Any type of natural baitBullhead Catfish -- Cheese or cornPerch -- BreadLake Sturgeon -- Lake lureLargemouth Bass -- CrayfishSteelhead Trout -- WormsMuskie -- Lake lureSockeye Salmon -- river lureWhen To FishThe time of day matters if you want to have the best success fishing. Early morning and afternoon are when fish bite the most, due to bugs flying close to the surface. You should also try to fish when it's raining, because the drops on the water make fish believe bugs are around.Where To Fish And Specific ConditionsTo find the fish you're after, you'll have to fish in the right spot. Here's a rundown of the locations where we've found the following fish.Bluegill -- All lakes and rivers; most active during rain.Chain Pickerel -- Lakes, rivers, and swamps; most active in sunny weather.Redfin Pickerel -- Rivers in the south; most active on warm, sunny days.Rock Bass -- All clear water in the country; most active on sunny days.Smallmouth Bass -- Northern rivers; most active during rain.Bullhead Catfish -- Swamps; most active during rain.Perch -- Rivers and lakes across the country; most active during sunny weather.Lake Sturgeon -- Southern lakes and swamps; most active during overcast weather.Largemouth Bass -- All waters in the south; most active during rainy weather.Steelhead Trout -- Lakes, mostly in the south; most active during rainy weather.Muskie -- Northern lakes; most active during overcast days.Sockeye Salmon -- Rivers in the north; most active during overcast weather.One further note is that fish, particularly bigger ones, loooovvvvve to hang out at the mouths of waterfalls, as the water there is more oxygenated than other areas. Try there if you're struggling.Legendary Fish:Head to the shore of Flat Iron Lake in the Heartlands to a place called Gill Landing. Here, you'll meet a stranger named...Gill, who is a world-renowned fisherman, or at least that's what he wants you to believe. He'll hand you a map with the locations of 13 epic-sized fish you'll find throughout the game. Snag them all and report back to Gill for your prize. These are indeed mighty fish, so expect the toughest fishing battles the game has to offer. You will need to use the "special" lures mentioned above to bag these big ones. The best advice I can give is to try to catch them when they're already close to shore, so as to cut down on your reeling time significantly and improve the odds of landing the fish. Here's the map:Watch Out For GoatsThere are unpenned billy goats throughout Lagras that can cause problems while fishing. On multiple occasions, I was fishing near the swamp and a goat smacked me in the rear, breaking my fishing line while I was reeling in. It was frustrating, and I thought it might have been a bug. But it happened three times, so the lesson here is to watch out for goats while fishing in Lagras.BoatsAt a certain point a few hours into the game, you will steal a boat and bring it to camp. At this point you can use it to head further into a lake to go after the bigger fish that tend to live in deeper water. You can also steal boats you find on your journey to fish anywhere you'd like.No Ice FishingRed Dead Redemption 2 has snowy, cold locations with frozen lakes and ponds, and one of the Legendary fish is located in a lake that is partially frozen over. However, there doesn't appear to be any true ice fishing where you drill through the ice and drop a line in. Here's to hoping Red Dead Redemption 2 gets the guaranteed-seller "Ice Fishing Expansion" down the road… Info from Gamespot.com
2018-11-16
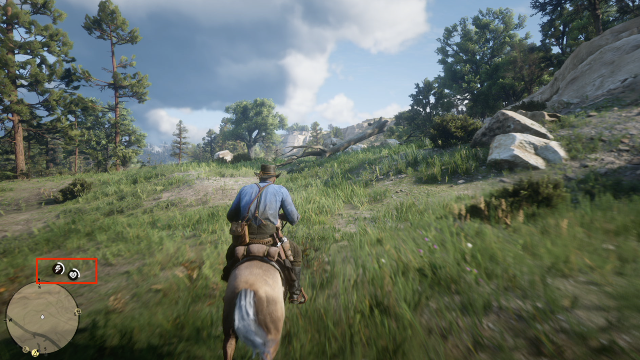
Compared to its predecessor, horses play a much bigger role in Red Dead Redemption 2 than you might think. So much so that it can be overwhelming if you haven’t been paying close attention to the tutorial messages. Horses have been made to feel like living, breathing creatures this time around, and as such, you need to commit to taking care of them and being cautious of their temperament.To help you wrap your head around Red Dead Redemption 2's horses, we detail below and in the video above everything you need to know to properly care for your steed. If you're more of an experienced rider and want to know what are the best horses out there, we've gathered that information in our best horses guide.For more guides like this, be sure to check out our guides roundup containing features highlighting all the tips you should know before playing and things the game doesn't tell you. And if you want to have some extra fun, be sure to read our feature detailing the game's cheat codes. Though, if you're a curious outsider looking in and want to know whether or not this game for you, then read our Red Dead 2 review if you haven't already.How To Ride Your Horse And Maintain Its CoresHorse controls are relatively simple. Tap the X or A button repeatedly to speed up and R1 or RB to slow down. You can double tap and hold X or A to match a companion's speed, and if you tap X or A in rhythm with your horse's gallop you will conserve stamina.As you ride your horse, you’ll want to keep an eye on its Cores. Like Arthur's Cores, the heart is your horse's Health Core and the lightning bolt is its Stamina Core--they've just got fancy little horseshoes in them. The symbol at the center of the circle represents the Core, while the ring meter that surrounds it is known as a bar.The more you push your horse, the quicker the Stamina bar will deplete. And if you don’t feed your horse every now and then, its Cores will drain and it won’t have as much Stamina or Health in its associated bars. It will also look sad and run with its head down, so try to stock up on horse foods and revival items from the General Store to keep your horse well.Your horse will get dirty over time as you ride it. If this happens, its meters will drain 25% quicker. You can clean it with your brush or by riding it through water. The former is acquired after completing the story mission, "Exit Pursued by a Bruised Ego." It's also worth noting that your horse's cores will refill when you sleep.There are ways to notice when something is awry with your horse. A flashing red exclamation point in the Stamina Core indicates your horse is scared/stressed (you need to press L3 to calm it) while a flashing red brush in the health core means your horse is dirty.Leveling Your HorseWhile mostly identical to how Arthur's Cores work, where horse Cores differ is how you increase their level. Instead of leveling them up by moving and withstanding damage, you develop your horse's Cores and bars by forming a stronger bond with them. As you ride, feed, and clean your horse, your bond will strengthen. And as that bond grows, your horse's Health and Stamina bars will increase.Your horse will even learn advanced maneuvers. At level 2, you can rear your horse back by pressing R1 or RB with square or X. There isn't really a use for this other than to look threatening from time to time--that or to just feel like a cool cowboy from an old western film. At level 3 you learn how to skid. While sprinting, press R1 or RB and you can either bring your horse to a halt or change directions at a moment's notice. Finally at level 4 you learn how to drift and piaffe, which is a fancy word for strafe. As your bond increases your horse will also respond to your call from greater and greater distances, and its stats, including speed, will get a slight bump. If you wanna see how close you are to the next level, you can check the player menu when you the press the pause button.You can expedite bonding by feeding your horse treats. And the stronger your bond is with a horse, the longer it will take to bleed out if it gets knocked down. It takes 60 minutes real time for a level 4 horse to die, so that gives you plenty of time to get to town and purchase a horse reviver from the General Store.Horse Stables And Upgrading Your Horse's StatsIf you wanna get the most out of your level 4 horse, you’ll want to stop at a stable and upgrade its saddle. Most items for sale are cosmetics, but there are a few things that can improve your horse's stats, like the stirrups and the saddles.But WAIT, you say! I can’t seem to enter the stable, and I can’t find a stupid brush to clean my horse. Well that probably means you’re screwing around too much and not doing any story missions. Once you complete "Exit Pursued by a Bruised Ego," you will have access to stables across the map and your horse brush.While at the stables, you can also rename, sell, and buy horses. You can sell both stolen horses and horses you’ve acquired legally. Stolen horses won’t fetch as good a price at stables, but at a certain point in the story you will meet some characters willing to purchase stolen horses for a better profit. Level 4 horses will also fetch a higher price, so if you plan on flipping a horse, so we recommend leveling it up first.Breaking HorsesIf you are looking to buy a horse, the first thing you’ll probably notice is that good horses ain’t cheap. As attached as you'll become with your first, Tennessee Walker, he's not exactly the powerhouse you’ll want by your side throughout the entire game. And if the best horses are too expensive, that means you'll have to find some out in the wild and break 'em yourself. Lucky for you, one of the best horses in the game can be acquired for free at the beginning of chapter 2 and onward. But before we get to that, let’s learn how to break a horse.As you explore the world, you’ll find wild horses everywhere. Big horses, little horses, painted horses, black horses, and so on. There are a dozen different breeds roaming the frontier, all with unique stats and attributes. If you see a horse you’re interested in, first take out your binoculars. Once you study the horse you will be given a prompt to “show info." Hit that, and you can check out the horses stats and its breed details.There are two ways to go about breaking a horse. You can chase it down, lasso it, and hop on its back, or you can approach it slowly, calming it if it gets spooked. Once you get close enough, you can hop on its back. While you might be inclined to take on the first method, it's much easier to break a horse if you approach it slowly. Once you’re on its back, pull back the left stick and subtly tilt the right stick to balance while calming it with square or X. If it bucks you, chase it down. When it calms down a bit, you can repeat the process.How To Find One Of The Best Horses Early: The White-Maned ArabianOnce you feel comfortable breaking horses, pack up a thick jacket and head up to the Grizzlies to find the White-Maned Arabian. This snow-white beauty wanders around Lake Isabella and can be found early on. It's quite difficult to tame, so you're going to need to be persistent in following it around and calming it down enough before you can approach it. If it bucks you and escapes, well, it’s gonna be a while before another one respawns.Once you do break it, put your saddle on it and take it to the nearest stable. Technically the horse will be yours once you put the saddle on, but take it back to a stable just in case--you can never be too careful!Info from Gamespot.com
2018-11-16

The newest release from GTA developer Rockstar Game, Red Dead Redemption 2 on PS4 and Xbox One, is a game that is filled with secrets and details. Its core story alone takes 50-plus hours to complete as you slowly accumulate wealth and honor. But if you're someone looking for a shortcut, we've got you covered. Much like the original game and GTA V, Red Dead 2 features an assortment of cheat codes that unlock additional resources, with some injecting odd gimmicks and quirks into your game. Bear in mind, you shouldn't expect these to work in Red Dead Online when that releases in late November.To find the Cheats menu in Red Dead Redemption 2, press the pause button and select the Settings option. In this menu, press Triangle or Y (on PS4 and Xbox One, respectively) to pull up the Cheats menu. From here, you'll find a long list of locked cheats. Initially, you won't know what any of these do or how to unlock them. Many of these codes can be activated by putting in the correct phrase, but others will require some extra time and effort.In addition to finding passwords while exploring the world, some of which are written into the ground, throughout the game you'll find newspapers for sale in towns, and some of these offer clues as to how to unlock these extra fun options. More newspapers will become available after completing main missions, which you'll see detailed in news articles. While many of these cheats introduce some mostly benign bits of fun--such as keeping your character, Arthur Morgan, perpetually drunk--activating these codes at any time will have some consequences for your save game. Once you activate these codes, all Trophies and Achievements will be deactivated on this particular file. As a result, before trying any of these codes, be sure to make a separate file for your main save.With over 30 codes to unlock, some of which have some specific requirements, we've collected a list of cheats that we've uncovered thus far. We also have a separate feature discussing some of the most entertaining and best cheats in Red Dead Redemption 2. Be sure to check back with GameSpot as we update this page with new codes, and how to find them.Cheat CodeNameDescriptionHow To UnlockA fool on commandDrunkAlways stay drunk (can be turned off in cheat menu)No requirementsAbundance is the dullest desireInfinite AmmoUnlimited ammunition for all weapons.Unlocked by purchasing the New Hanover Gazette No. 27 in Valentine or the Blackwater Ledger No. 62. Can be done after journeying to Horseshoe Overlook in Chapter 2.Better than my dogIncrease Horse Whistle RangeActivating will allow your Horse to find you regardless of distance.No requirementsGreed is American VirtueHeavy WeaponsGrants you instant access to the Bold-action Rifle, Mauser Pistol, Pump Action Shotgun, and Semi-Automatic Pistol.Unlocked by purchasing Saint Denis Times No. 46 or the Blackwater Ledger No. 65 after completing the mission Advertising, the New American Art in Chapter 3.I shall be betterSet Dead Eye To Level 3Activating this cheat will upgrade your Deadeye skill. Level 3 is the initial level, but more will be added as it is unlocked.No requirementsI seek and I findSet Dead Eye To Level 5Activating this cheat will upgrade your Deadeye skill. Note this is tied to the "I shall be better" cheat.No requirementsKeep your dreams simpleCreate WagonActivating this cheat will spawn a wagon, and along with another horse.No requirementsRun! Run! Run!Create Race HorseActivating this cheat will instantly spawn a Race Horse for use.No requirementsThe lucky be strong evermoreIncrease StaminaActivating this cheat will grant infinite stamina for you and your horseUnlocked by purchasing the Blackwater Ledger No. 68 after the mission Dear Uncle Tacitus in Chapter 5.Virtue unearned is not virtueIncrease HonorActivating this cheat will increase your Honor to the maximum amount (good honor)Unlocked by purchasing the Blackwater Ledger No. 67 after the mission Banking, The Old American Art in Chapter 4.Would you be happier as a clown?Create Circus WagonActivating this cheat will create a Circus Wagon for use.Unlocked by purchasing the Blackwater Ledger No. 73 during Epilogue Part 2.You flourish before you dieSet Health, Stamina, and Dead Eye Bars to FullRestores all health, stamina, and Dead Eye energy to full.No requirementsYou are a beast built for warCreate War HorseActivating this cheat will create a War Horse for use.Unlocked by purchasing the Blackwater Ledger No. 72 during Epilogue Part 1.You long for sight and see nothingFog Of WarActivating this cheat will reveal the full map before discovery.Unlocked by purchasing the Blackwater Ledger No. 66 or New Hanover Gazette No.31 after the mission Blood Feuds, Ancient and Modern in Chapter 3.You seek more than the world offersFortify Heath, Stamina, and Dead Eye BarsActivating this cheat will refill and fortify Health, Stamina, and Dead Eye bars.Unlocked by purchasing the New Hanover Gazette No.36 after completing The King's Son mission in Chapter 6.You want more than you haveCreate Superior HorseActivating this cheat will create a Superior Horse for use.No requirements (Hint location: Deer Cottage northwest of Annesburg. Found written into the shelves of the drawers)Red Dead 2 is now available on PS4 and Xbox One. If you want to hear more of our thoughts on Rockstar's expansive open-world western, check out our full Red Dead 2 review. We've got much more in store for the game in the coming weeks, which includes our new recurring series QuickDraw. For now, take a look at our round-up of fascinating and interesting facts the game doesn't outright tell players, and along with other useful tips you should know.Editor's note: Our Red Dead 2 cheats are based on a mix of in-game discovery, and through online research at sites including IGN and Reddit.Info from Gamespot.com
2018-11-16
While Red Dead Redemption 2 for PlayStation 4 and Xbox One takes place in a very realistic world where many dynamic, and engrossing systems play off one another, this is a Rockstar game. As such, there are plenty of opportunities to engage in dumb and ridiculous fun. Beyond what you can make happen on your own, much like the original game, you can access a variety of cheat codes in the game to enhance and fundamentally alter aspects of your to suit your needs. Though we strongly recommend finishing the main story and seeing all the key events before trying out these codes out, you're free to use those to your liking at any time (though some codes do require advancing to a certain point in the story first).In order to start messing around with these codes, you'll need to input the key phrases into the Cheats menu--which is accessible in the Settings option in the pause menu. While many of these codes can be used at any time, many of these options will require some extra effort to unlock. As of now, we haven't discovered all of them, and several of them will needed to be unlocked after acquiring specific newspapers from the various towns throughout the game. However, before you activate these cheats, you'll need to know that doing so will deactivate all Achievements and Trophies for your save game after the initial use. So before you go crazy with these codes, be sure to make a separate save file.And with that, here's our quick list of some of the best codes to use. Though if you want to know more about Rockstar's open world western, go check out our Red Dead Redemption 2 review. Though if you're looking for tips and other details to learn, check our essential guide for newcomers, and along with our round up of interesting details that the game doesn't tell you about.Drunk On CommandBy inputting the phrase "A fool on command" in the cheats menu, you'll unlock the Drunk option. This will instantly make Arthur intoxicated, resulting in him wobble about as he struggles to stand up straight. You'll even get an occasional odd comment from him as he wanders down the street or insolation while in the wilderness. While enabled, this will keep the main character perpetually drunk. But if you've had enough, you can deselect the option to return Arthur to his sober self--and all without the nasty hangover.A Horse Ride Is Only A Whistle AwayAs you're gradually building a bond with your new steed, you'll notice that whistling for your horse will only work within fairly short distances. If you don't have time to invest in building up your bond to increase the distance, you can input the code "Better than my dog" to get it to come to you at anytime, regardless of where you are on the map. This can be quite handy when you're traveling the great distances and you can't be bothered to backtrack to where you last left them.That New Horse SmellHowever, if you feel you deserve a stronger and more able-bodied stallion to help you cover great distances, the code "Run! Run! Run!" will do just the trick. After activating this code, you'll instantly spawn a prized race horse for Arthur to ride. As Red Dead Redemption 2 features a large variety of different horses, this particular mare is naturally adept at getting from A to B quickly.A New, Rejuvenated YouAfter spending so much time traveling in the wilderness and getting into dangerous scrapes with many of the gangs roaming the land, you'll often find yourself in rough shape. If you need a pick-me-up fast, then enter the cheat "You flourish before you die" to fully restore Arthur's main cores. Once you're top shape, you'll be able to dive right back into your adventure in no time.Guns, Lots Of GunsWhen you're living life as a bandit, the difference between seeing another day and laying face-first in the dirt could down to what weapon you're holding in your hand. So if you want to upgrade your own hardware to even the odds, use the code "Greed is American Virtue" to unlock a new set of weapons for the traveling outlaw. Once activated you'll find the Pump-Action Shotgun, Mauser Pistol, Semi-Automatic Pistol, and Bolt-Action Rifle sitting in your inventory. To unlock this cheat for use, you'll need to finish the Advertising, the New American Art mission in Chapter 3, and then acquire a newspaper in the town of Rhodes.All The Ammo You NeedRed Dead Redemption 2 prides itself on on offering semi-realistic world where survival is dependent on the resources you have. However, there may come a time where you wish that ammo was in more plentiful supply. If that ever happens, all you'll need to do is use the cheat "Abundance is the dullest desire" in the menu, which is unlocked after picking up the newspaper in Valentine during Chapter 2. Once activated, all ammo will come in unlimited supply, and you can keep firing off your weapons without worrying to count your bullets.Info from Gamespot.com
2018-11-16
In Red Dead Redemption 2, hunting is an important part of exploration and survival in the vast open world. In addition to finding food and other necessary supplies, you'll be able to use materials taken from fallen prey to craft outfits and talismans, which unlock special perks that amplify Arthur's main attributes. As you travel, you may even stumble upon an elusive animal that other explorers have rarely seen. Your first encounter with such a beast will be the Legendary Grizzly Bear, which can offer up a legendary bear pelt if you're able take it down.These Legendary Animals can be found across the many regions of the map and take some extra effort to hunt. While some of these are small in stature, there are many that tower in size over Arthur and are quite dangerous in a fight. But if you're able to take them out, you'll acquire the means to craft some of the game's most valuable accessories and outfits. These particular animals offer the rarest pelts and materials you can find, which can be turned in to the local Trappers and Fences--those shady, black market dealers offering up some of the rarest goods. But rest assured, any materials that can't fit in your bags will be sent straight to the respective merchants.In this feature, we're giving you all the details you need in order to track and hunt each of the game's Legendary Animals. If you want some extra tips for general survival and even fishing--which has its own set of Legendary Fish--be sure to check out our guides and features relating to each of Red Dead 2's most involved gameplay systems. Furthermore, be sure to check out our new weekly series QuickDraw, which focuses on the game's numerous gameplay features and along with a broader look on the impact of the Red Dead series.Table of Contents [hide]Legendary Bharati Grizzly BearLegendary BeaverLegendary Bighorn RamLegendary BoarLegendary BuckLegendary BullgatorLegendary CougarLegendary CoyoteLegendary ElkLegendary FoxLegendary Giaguaro PantherLegendary MooseLegendary Tatanka BisonLegendary White BisonLegendary WolfLegendary Bharati Grizzly BearLocation: During the Chapter 2 story mission Exit Pursued By A Bruised Ego, you'll encounter your first Legendary Animal. While it's possible to take down the bear at this time, you can return later if you want better firepower. You can find it in Grizzlies East, north of the lake O'creah's Run.Crafting:Fence: Bear Claw Talisman (Decreases health core drain by 10%) -- Legendary Bear Claw, Silver Chain Bracelet, Quartz ChunkLegendary BeaverLocation: This rare beaver is known to wander southwest of Butcher Creek, which is directly to the west of Van Horn Trading Post.Crafting:Fence: Beaver Tooth Trinket (Slows weapon degradation by 10%) -- Legendary Beaver ToothLegendary Bighorn RamLocation: Living up to its name, this unusual ram can be found at Cattail Pond, just west of Valentine--the first town you come across in Chapter 2.Crafting:Fence: Ram Horn Trinket (Doubles amount of Creeping Thyme, Oregano, and Wild Mint collected): Legendary Ram HornLegendary BoarLocation: The rare boar can be found in Bluewater Marsh, north of Lagras in the Lemoyne region.Crafting:Fence: Boar Tusk Talisman (Decreases drain speed of horse health and stamina by 10%) -- Legendary Boar Tusk, Cobalt Petrified Wood, Gold EarringLegendary BuckLocation: In the mountains northwest of Strawberry, you'll encounter this large buck.Crafting:Fence: Buck Antler Trinket (Receive higher quality parts when skinning animals) -- Legendary Buck AntlerLegendary BullgatorLocation: First, you'll need to complete the Chapter 4 story mission Country Pursuits, which introduces you to the beast while showing you why it's so dangerous. Afterwards, you'll be able to encounter the massive gator in Bayou Nwa, west of Lakay--which is north of Saint Denis.Crafting:Fence: Alligator Tooth Talisman (Decrease dead eye drain speed by 10%) -- Legendary Alligator Tooth, Gold Jointed Bracelet, Vintage Civil War HandcuffsLegendary CougarLocation: This fearsome feline can be found in Gaptooth Ridge, west of Tumbleweed.Crafting:Fence: Cougar Fang Trinket (Increase stamina XP by 10%) -- Legendary Cougar FangLegendary CoyoteLocation: The hunting grounds for this dangerous coyote can be found in Scarlett Meadows, northwest of Northwest of Rhodes and Southeast of the Old Mill.Crafting:Fence: Coyote Fang Trinket (Increase dead eye XP by 10%) -- Legendary Coyote FangLegendary ElkLocation: You can find this animal east of Bacchus Station in the Ambarino region--the northern section of the map.Crafting:Fence: Elk Antler Trinket (Increase money from looting by 10%) -- Legendary Elk AntlerLegendary FoxLocation: The fox can be found near Mattock Pond, just north of Rhodes in the Lemoyne region.Crafting:Fence: Fox Claw Trinket (Increases eagle eye duration by five seconds) -- Legendary Fox ClawLegendary Giaguaro PantherLocation: To encounter this incredibly dangerous animal, you'll first need to prove yourself as hunter by reaching the rank 9 challenge for Master Hunter. Afterwards, you'll find it roaming west of Shady Belle in Lemoyne. This is directly east of Braithwaite Manor.Crafting:Fence: Panther's Eye Trinket (Decreases dead eye drain speed by 10% for three seconds) -- Legendary Panther EyeLegendary MooseLocation: This massive moose can be seen in the area of Roanoke Ridge, which is near the northeastern corner of the map. Legendary Pronghorn Location: This rare antelope is found wandering in Rio Del Lobo Rock, just east of Fort Mercer in New Austin.Crafting:Fence: Moose Antler Trinket (Increases health exp by 10%) -- Legendary Moose AntlerLegendary Tatanka BisonLocation: In New Austin, you can find this rare bison just southeast of the MacFarlane ranch at Hennigan's Stead.Crafting:Fence: Tatanka Bison Horn Trinket (Decreases received melee damage by 10%) -- Legendary Tatanka Bison HornLegendary White BisonLocation: You can find another rare bison at Lake Isabella, just north of Mount Hagen in Grizzlies West.Crafting:Fence: Bison Horn Talisman (Decreases the speed stamina drains by 10%) -- Legendary Bison HornLegendary WolfLocation: This elusive wolf can be found in Cotorra Springs, west of Bacchus Bridge in Ambarino.Crafting:Fence: Wolf Heart Trinket (Doubles resistance to alcohol) -- Legendary Wolf HeartInfo from Gamespot.com
2018-11-16
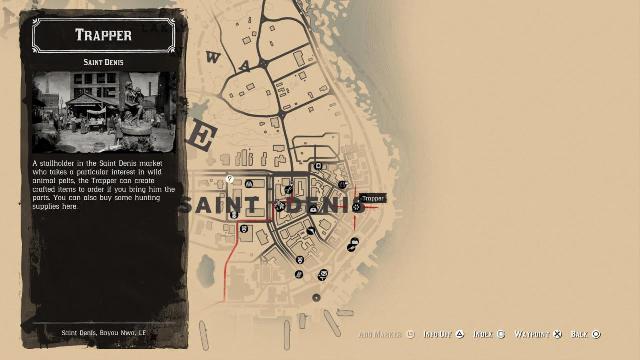
One of the first things you learn in Red Dead Redemption 2 is how to hunt. It's a survival skill that can help you sustain your cores while out in the wild, and it's a reliable source of cash if you're able to quickly gather and turn around animal pelts--the better the condition, the more valuable, of course.While it can take time to spot high-quality animals and even longer to learn how to hunt them efficiently, without making a mess of their pelt, the hardest piece of the puzzle to figure out early on is where to go to sell fur for cash once it's in your hands. You need a trapper, and we've got an easy-to-follow guide that shows you exactly where Read Dead 2's wandering Trapper can be found; five locations in all. Saint DenisThe main location is in Saint Denis, the bustling city to the south. You can go there at any point after the game sets you free. The trapper is located within a busy market, under the giant brick wall painted red with an advertisement for biscuits. This is this only trapper location within a town or city; the rest are scattered throughout the wilderness. Roanoke Ridge Woods, New HanoverTucked away in the woods, around the northeast quadrant of the map, lies a shady outpost for our industrious trapper. Big Valley (East), West ElizabethSlightly Northeast from the nearby Riggs Station lies our man, setup in the middle of a small clearing. Big Valley (North), West ElizabethWith lots of great hunting opportunities nearby, the convenience of the trapper's spot in the northwest corner of the map is worth taking advantage of. Endgame TrapperWe don't want to get into too many specifics here, but know that this trapper spot won't be available until the final chapter in the game.Info from Gamespot.com
2018-11-16
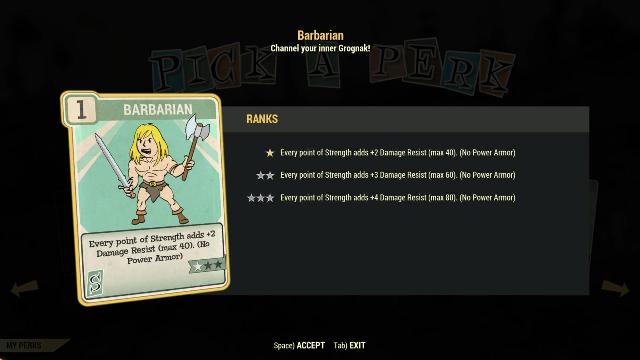
Fallout 76’s new leveling system is very different from previous games. This time it's based around Perk cards, which you earn after leveling up or completing challenges. Every time you level up, you can put a point into one of the seven S.P.E.C.I.A.L. skills that make up your character's stats, and then pick a card to equip for the skill. The number of points you have in that skill determines how many cards you can have. For example, if you have four points in a particular skill, you can unlock four Rank 1 cards, or two Rank 2 cards, or one Rank 3 card and one Rank 1 card. A Perk card always starts at Rank 1, but if you want to upgrade its rank, you need to combine it with variable duplicates of the same card.There are a bunch of cards to collect, and you get them at random. What you get is more reliant on luck than anything, but if you're curious what's out there, we've got your covered. Below we've compiled every card we've earned so far and have broken them all down into their specific categories. Be sure to check back often as we update this feature with even more Perk cards.If you're hungry for more guides, check out our in-depth feature highlighting essential tips you should know before starting. You can also read our survival guide for details on locations to visit first, as well as a basic rundown of the game's systems. If you're curious about our thoughts on the game, be on the lookout for our review in progress in the days ahead.In the meantime, got any super useful Perk cards that don't see here? Be sure to tell us all about them and how great they are for your current character build in the comments below.Table of Contents [hide]StrengthPerceptionEnduranceCharismaIntelligenceAgilityLuckStrengthMany of the Strength Perk cards we've found help you dish out extra damage with the different weapon types, such as Slugger and Gladiator, which affect the damage of two-handed and one-handed weapons respectively. Others increase your ability to withstand the weight of your weapons and equipment. There's plenty for you to play around with if your objective is to utterly devastate enemies and players.PerceptionAccuracy, firearms damage, and environmental awareness is the name of the game for Perception. You'll want to net these bonuses if you're more an exploration-focused player whose also a fan of picking locks effectively and keeping your distance from enemies.EnduranceIt's not easy living out in the wasteland. Endurance Perk cards are going to increase your ability to resist diseases and radiation, as well as increase the effectiveness of your health items, and expand your repertoire of ways to get back into tip-top shape--for better or worse (refer to Cannibal).CharismaCharisma won't mean much if you're not the type to join up with friends. Most of the Charisma Perk cards we've found help heal teammates and offer bonuses to their statistics. But don't ignore Charisma Perk cards entirely, as there are some that help out solo players too, like Field Surgeon, which makes it so Stimpaks and Radaway work much quicker. There's also Bloocksucker, which makes drinking blood a totally viable way to quench your thirst! We're still debating on whether or not that's either creepy or charismatic..IntelligenceAs you'd expect, Intelligence Perk cards improve your ability to craft weapons and armor. They also offer bonuses to hacking, health gain, and explosives damage. There's plenty more that we've yet to find here, but these are the sorts of cards you'll want if you're more of a methodical tactician and tinkerer.AgilityAgility Perk cards add some finesse to your survival, offering you bonuses to Action Points and your overall physical ability. Whether it's reducing the weight of food and drink or just making you better at sneaking, you'll want Ability Perk card bonuses if you favor physical capability over strength and endurance.LuckLuck Perk cards often increase your ability to pick up more money or resources. Others just improve an incredibly specific characteristic, like Can Do!, which ups your chances of finding an extra canned good when searching a container. Not every card we've found so far is useful, but it certainly doesn't hurt to stat into Luck every once in a while to see what interesting bonus you might get.Info from Gamespot.com
2018-11-16

There's a bunch of anime series airing on Netflix, Amazon, Crunchyroll, Funimation, and Hidive. Here are our seven top recommendations from the fall 2018 season you should add to your queue.Of all the anime this season, Bloom Into You is the must watch. This love story between two high school girls also addresses the pressures of living with low self-worth and the struggles of understanding asexual love. Despite the heaviness of the story's drama, there are both brief snippets of hilarity and quiet moments of internal resilience that draw you into the changing dynamic between the second-year student council president--who can't escape her dead sister's shadow--and the young first-year--who dreams of falling in love but doesn't feel the emotions that manga and music say she should.Animated by Troyca, Inc--the studio responsible for the spectacular 2017 anime Re:Creators--and featuring music by Michiru Oshima--who's composed music for anime like Fullmetal Alchemist and video games like The Legend of Zelda: Twilight Princess--Bloom Into You might be the most gorgeous anime this season, both to watch and listen to. The series is exclusively airing on Hidive in both Japanese and English.Zombie Land Saga is about an ordinary high school girl who leaves her house to start her first day of school--only to be struck and killed by a passing truck. She wakes up 10 years later, revived as a zombie by an eccentric young man who wants to manage an idol group entirely composed of the living dead. The story mixes together idol tropes and common zombie story stereotypes to create something truly bizarre, but it's all surprisingly fun to watch. The series airs in English on Funimation and in Japanese on Crunchyroll.A bit more somber, Iroduku: The World in Colors is a series about a teenage witch, named Hitomi, who's colorblind and lives in the year 2078. That is, until her grandmother transports Hitomi 60 years into the past to 2018. Now lost in a world she doesn't completely recognize and lacking the know-how to complete certain tasks--like needing paper money to pay for things--Hitomi struggles to find the teenager who will one day grow up to be her grandmother so she can go home. The anime is already setting itself up to explore similar themes to what we saw in 2016's Orange. Which isn't surprising, as Yuuko Kakihara--who worked on the script for five of Orange's episodes--is the writer for The World in Colors.This season also features a few new isekai--stories where a normal person from our world is transported to another--but the one you want to watch is That Time I got Reincarnated as a Slime. It's pretty much exactly about what the name implies. A dude from our world dies and he's reborn as a cute little blob of sentient goo in a fantasy world of dragons and goblins. The series is a little weird at first, but stick with it--the manga that the anime is based on goes to some charming places. The show is airing in the original Japanese on Crunchyroll and in English on Funimation.Ms. Vampire who lives in my neighborhood is a cute story about a doll-loving middle-schooler moving in with a centuries-old otaku vampire who looks to be no older than a high school first-year. The first episode tackles the "but where are the parents" problem that most anime have with a humorous twist, and flips the regular person meeting a vampire dynamic by having the normal girl be the strange one with habits that are difficult to comprehend. The first episode of Ms. Vampire who lives in my neighborhood possesses tremendous comedic timing and plays off your expectations of slice-of-life tropes in pretty hilarious ways. You can watch the anime on Crunchyroll.Golden Kamuy returns on Crunchyroll and Funimation with a second season, continuing the adventures of our favorite band of ridiculous treasure seekers who are racing to find certain escaped convicts who have strange tattoos all over their bodies. When combined, the tattoos complete map that leads to a massive pile of gold, which pretty much everyone in the anime wants for themselves. Golden Kamuy's first season aired this past spring, and ended fairly abruptly in the middle of the anime's story, so it's good to see the show continue again so quickly.Castlevania is also getting its second season this fall. Once again, the anime is exclusive to Netflix, but that also means you get the whole season up front. Capturing the aesthetic of the video game Castlevania: Symphony of the Night, Castlevania the anime portrays the bloody tale of Trevor Belmont's quest to defeat Dracula. Castlevania delves into murder, gore, and heroes and villains that are both right in their own way and also deeply flawed. Think Berserk or Devilman Crybaby. Castlevania can be unsettling at times, but the show captures the essence of the Castlevania video game because of itThe full list of anime series and movies that have been confirmed to premier this fall on Amazon, Crunchyroll, Funimation, Hidive, and Netflix are listed below. We'll update the list if additional titles are announced.Fall 2018 Anime Release Date Schedule (U.S.)AmazonOctober 5 Boarding School JulietIroduku: The World in ColorsOctober 11 Le Cirque de KarakuriCrunchyrollOctober 1 That Time I Go Reincarnated as a SlimeOctober 3 RErideD: Derrida, who leaps through timeOctober 4 Zombie Land SagaOctober 5 Jojo's Bizarre Adventure Part 5: Golden WindOctober 6 Goblin SlayerRadiantSSSS GridmanSword Art Online: AlicizationOctober 7 Ulysses: Jeanne d'Arc and the Alchemist KnightOctober 8 Golden Kamuy (Season 2)October 12 Senran Kagura Shinovi MasterFunimationOctober 1 Space Battleship Tiramisu Zwei (Season 2)That Time I Go Reincarnated as a SlimeOctober 6 Ace Attorney (Season 2)SSSS GridmanOctober 8 Golden Kamuy (Season 2)October 9 Tokyo Ghoul:re (Season 2)HidiveOctober 1 The Girl in TwilightOctober 5 Bloom Into YouOctober 7 Release The SpyceNetflixOctober 3 Violet Evergarden: SpecialOctober 15 The Seven Deadly Sins: Revival of The CommandmentsOctober 26 Castlevania (Season 2)October 30 Fate/EXTRA Last Encore: Illustrias Geocentrism TheoryInfo from Gamespot.com
2018-11-16

Red Dead Redemption 2's release has come for both PlayStation 4 and Xbox One. Those who prefer to play games on PC may be rewarded with their patience eventually, but as of now we have no indication that Red Dead 2 will ever come to PC. That doesn't mean there is no hope at all, though.So far the studio has given no official indication of a PC port incoming. There was some hope when a programmer seemingly outed a PC version online, but it remains unclear if that was merely a mistake. [Update: The latest glimmer of hope for PC fans comes via Rockstar Intel, which reports that the Red Dead 2 companion app includes references to PC in its code. It's possible these don't mean anything or are being misinterpreted, but it does bear noting.]The most recent Rockstar game, Grand Theft Auto V, did make the jump to PC after its initial console release. Following its original release on PlayStation 3 and Xbox 360 in 2013, Rockstar released upgraded Playstation 4 and Xbox One ports the following year, and then a PC port in 2015. Those later ports were widely lauded for their improved technical underpinnings, and the PC version has enjoyed an active mod community.Red Dead Redemption 2 appears very similar to GTAV in key ways. It's a technical powerhouse that's already pushing the current console generation to its limit. While the Xbox One X came out ahead in a performance analysis, both it and the high-end PS4 Pro were said to be hitting the upper limits of their processing power. We may be on the verge of another console generation to debut in the next few years, so a port to those with some added bells and whistles could make sense. And if that happens, a PC port would be likely as well. Plus Red Dead 2 is already receiving positive reviews and helping Take-Two's stock price, so another shot in the arm from a port would be welcome for the company.Then again, Rockstar has been inconsistent with ports in general and PC support more specifically. The original Red Dead Redemption never made the trip to PC, and in fact is still only available on PS3 and Xbox 360--along with Xbox One, via backwards compatibility.Red Dead Redemption 2 could come to PC in a matter of years, but for the time being, your best bet is to saddle up on the current generation of consoles. If you need some help recalling the events of the first game, check out our story recap. Your console decision may come down to performance--keeping in mind that Xbox One X performed the best in a test, but PS4 has exclusive content for 30 days.Info from Gamespot.com
2018-11-16

A final Nintendo Direct focused on the upcoming Super Smash Bros. Ultimate introduced a whole new mode, which pairs hand-in-hand with its revised way to include beloved characters from a wide variety of new and retro video games. The new "Spirits" system replaces Trophies, letting the company give power-up attributes to still artwork rather than attempt to render 3D models of every character it wishes to reference.You earn Spirits by battling in Spirits Mode, and then they can be used to buff your character. The Spirits come in two varieties: Primary Spirits, which mostly have stat increases, and Support Spirits, which attach to Primary Spirits and imbue you with special skills or abilities. Spirits are ranked by rarity: Novice, Advanced, Ace, and Legend. They also come in three power types: Attack (Red), Grab (Green), and Shield (Blue), in a rock-paper-scissors circle of vulnerabilities.The presentation showed dozens of Spirits rapid-fire style and with some attributes obscured by the various menus. While this list isn't complete, it shows several of the Spirits shown so far, with their special attributes, color affinity, and rarity. Check out the list to see just how deep Nintendo is reaching with its references.Smash Bros. Ultimate releases on December 7. Check out our pre-order guide for more details.Primary SpiritsGooey -- AdvancedYuga -- Shield, AceArticuno, Zapdos, & Moltres -- Attack, LegendCranky Kong (Speed Down) -- Attack, AceKlaptrap (Weight Down) -- Attack, AdvancedRevali -- Attack, AdvancedRabbid Peach -- Shield, AdvancedKid Dracula -- Grab, AcePrimid -- NoviceBonkers -- Attack, AceReinhardt Schneider -- NoviceFlare -- NoviceBokoblin -- NoviceSmeargle -- NoviceLakitu & Spiny -- Grab, AdvancedGordo -- Shield, AdvancedGuts Man -- Grab, AdvancedOwain -- Attack, NoviceThe Imprisoned -- Shield, AdvancedBullet Bill -- Attack, NoviceMelia -- AdvancedLeon Belmont -- Grab, AdvancedZael -- Attack, AdvancedPrince Fluff (Weight Down) -- Grab, NoviceMicaiah -- Grab, AceSevera -- NoviceShy Guy -- NoviceSkull Man -- Shield, AdvancedST Falcon -- Attack, NoviceSkull Kid -- Grab, AdvancedSigma -- Attack, AceStarfy -- AceJimmy T -- Shield, AceMumkhar -- Attack, AdvancedBlooper -- ShieldEphraim -- Attack, AceZoroark -- Attack, AdvancedOctoling Girl and Octoling Boy -- Attack, AceKyogre -- ShieldPrincess Ruto -- ShieldCut Man -- GrabSupport SpiritsVulpix (Fire Flower Equipped)Cappy (Strong Throw)Pseudo-Palutena (Transformation Duration Up)Elise (Autoheal)Slippy Toad (Made of Metal)Rattly (Jump Up)Tree (Unflinching Charged Smashes)Lip (Lip's Stick Equipped)Nabbit (Item Gravitation)Ouendan (Critical Health Stats Up)Amy -- Attack, AceFortidudo -- AdvancedAir Man -- Shield, AdvancedPolterpup -- Shield, AdvancedRogue the Bat -- Grab, AdvancedLip -- Grab, AceAble Sisters -- Attack, AceHal Emmerick -- Shield, AdvancedMimikyu (Death's Scythe Equipped) -- AdvancedGuardian (Weapon Resist Up) -- AdvancedYama -- Attack, NoviceDr. Lobe -- AdvancedF-Type -- Shield, NoviceMia & Miyu Amakara (Poison Damage Reduced)Jelfonzo -- Grab, NoviceNino (Undamaged Attack Up)Urban Champion Fighter (Fist Attack Up)SnipperclipsMedli (Strong Wind Immunity)UnknownMouser -- NoviceSilver the Hedgehog -- AdvancedDry Bowser -- LegendClefairyMetal SonicUrbosaEliwoodLoftwingPiantasPandoraKaitlin and KatieChibi-RoboPiplupTailsDr. WilyWaddle-DeeMetroidMr. ResettiMajora's Mask MoonZeroRambi the RhinoInfo from Gamespot.com
2018-11-16

At Microsoft's X018 conference, the company announced the first big expansion for Forza Horizon 4. The DLC is called Fortune Island, and it's set to launch on December 13. It keeps you racing through the UK but takes you to some northern British Isles with particularly craggy mountainsides and dangerous weather like lightning storms. The new setting isn't without its peaceful charms, though, as you'll be able to witness the aurora borealis.Naturally, Fortune Island will come alongside a new set of cars to drive as well. The game has already started rolling out the five custom-built Ford vehicles from the GymkhanaTEN video series. Car Pass members can already grab the 1977 Ford GymkhanaTEN, F-150 Hoonitruck, and the 1993 Ford Escort Cosworth Group A. Later this month they can also get the 1965 Ford Hoonicorn Mustang V2 and the 2017 Ford Fiesta RS, followed by the 2016 Ford GymkhanaTEN Focus RS RX in December.Fortune Island is part of the expansions bundle for $35, which is available for Ultimate Edition owners at no additional cost. If you're a Game Pass subscriber, you've already gotten access to Forza Horizon 4 as part of your subscription, and you can get the expansions as a bundle or individually for 10% off.Setting the expansion in the rocky north should prove a challenge for experienced racers, especially given the game's marquee feature of changing seasons. GameSpot's Forza Horizon 4 review found the seasons had a real impact on gameplay, and contributed to a diversity of race types."Everything you do in Horizon feels valuable, no matter how big or small--from the basic thrills of speeding a fast car down a gorgeous mountain highway to spending time tinkering with your favorite ride to manage seasonal road conditions to just hanging out with friends and strangers online and goofing off in friendly games," said critic Edmond Tran. "The charm of the Horizon series is as palpable as ever, a winning, all-inclusive recipe that celebrates the joy of driving above all else."Info from Gamespot.com