2018-11-20

Bethesda has announced a new update for Fallout 76. The patch makes several improvements to the RPG's performance and stability, and also fixes numerous bugs in the game.The new update resolves certain gameplay and performance issues, and further stabilizes the Fallout 76 game client and servers. Additional patches have been made for the Xbox One version of the game--where certain menus could cause in-game instability.In terms of bug fixes, most of the update addresses issues with combat. An issue where certain enemies were able to chase players further than intended has been fixed, as has a glitch that prevented Ghoul and Scorched Officers from dropping nuke codes upon being killed. For PvP play, you'll now see the correct cap reward whether you're seeking revenge or someone else is hunting you down. Respawning after dying in PvP play will now correctly clear your hostile status towards other players if you don't click the "Seek Revenge" option. For the full list of changes implemented in Fallout 76's new update, check out the full patch notes on Bethesda's main website. We've also outlined them below.Fallout 76 November 19 Update Patch NotesPatch VersionXbox: 1.0.1.8PS4: 1.0.1.9PC: 1.0.1.14GeneralPerformance: Several issues have been addressed to resolve hitches during gameplay and other performance issues.Stability: The Fallout 76 game client and servers have received additional stability improvements.Xbox: Fixed an issue that could lead to instability on certain menus.Bug Fixes Art And Graphics Ambient Occlusion: Placed items no longer leave behind shadow outlines after being picked up.Camera: The game camera now pans more smoothly when the player enters furniture.Graphics: The cover of Tesla Science magazine Issue 9 no longer appears solid red on pickup, or when inspected.EnemiesGeneral: Fixed an issue in which some enemies could chase the player farther than intended.Loot: Ghoul and Scorched Officers now correctly drop nuke code pieces upon being killed by a player.C.A.M.P., Workshops, And CraftingBlueprints: Fixed an issue that could cause Blueprints to break into smaller parts after logging out and back in to Fallout 76.Plans: Paints applied to Power Armor during the Fallout 76 B.E.T.A. will now appear correctly on the items that were painted, and those paints can now correctly be applied to additional sets of Power Armor.Repair: Fixed an issue that could cause an item to return to a broken state after being repaired.QuestsBureau of Tourism: The Prickett's Fort Token Dispenser can now be repaired, and players can no longer walk through it.PvPPacifist Mode: Players with Pacifist Mode enabled who engage in PVP by contesting a Workshop owned by another player will now correctly deal full damage to that player as long as they remain hostile.Respawn: Choosing the "Respawn" option after dying during PVP combat will now correctly clear any active hostile status toward other players.Seek Revenge: Cap rewards will now display correctly when choosing the "Seek Revenge" respawn option after being killed by another player.Seek Revenge: When targeted by another player who is seeking revenge, the reward amount will now display the correct number of Caps that can be earned by killing that player.User InterfaceLanguages: Korean fonts will now be displayed correctly in game menus.Hotkeys: The "Take Photo" hotkey can no longer be rebound and is now tied to the space bar on PC and the A button on controllers.Hotkeys: Fixed an issue that could cause the "Take Snapshot" button in Photomode to display an incorrect hotkey.Social: Fixed an issue that could cause players to disappear from each other's social menus if two players each sent a friend invite to one another.Social: Fixed an issue that prevented newly equipped Player Icons from displaying to other players in the Social Menu.Info from Gamespot.com
2018-11-20
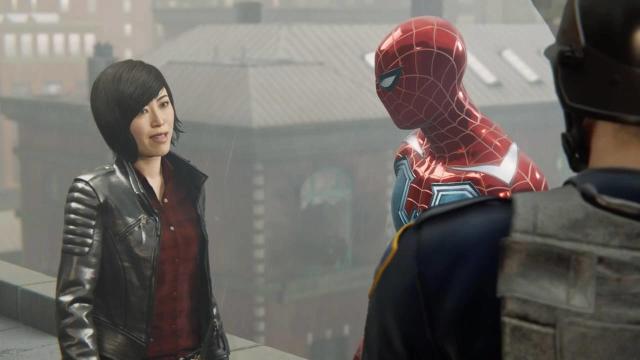
Things get dark in Turf War, the second episode of Marvel's Spider-Man's DLC campaign. After the relatively lighter and slower investigation into Black Cat's plans with the mob in The Heist, the first of three expansions that make up a campaign called The City That Never Sleeps, Spider-Man finds himself thrown into a full-on gang war at the start of the second. Turf War is The Empire Strikes Back of the campaign, and throughout the two or so hours of story missions trying to stop the powerful mob boss Hammerhead, Spider-Man is completely embattled and potentially outmatched.Turf War doesn't pull its punches. Cops are dying, gangsters are threatening witnesses and openly committing murders, and Spider-Man is struggling to keep up with it all. The basic structure of the game remains the same--there are missions scattered around New York as part of the story campaign, and in between them you can wander around doing whatever you feel like--but the nature of Turf War makes every objective feel dangerously time-sensitive. When Hammerhead's men threaten to kill an informant, you'll want to swing across town to stop them. When gangsters prepare to attack police convoys and take their weapons, you'll be concerned that your presence is needed. This chapter is at its best when it feels like Spider-Man really is at war--and he's losing.It helps that Turf War feels significantly more challenging than vanilla Spider-Man. Another new batch of enemies, these ones wearing jetpacks and sporting shields, join the array of enemies from both the base game and The Heist to make for some pretty dicey encounters. More than one fight in Turf War will put seasoned Spider-Men through their paces, especially if they're a bit rusty from the month off between the two DLC chapters. Scraping through some fights against an extremely well-outfitted enemy as Spider-Man swings madly from one crisis to another perfectly fits the tone of Turf War. Spider-Man PS4 is at its best when it's taking close, intimate looks at the game's characters, and in Turf War the game casts that spotlight on Yuri Watanabe, Spidey's high-ranking friend in the NYPD. Yuri is operating with a personal vendetta against Hammerhead that builds in the early part of the DLC, and as she and Spider-Man try to stop them, his reliance on her authority and her reliance on his superpowers are weaknesses that strain their relationship and have serious consequences.Yuri saw some characterization in the base game, but she was largely a voice on Spidey's radio advising him where to go. Here we spend more time with Yuri as the battle between the gangsters rages and she and Peter Parker grapple with their own exploited personal failings. You might wrap up Turf War's story campaign in a couple hours, but thanks to the frantic pace and challenging difficulty, those hours will feel fraught. The speed and challenge bring a bit of a different pace and tone to Marvel's Spider-Man, the variety of which makes Turf War new and fresh, while the dark focus on character channels the best parts of the game's main story.As you clear Turf War's campaign, you'll also find a small handful of new open-world events to New York to complete, mostly just to give you a little more to do in this chapter. Like in The Heist, there's not a lot to them and you've gotten a taste of some or all of them before now, but they provide a few solid reasons to hang around the game after completing the story chapter. The gang war leads to new open-world crimes that are a bit different from the generic set that came in The Heist, which is welcome given that you'll need to clear quite a few of them to hit 100 percent completion in this chapter.Screwball is also back with more challenges, some of which have new wrinkles added that make them a bit tougher than their vanilla counterparts. And there are new Hammerhead-themed base-clearing challenges, which can be pretty tough thanks to new locations and new enemies to fight.As with The Heist, it's nice to have a reason to jump back into Spider-Man PS4 and mess around in its world, but its Insomniac's story and characterization that once again are making Spider-Man something worth revisiting. Turf War excellently ratchets up the stakes on Spidey and forces him to deal with a whole host of new personal and interpersonal issues. Together with its predecessor chapter, Turf War suggests there are plenty of stories Insomniac could continue to cover in Spider-Man, and that they'll all be worth swinging back to New York to experience.Info from Gamespot.com
2018-11-20

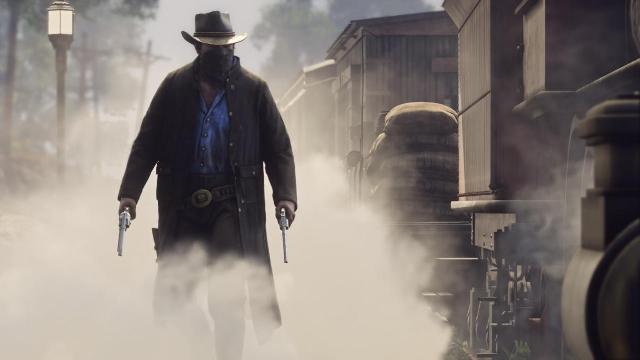
There are plenty of games going on sale for Black Friday this week, and surprisingly that includes the recently released Red Dead Redemption 2. The game is being discounted at a few select retailers, as well as on online stores, although it's primarily the more expensive editions of the game seeing a price cut.All the current RDR2 Black Friday deals are outlined below. We will continue to add to the list as new discounts are announced. Be sure to stay on top of when specific retailers--like Best Buy and Walmart--open and close their doors for Black Friday so you can plan accordingly.For now, the best Black Friday Red Dead Redemption 2 deals are available through the Xbox Store and PlayStation Store. The normally $80 Special Edition is being lowered to around $70 for Black Friday. The Special Edition comes with the base game, as well as a bank robbery mission and gang hideout, Dappled Black Thoroughbred horse, talisman and medallion in-game bonuses, boosts, cash discounts, the Nuevo Paraiso Gunslinger outfit, and several free weapons. The even more expensive Ultimate edition drops to $90 on both platforms. As of this writing, you'll need an Xbox Live Gold membership to take advantage of the Xbox pricing.Physical retailers are selling the game at full price but with a bonus item. At Best Buy, the Black Friday deal comes with RDR2 and a special collapsible cup. At Walmart, the Black Friday deal is for the store's exclusive steelbook edition. Ebay has also announced it will have a bundle with the Xbox One version of the game and Call of Duty: Black Ops 4 for $70.Red Dead Redemption 2 Black Friday DealsXbox One$60 -- Best Buy [with free collapsible cup]$60 -- Walmart [steelbook edition]$70 -- Ebay [Call of Duty: Black Ops 4 bundle]$72 (Xbox Live Gold) -- Xbox Store [Special edition]$90 (Xbox Live Gold) -- Xbox Store [Ultimate edition]PlayStation 4$60 -- Best Buy [with free collapsible cup]$60 -- Walmart [steelbook edition]$69.59 -- PlayStation Network [Special edition]$90 -- PlayStation Network [Ultimate edition]There's also a few deals on the original Red Dead Redemption this Black Friday as well. We've outlined them below.Red Dead Redemption Black Friday DealsXbox One$10 - Xbox Store$12 - Walmart [GotY Edition]In our Red Dead Redemption 2 review, Kallie Plagge gave the game a 9/10, writing, "Red Dead Redemption 2 is an excellent prequel, but it's also an emotional, thought-provoking story in its own right, and it's a world that is hard to leave when it's done."Red Dead Redemption 2 is only available for Xbox One and PS4.Info from Gamespot.com
2018-11-20

Black Friday is fast approaching, and already several retailers--such as Best Buy, Target, and Walmart--have released the sales that customers can expect during the holiday. For the past few years, the Friday after Thanksgiving has presented a good opportunity to purchase an Xbox Live Gold subscription at a discount, and this year is no exception.Xbox Live Gold allows you to play online multiplayer in Xbox 360 and Xbox One games that support the feature--such as Forza Horizon 4 and For Honor: Marching Fire Edition. A subscription also gives you access to several free games that Microsoft changes every month, and you can keep them for as long as you keep paying for the service. You get exclusive discounts on select titles in the Xbox Marketplace each month as well.Normally, you can buy a one-month subscription for Xbox Live Gold for $10, three-month for $25, six-month for $40, and 12-month for $60. If you're just looking to try out the service, then buying a one-month subscription through the Microsoft Store on Black Friday is the way to go, as the price has been lowered to $1. The same is true for a year-long subscription, which will be discounted in the Microsoft Store to $40. For three-month, you'll want to take advantage of Walmart's 50% off Black Friday deal. Go to Target or Best Buy for a six-month subscription.Every retailer and online store is offering different discounts for each subscription on Xbox Live Gold. We've outlined all of the current deals below, and will update the list as additional Black Friday sales for Xbox Live Gold become available. Be sure to check out our other Xbox Black Friday deal guides too.Xbox One Black Friday GuidesEvery Early Deal For Xbox One Consoles, Games, And AccessoriesBest Deals For Xbox One Consoles And GamesAll Black Friday 2018 Xbox Live Gold Deals (So Far)Microsoft StoreOne-month -- $112-month -- $40WalmartThree-month -- $12.50TargetThree-month -- $15Six-month -- $3012-month -- $50Best BuyThree-month -- $15Six-month -- $3012-month -- $50Info from Gamespot.com
2018-11-20

Only a few years after Fallout 4's release, Bethesda surprised fans by officially announcing Fallout 76, the next entry in its beloved post-apocalyptic RPG franchise. The new game was revealed in a trailer after a series of teases, and Bethesda discussed it in more detail at E3 2018 and at QuakeCon 2018. We even got an opportunity to play the game at a recent hands-on preview event. But the game is out now, and we've only just began to make strides in Bethesda's sprawling adventure.To ensure you're kept up to date on everything there is to know about Fallout 76, we've compiled all the information we have on the game so far: the platforms it's on, its online functionality, its anti-griefing features, and where the game falls in the series' timeline.If you've been playing the beta, you'll be happy to know that the game is receiving a launch day update containing a ton of new content. In the meantime, be on the lookout for our full review, as well a slew of guides to help you get started in the game.Table of Contents [hide]Our Fallout 76 Early Review ImpressionsWhat is Fallout 76?Who's Developing It?Is It An Online Survival Game?How Big Is The World?What Can You Do?How Does Character Creation And Progression Work?How Does PvP Work?How It Plays: Our In-Depth PreviewAny Voice Chat?Guides And What To Do FirstRelease DateOur Fallout 76 Early Review Impressions"Fallout 76 attempts to pull off some significantly new ideas for the series, but with few exceptions, they notably diminish many aspects of the game. Multiplayer is fun, but it's not an ideal way to enjoy questing, and the shooting mechanics aren't strong enough to make combat-heavy activities enjoyable for long periods. Things feel better as a solo experience, but the lack of in-universe characters makes becoming emotionally invested in the world and your goals difficult." Read out full early review impressions. What is Fallout 76?Fallout 76 is a prequel to all of the previous Fallout games. Set in 2102, you play an inhabitant of Vault 76 who emerges from the shelter 25 years after the bombs fell on America. Your task is simple: explore what remains of post-apocalyptic America and rebuild civilization.Longtime fans will likely recognize Vault 76; although it's not a place we've visited before, this isn't the series' first mention of it. Both Fallout 3 and 4 reference it and, according to the Fallout Wikia, this West Virginia-based vault was occupied by 500 of of America's best and brightest minds. Unlike the more grotesque experimental vaults in the Fallout universe, Vault 76 is a control vault intended to be opened 20 or so years after a nuclear war. But if the Vault was supposed to open 20 years after the bombs fell, why have 25 years gone by? The story has a few surprises in store for those willing to tackle its myriad challenges.Fallout 76 uses the Creation Engine, the same engine used to make Fallout 4, but it will purportedly feature much more graphical detail than its predecessor. Game director Todd Howard has said that Fallout 76 has new rendering and lighting technology, which allows for "16 times" the detail.Who's Developing It?Bethesda Game Studios, the Maryland-based developer responsible for the Elder Scrolls series and both Fallout 3 and Fallout 4, is at work on the game. In addition, Bethesda Game Studios Austin--formerly BattleCry Studios--assisted in fine-tuning the Creation Engine to support multiplayer functionality.Is It An Online Survival Game?Fallout 76 is a much different sort of game from its predecessors. It's "entirely online," but don't worry, you'll be able to play it solo too. According to Bethesda, the idea to take this approach to open-world survival came four years ago, when it started to work on building a multiplayer Fallout experience. Howard described the game's approach to survival as "softcore," which means death doesn't equal loss of progression.You can form a party with up to three other players. You won't be able to manage your placement in servers when you login, as you'll automatically be inserted into a session with others upon booting up the game. Of course, you also have the option simply join alongside your friends and play together.Howard commented that Fallout 76 will have dedicated servers that will support the game "now and for years to come." At launch, there will only be public servers, but Bethesda plans to introduce private servers that will allow players to invite friends to play in order to prevent undesirable behavior.Some classic mechanics from past games will be changing to accommodate the shift to online play. For example, V.A.T.S has been reconfigured to work in real time, while still allowing players to target specific enemy body parts. But this time around, it has been updated to be more of a tool that allows you to spot out dangers in the environment.How Big Is The World?According to Howard, Fallout 76's world is four times the size of Fallout 4. There are six different regions to explore, and each has its own unique style, risks, and rewards. Confirmed areas include the West Virginia State Capitol, The Greenbrier, Woodburn Circle, New River Gorge Bridge, and Camden Park. Contained within each area is a variety of new creatures to encounter, some of which are based on West Virginian folklore. You can take at the full map in the image below.What Can You Do?Like previous games, players spend the majority of their time exploring and completing quests. However, Fallout 76 does not feature any human non-player characters, as all surviving humans are controlled by active players. Instead, the game uses a combination of robot NPCs, collectible recordings, and environmental storytelling in order to give players what they need to piece together quests and the story at large.Given the game's premise of rebuilding the world, there's base-building elements similar to Fallout 4. You're able to set up a bases anywhere using an item called the Construction and Assembly Mobile Platform, or C.A.M.P. These can be placed down in the world and allow you to construct an impromptu camp. We got to see the player laying down walls and decorating the base with pool tables, toilets, and other household objects. As the "mobile platform" part of the name implies, your CAMP can also be picked up and relocated, allowing you to move your base anywhere in the world.While you can help build the world, you can also destroy it. If you have the necessary nuclear launch codes, it's actually possible to access a missile silo to fire a nuke at any point on the map. Doing so irradiates the chosen area, but it also allows for the opportunity to discover rare weapons, gear, and items. Be wary; nuking an area also causes more powerful enemies to show up, making it more difficult to survive. But don't be discouraged by this, the C.A.M.P. blueprint system makes it easy for players to quickly rebuild their homes, and if they're privy to an incoming threat, they can pack their things and move to a new location.As an online experience, player choice is incredibly important, going as far as giving players the freedom to choose who are the heroes and who are the villains. Early footage showcased multiple players engaging in combat and participating in friendly activities, which seems to indicate that players have the freedom to choose their paths in the world of Fallout 76.How Does Character Creation And Progression Work?There are similar character creation tools as Fallout 4. However, you're free to change your appearance at any point. In addition, you can also utilize the game's new photo mode during the creation process to better see how your character looks, as well as snap some shots you can share on social media.The SPECIAL system returns and it's a bit different. Like previous games, SPECIAL encompasses the following stats: Strength, Perception, Endurance, Charisma, Intelligence, Agility, Luck. You're given one point to put into any of those stats every time you level up. The first thing you do when you emerge from the vault is pick a SPECIAL and then you pick a perk in that particular SPECIAL. Essentially, every SPECIAL is a pool of points for your perks.But unlike previous games, perks are now cards you can equip and unlock as you rank up in a given SPECIAL; though, you're free to swap cards out at any time if you want to alter your build. Each SPECIAL characteristic you develop has a perk card cap of 15. These perk cards can be enhanced further from one to five points to increase their power.You can obtain additional perk cards via Perk Card Packs (four random cards), which you earn every two levels initially (1-10), and then every 5 after that. You can also pick one perk card per level, usually from your SPECIAL choice. There are hundreds of Perks cards you can unlock, so naturally SPECIAL ranks cap out after a while (you gain a rank up in a SPECIAL each time you level up). At level 50, you'll stop increasing SPECIAL ranks, but you'll still get card packs.How Does PvP Work?When you shoot someone you do a little bit of damage, which can be equated to lightly slapping them in order to challenge them to a duel. In response to this, the other player can choose to ignore or engage. If they engage in a battle with you, they'll start to take full damage. The one who is killed in this consenting PvP match has the option to seek revenge. Doing so gives that person the opportunity to get double the rewards granted they're successful.If you'd rather choose to ignore a PvP match, there's no way to escape being killed--despite the small damage dealt to you during the initiation phases. However, if you are killed by a player under these circumstances, that player becomes a Wanted Murderer and will receive no rewards from having killed you.A Wanted Murderer is marked on the map as a red star and a bounty is placed on their head. Players looking to cash in on this bounty aren't visible on the Murderer's map. If the murderer is killed, the money from that bounty is taken out their stock.In order to give players time to properly acclimate to how Fallout 76 plays, PvP won't be available to players until level five. And if you perish from any PvP encounter, the only thing you'll lose is the junk you've been collecting, which can be reclaimed after death if not already picked up by other players. You can always store junk in stashes found around the world, so as to safeguard a portion of your stock. Armor and weapons are retained in your inventory after death.How It Plays: Our In-Depth PreviewWe recently got a hands-on with a build of Fallout 76. It plays similarly to Fallout 4, but it features some new additions that subtly shift the paradigm established by past entries in the series. We got to experience three hours of the game, exploring a decent chunk of the opening area while taking on quests and generally working cooperatively with the players around us. There's a lot to unpack about how the upcoming multiplayer open-world RPG, so be sure to watch the video above and read our full thoughts in our in-depth preview detailing what we got to play.Any Voice Chat?It's possible to chat with your teammates and even strangers you discover out in the world. It's area-based so your ability to hear other plays will vary. But if you want nothing to do with strangers, it's possible to mute their voices entirely.Guides And What To Do FirstFallout 76 is a massive game that just might overwhelm you right at the start. To help ease the pain of emerging from Vault 76, we've gathered together some recommendations of where to go first. But if you want a full rundown on stuff you should know before starting, check out our Fallout 76 beginner's guide. In addition, we have guides on Perk cards and Power Armor locations. Release DateFallout 76 is being developed for PC, PS4, and Xbox One, and is currently scheduled to be released on November 14. Unfortunately, there's no word about a Nintendo Switch release, which didn't seem out of the question after the Skyrim re-release made it to that platform.Info from Gamespot.com
2018-11-20
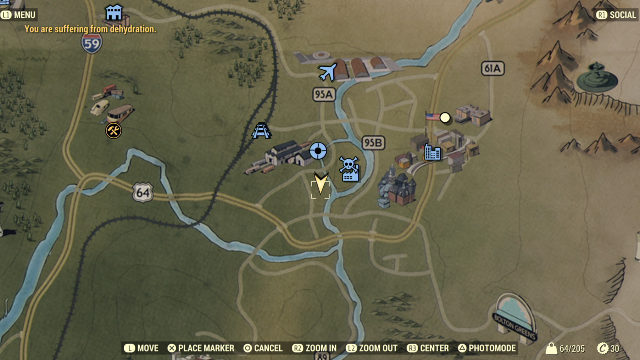
As you explore the wasteland of West Virginia in Fallout 76, you'll often happen upon abandoned Power Armor. This high-level piece of equipment is a special armor that can be enhanced further with pieces of armor plating. These pieces are usually around level 40, so you can’t even use them until you're leveled up. But don’t ignore Power Armor entirely because you're a low level! Remove the pieces attached and take the Chassis left over, as even without the armor plates attached, you'll get a bonus to your defense and a boost to your carrying capacity.It's also worth noting that once you hop into a Power Armor chassis, it's yours for good just as long as you store it in your inventory or place it in your Stash. You'll want to start compiling Power Armor pieces early on so that you can be prepared to use them when you reach the appropriate level.Power Armor is such a boon to your stats both early and later on, so it's well worth taking the time to seek them out. That and the Fusion Cores they often have on them are a valuable asset! To help secure you a set, we've gathered below Power Armor locations that are nearby Vault 76 and easy to get early on. It's worth noting that while these locations are set, sometimes there won't be Power Armor. This is because the game's world is persistent, so if a player has picked up that armor recently, that means it'll be gone. Lucky for you, a Power Armor set does respawn after a while. Remain steadfast and you'll grab one for yourself in due time!Be sure to check back often as we highlight more easy-to-find Power Armor sets. If you're looking for more Fallout 76 guides, check out our survival guide, as well as our guide offering tips you should know before starting. You can also check out our feature showcasing all the Perk Cards we've found so far. If you're more curious about how the game is, we'll be putting out a review in progress sometime in the days ahead.Portside Pub / Mama Dolce's Processing PlantThis set should be the first one you check for if you're keen on grabbing some Power Armor right away. It's located east of Vault 76; you'll see an area that looks like a train yard on the map. You can find the Power Armor in a warehouse located south of Portside Pub, which is a smidge westof Mama Dolce's Processing Plant. Refer to the map screenshot below for the exact location.This warehouse is booby trapped, so you're going to want to be careful in your approach. Fortunately, you can take a staircase to enter the building from the roof to avoid most of the danger. Simply head up the stairs, making sure to steer clear of the explosives traps as they'll likely trigger as you pass through. Once you're inside the warehouse, drop down to find the Power Armor. If you need more visual direction, refer to the screenshots in the gallery above.Morgantown TrainyardThe Morgantown Trainyard is just northwest of Portside Pub at the point on the map that appears as, well, you guessed it: a train yard. This Power Armor set is another one of the easier ones to grab, so you're more than likely to show up and find nothing. But don't give up!When you arrive to the train yard, look out for a train carriage labeled as "USA Star." There are a couple in the yard, but the one you want is located just below a rusty crane nearby the east side of the main warehouse. The Power Armor suit is inside the carriage to your left.Gorge JunkyardThis next Power Armor is at the Gorge Junkyard, which is directly east of Vault 76. If you've just started, you'll want to put off getting this set, as it requires a level 3 lock-picking skill. If you want to up your ability to open those pesky locks, try putting points into Perception as much as possible, and if luck is on your side, you'll receive a few Picklock Perk cards, which should get you to where you want to be.Once you meet these requirements, head to the junkyard and find a green truck trailer amid the junk for the Power Armor. It should be south of the red beached ship on the northern side of the yard near a tiny shack. Refer to the map above for an estimate of where it is, as well as the shots in the gallery for a more visual look.Aaronholt HomesteadThis Power Armor location has a more lenient lock to pick coming in at a lowly Level 1--that said, it still requires you to have better lock-picking skill than zero, so don't go here unless you've leveled that up! Anyway, this location is a bit further out at the Aaronholt Homestead, which is located northeast of the ferris wheel on the map.You'll find the set tucked away in a shack beside the three large silos. Be wary of the giant bugs in the area, as they're likely to be a nuisance to you if left unattended when you pick the lock. Info from Gamespot.com
2018-11-20
As you play Red Dead Redemption 2, you'll start to see notifications informing you that you've completed a challenge. Now this all sounds fine and dandy, but you're likely asking yourself: "What does completing challenges do? Heck, why should I even bother completing them?" That's a fair question, and we're here to answer it.Challenges are gameplay feats you complete to earn XP and unlock upgraded equipment for purchase at your local trapper, such as new Gun Belts, Bandoliers, Holsters, and Off-Hand Holsters. Each piece posses its own perks that increase either ammo capacity or decrease weapon degradation rate. Equipping them even improves your general statistics, but more on that in a second. There are nine challenge categories in total, each with ten feats to complete. As you'd expect, the feats vary per category. For example, the Bandit challenges has you working to hold up townsfolk, steal wagons, and amass a sizable bounty, while the Explorer challenges focus on you finding treasure. It's important to note that you must complete challenges in sequential order, so you can't just prioritize completing the seventh challenge over the first few only because it's easier.Completing challenges is a worthwhile endeavor, as the equipment you unlock offer bonus bars around your Health, Stamina, and Dead Eye Cores when you complete the set. You are rewarded an extra bar when you complete one of the three sets associated with that statistic. And you unlock an additional bar to that statistic once you've acquired all three sets associated with it. The table below contains details on which equipment set is associated with which attribute.AttributeEquipment SetHealthHorsemanSharpshooterWeapons ExpertStaminaBanditGamblerMaster HunterDead EyeExplorerHerbalistSurvivalistThere's even an extra bonus in store for you upon completing all 90 challenges. You unlock a special outfit called "Legend of the East," which provides hefty bonuses to Arthur's statistics. If that's something you're aspiring towards, you're in luck as we've compiled every single challenge in the game for your reference, so get crackin'!BanditChallengeDescriptionRewardBandit 1Hold up five townsfolkBandit BandolierBandit 2Rob two stage coaches or complete two stage coach robbery missions$5 + 25 Dead Eye XPBandit 3Rob a cash register in any four shops in one dayBandit HolsterBandit 4Rob three stage coaches in a single day$10 + 50 Dead Eye XPBandit 5Amass a $250 bounty in one State$10 + 50 Dead Eye XPBandit 6Steal five horses and sell them to the horse Fence at Clemens Cove$15 + 100 Dead Eye XPBandit 7Rob $50 worth of cash and valuables from townsfolk and travelersBandit Off-Hand HolsterBandit 8Steal seven wagons and sell them to the Fence at Emerald Ranch$15 + 100 Dead Eye XPBandit 9Hogtie someone and leave them on railroad tracks three times$20 + 150 Dead Eye XPBandit 10Complete five train robberies without dying or getting caughtBandit Gun BeltExplorerChallengeDescriptionRewardExplorer 1Find a treasure mapExplorer HolsterExplorer 2Find a treasure$5 + 25 Stamina XPExplorer 3Find a treasureExplorer BandolierExplorer 4Find a treasure$10 + 50 Stamina XPExplorer 5Find a treasure$10 + 50 Stamina XPExplorer 6Find a treasure$15 + 100 Stamina XPExplorer 7Find a treasureExplorer Gun BeltExplorer 8Find a treasure$15 + 100 Stamina XPExplorer 9Find a treasure$20 + 150 Stamina XPExplorer 10Find a treasureExplorer Off-Hand HolsterGamblerChallengeDescriptionRewardGambler 1Win five hands of pokerGambler HolsterGambler 2In blackjack, double down and win the hand five times$5 + 25 Dead Eye XPGambler 3Win three games of five finger filetGambler BandolierGambler 4Bust a poker opponent out in Flatneck Station, Saint Denis, and Valentine$10 + 50 Dead Eye XPGambler 5Win three rounds of dominoes without drawing any tiles against two or fewer opponents$10 + 50 Dead Eye XPGambler 6Beat a blackjack dealer in Rhodes and Van Horn$15 + 100 Dead Eye XPGambler 7Beat the five finger filet player in Strawberry, Valentine, and Van HornGambler Gun BeltsGambler 8Win three hands of blackjack with three hits or more$15 + 100 Dead Eye XPGambler 9Win three consecutive games of dominoes$20 + 150 Dead Eye XPGambler 10Win three consecutive hands of pokerGambler Off-Hand HolsterHerbalistChallengeDescriptionRewardHerbalist 1Pick six yarrowHerbalist Off-Hand HolsterHerbalist 2Pick and eat four species of berry$5 + 25 health XPHerbalist 3Craft seven items using sage as an ingredientHerbalist Gun BeltHerbalist 4Pick five mushrooms and feed them to your horse$10 + 50 Health XPHerbalist 5Craft nine items using the Indian tobacco as an ingredient$10 + 50 Health XPHerbalist 6Pick 15 different species of herb$15 + 100 Health XPHerbalist 7Craft and use five special miracle TonicsHerbalist HolsterHerbalist 8Use oleander to craft six poison weapons$15 + 100 Health XPHerbalist 9Pick one of each species of herb$20 + 150 Health XPHerbalist 10Season and cook all 11 types of meatHerbalist BandolierHorsemanChallengeDescriptionRewardHorseman 1Kill five rabbits from horsebackHorseman Gun BeltHorseman 2Jump over three obstacles in 15 seconds$5 + 25 Stamina XPHorseman 3Ride from Valentine to Rhodes in less than five minutesHorseman HolsterHorseman 4While mounted, drag a victim for 3,300 feet using your lasso$10 + 50 Stamina XPHorseman 5Trample five animals with your horse$10 + 50 Stamina XPHorseman 6Ride from Strawberry to Saint Denis in less than nine minutes without touching water$15 + 100 Stamina XPHorseman 7Kill seven enemies from horseback without dismountingHorseman BandolierHorseman 8Kill nine predators from horseback$15 + 100 Stamina XPHorseman 9Ride from Van Horn to Blackwater in less than 17 minutes without touching water$20 + 150 Stamina XPHorseman 10Break every single wild horse breedHorseman Off-Hand HolsterMaster HunterChallengeDescriptionRewardMaster Hunter 1Skin three deerMaster Hunter Off-Hand HolsterMaster Hunter 2Get three perfect-quality rabbit pelts$5 + 25 Health XPMaster Hunter 3Track 10 different animal species using your binocularsMaster Hunter BandolierMaster Hunter 4Get a clean kill after calling to an animal five times$10 + 50 Health XPMaster Hunter 5Skin three black bears or grizzly bears$10 + 50 Health XPMaster Hunter 6Kill five cougars with your bow and skin them$15 + 100 Health XPMaster Hunter 7Use a bait to lure and kill both an herbivore and predatorMaster Hunter Gun BeltMaster Hunter 8Catch three fish without using a fishing rod (aka use dynamite)$15 + 100 Health XPMaster Hunter 9Catch an opossum playing possum$20 + 150 Health XPMaster Hunter 10Track and kill a Legendary PantherMaster Hunter HolsterSharpshooterChallengeDescriptionRewardSharpshooter 1Kill three flying birdsSharpshooter BandolierSharpshooter 2Kill two different animal species in the same Dead Eye use$5 + 25 Dead Eye XPSharpshooter 3Kill five flying birds while moving on a trainSharpshooter HolsterSharpshooter 4Kill an enemy at least 80 feet away with a throwing tomahawk$10 + 50 Dead Eye XPSharpshooter 5Kill six animals without switching or reloading your weapon$10 + 50 Dead Eye XPSharpshooter 6Kill someone at least 660 feet away with a long scoped rifle$15 + 100 Dead Eye XPSharpshooter 7Land seven headshots in a rowSharpshooter Off-Hand HolsterSharpshooter 8Disarm three enemies without reloading or switching your weapon$15 + 100 Dead Eye XPSharpshooter 9Shoot three people's hats off in the same Dead Eye use$20 + 150 Dead Eye XPSharpshooter 10Kill three flying birds with three consecutive long scoped rifle shotsSharpshooter Gun BeltSurvivalistChallengeDescriptionRewardSurvivalist 1Catch a bluegillSurvivalist Gun BeltSurvivalist 2Hand five animals to the camp or trapper$5 + 25 StaminaSurvivalist 3Kill five animals using a Varmint rifleSurvivalist Off-Hand HolsterSurvivalist 4Craft dynamite, fire, improved, poison, and small game arrows$10 + 50 StaminaSurvivalist 5Catch a fish in the Bayou from a riverboat and while standing on railroad tracks$10 + 50 StaminaSurvivalist 6Kill a scavenging animal while it is feeding on a corpse five times$15 + 100 StaminaSurvivalist 7Kill eight small game animals using small game arrowsSurvivalist BandolierSurvivalist 8Craft a homing tomahawk, improved tomahawk, volatile dynamite, and volatile fire bottle$15 + 100 StaminaSurvivalist 9Catch a fish that weighs at least 19 pounds$20 + 150 StaminaSurvivalist 10Catch one of each type of fish in the worldSurvivalist Holster Weapons ExpertChallengeDescriptionRewardWeapons Expert 1Kill three enemies with a knifeWeapons Expert HolsterWeapons Expert 2Kill three enemies in 10 seconds with throwing knives$5 + 25 Health XPWeapons Expert 3Kill three birds of prey with a tomahawkWeapons Expert Gun BeltWeapons Expert 4Kill 10 enemies with a shotgun loaded with crafted ammo$10 + 50 Health XPWeapons Expert 5Kill five mounted enemies with one throwing knife per kill$10 + 50 Health XPWeapons Expert 6Kill a group of four enemies with a single stick of dynamite$15 + 100 Health XPWeapons Expert 7Kill four consecutive enemies by throwing and retrieving the same tomahawkWeapons Expert Off-Hand HolsterWeapons Expert 8Kill 15 enemies with a long-barreled sidearm$15 + 100 Health XPWeapons Expert 9Kill nine unaware enemies with a bow$20 + 150 Health XPWeapons Expert 10Kill a grizzly bear with throwing knives without taking damageWeapons Expert BandolierInfo from Gamespot.com
2018-11-20
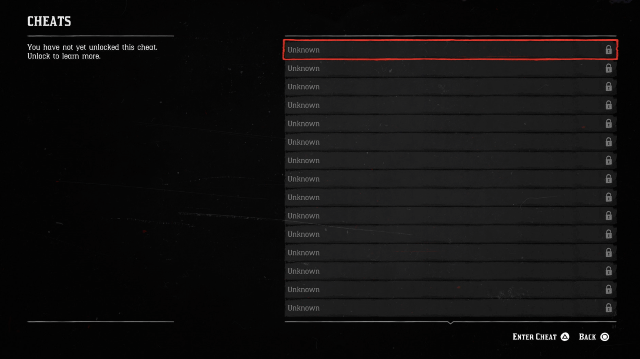
The newest release from GTA developer Rockstar Game, Red Dead Redemption 2 on PS4 and Xbox One, is a game that is filled with secrets and details. Its core story alone takes 50-plus hours to complete as you slowly accumulate wealth and honor. But if you're someone looking for a shortcut, we've got you covered. Much like the original game and GTA V, Red Dead 2 features an assortment of cheat codes that unlock additional resources, with some injecting odd gimmicks and quirks into your game. Bear in mind, you shouldn't expect these to work in Red Dead Online when that releases in late November.To find the Cheats menu in Red Dead Redemption 2, press the pause button and select the Settings option. In this menu, press Triangle or Y (on PS4 and Xbox One, respectively) to pull up the Cheats menu. From here, you'll find a long list of locked cheats. Initially, you won't know what any of these do or how to unlock them. Many of these codes can be activated by putting in the correct phrase, but others will require some extra time and effort.In addition to finding passwords while exploring the world, some of which are written into the ground, throughout the game you'll find newspapers for sale in towns, and some of these offer clues as to how to unlock these extra fun options. More newspapers will become available after completing main missions, which you'll see detailed in news articles. While many of these cheats introduce some mostly benign bits of fun--such as keeping your character, Arthur Morgan, perpetually drunk--activating these codes at any time will have some consequences for your save game. Once you activate these codes, all Trophies and Achievements will be deactivated on this particular file. As a result, before trying any of these codes, be sure to make a separate file for your main save.With over 30 codes to unlock, some of which have some specific requirements, we've collected a list of cheats that we've uncovered thus far. We also have a separate feature discussing some of the most entertaining and best cheats in Red Dead Redemption 2. Be sure to check back with GameSpot as we update this page with new codes, and how to find them.Cheat CodeNameDescriptionHow To UnlockA fool on commandDrunkAlways stay drunk (can be turned off in cheat menu)No requirementsAbundance is the dullest desireInfinite AmmoUnlimited ammunition for all weapons.Unlocked by purchasing the New Hanover Gazette No. 27 in Valentine or the Blackwater Ledger No. 62. Can be done after journeying to Horseshoe Overlook in Chapter 2.Better than my dogIncrease Horse Whistle RangeActivating will allow your Horse to find you regardless of distance.No requirementsGreed is American VirtueHeavy WeaponsGrants you instant access to the Bold-action Rifle, Mauser Pistol, Pump Action Shotgun, and Semi-Automatic Pistol.Unlocked by purchasing Saint Denis Times No. 46 or the Blackwater Ledger No. 65 after completing the mission Advertising, the New American Art in Chapter 3.I shall be betterSet Dead Eye To Level 3Activating this cheat will upgrade your Deadeye skill. Level 3 is the initial level, but more will be added as it is unlocked.No requirementsI seek and I findSet Dead Eye To Level 5Activating this cheat will upgrade your Deadeye skill. Note this is tied to the "I shall be better" cheat.No requirementsKeep your dreams simpleCreate WagonActivating this cheat will spawn a wagon, and along with another horse.No requirementsRun! Run! Run!Create Race HorseActivating this cheat will instantly spawn a Race Horse for use.No requirementsThe lucky be strong evermoreIncrease StaminaActivating this cheat will grant infinite stamina for you and your horseUnlocked by purchasing the Blackwater Ledger No. 68 after the mission Dear Uncle Tacitus in Chapter 5.Virtue unearned is not virtueIncrease HonorActivating this cheat will increase your Honor to the maximum amount (good honor)Unlocked by purchasing the Blackwater Ledger No. 67 after the mission Banking, The Old American Art in Chapter 4.Would you be happier as a clown?Create Circus WagonActivating this cheat will create a Circus Wagon for use.Unlocked by purchasing the Blackwater Ledger No. 73 during Epilogue Part 2.You flourish before you dieSet Health, Stamina, and Dead Eye Bars to FullRestores all health, stamina, and Dead Eye energy to full.No requirementsYou are a beast built for warCreate War HorseActivating this cheat will create a War Horse for use.Unlocked by purchasing the Blackwater Ledger No. 72 during Epilogue Part 1.You long for sight and see nothingFog Of WarActivating this cheat will reveal the full map before discovery.Unlocked by purchasing the Blackwater Ledger No. 66 or New Hanover Gazette No.31 after the mission Blood Feuds, Ancient and Modern in Chapter 3.You seek more than the world offersFortify Heath, Stamina, and Dead Eye BarsActivating this cheat will refill and fortify Health, Stamina, and Dead Eye bars.Unlocked by purchasing the New Hanover Gazette No.36 after completing The King's Son mission in Chapter 6.You want more than you haveCreate Superior HorseActivating this cheat will create a Superior Horse for use.No requirements (Hint location: Deer Cottage northwest of Annesburg. Found written into the shelves of the drawers)Red Dead 2 is now available on PS4 and Xbox One. If you want to hear more of our thoughts on Rockstar's expansive open-world western, check out our full Red Dead 2 review. We've got much more in store for the game in the coming weeks, which includes our new recurring series QuickDraw. For now, take a look at our round-up of fascinating and interesting facts the game doesn't outright tell players, and along with other useful tips you should know.Editor's note: Our Red Dead 2 cheats are based on a mix of in-game discovery, and through online research at sites including IGN and Reddit.Info from Gamespot.com
2018-11-20

Riding on horseback is the primary of getting around in Red Dead Redemption 2's massive world. Before long, you'll find yourself rearing up a multitude of horses in search of the one that'll get you around the quickest. With not much in the way of fast travel, having a horse that's not only fast but can withstand the burdens of exploration is essential.While the question of which horse is the absolute best comes down to preference, there are a few breeds that can be classified as some of the top candidates. Below we discuss these breeds and highlight their locations. If you're looking for a more in-depth guide on horse care and how to boost your trusty steed's performance while making bank along the way, we've got one in the hopper coming soon, so be sure to check back often to get all the information on how to be a proper horse trainer.Be mindful that there are some light location spoilers below given how most of these horses can only be acquired later in the game. You should be good for the White-Maned Arabian breed, but be careful when looking at the details below if you want to steer clear of potential story bits.For more guides, you should check out our features highlighting all the tips you should know before playing and things the game doesn't tell you. Though, we also have guides on more specific subjects, like gun customization and money making. Be sure to read our Red Dead 2 review if you haven't already. And if you want to have some extra fun, be sure to read our feature detailing the game's cheat codes.What Are The Best Breeds?As stated, there is no singular "best horse" in the game. There are only strong breeds that fair much better than the standard breeds you encounter early on. Speaking on the different types: the Arabian, Turkoman, and Missouri Fox Trotter breeds stand out as the most well-rounded and top-tier. Keep in mind that the stats below reflect the horse when you find it and not at its top condition.ArabianArabian breed horses have some of the best stats overall. There are three coat types in total, each with their own unique statistics: White, Black, and Rose Grey Bay.White-Maned ArabianThe White-Maned Arabian can only be found in the wild, which makes it possible to find relatively early on. This snow-white beauty wanders around the edges of Lake Isabella. It's quite difficult to tame, so you're going to need to be persistent in following it around and calming it down enough before you can approach it.Compared to other Arabian horses, it has the lowest base Health and Stamina stats--though, it's still much higher than any of the more standard horse breeds. A worthy compromise for a fantastic horse you can catch and tame so early in the game. Just watch out for the wolves who hang out nearby.SpeedAccelerationHandlingType66EliteSuperiorBlack ArabianThe Black-Maned Arabian horse can be purchased at the Saint Denis Stable during Chapter 4. It has most the well-rounded stats of the Arabian Horses with decent Health and Stamina.SpeedAccelerationHandlingType66EliteSuperiorRose Grey Bay-Maned ArabianThe Rose Grey Bay-Maned Arabian can only be bought at the Blackwater Stable during the Epilogue section of the game. It has the highest Health and Stamina of the three Arabian horses.SpeedAccelerationHandlingType66EliteSuperiorTurkomanTurkoman breed horses make up their lacking acceleration with solid speed, average handling, and a high Health pool. As a cross between War and Racing breeds, they're well worth owning for riders who want a trusty steed who can withstand damage without sacrificing speed. All three Turkoman breeds have the same exact stats, which are reflected below along with a brief breakdown of where you can purchase them and when.SpeedAccelerationHandlingType65StandardRace / WarGold Turkoman: Sold at the Saint Denis Stable during Chapter 4.Dark Bay Turkoman: Sold at the Blackwater Stable during the Epilogue.Silver Turkoman: Sold at the Tumbleweed Stable during the Epilogue.Missouri Fox TrotterThe Missouri Fox Trotter balances the best base speed of all the horse breeds with solid Health and high Stamina. As a mix between the Race and Work breeds, the Missouri Fox Trotter comes highly recommended for those who want all of the perks and benefits of a fast riding horse with resilient Stamina. Like the Turkoman breed, all of the Missouri Fox Trotter coats have the same exact stats, which are reflected below along with a brief breakdown of where you can purchase them and when.SpeedAccelerationHandlingType75StandardRace / WorkAmber Champagne: Sold at Scarlett Meadows Stable during Chapter 4.Silver Dapple Pinto: Sold at Blackwater Stable during the Epilogue.Info from Gamespot.com
2018-11-20
Red Dead Redemption 2 is finally here. Rockstar's new open-world western game is now available on both PS4 and Xbox One, and it presents players with a massive, deep open world to explore. The main story alone will take you in the neighborhood of 50 hours to complete, and that's before engaging in much of its side content--and all of this is to be followed by Red Dead Online in November, the game's online multiplayer component.To help you make the most of the experience, we've put together numerous guides and tips, tackling both specific aspects of the game and a broader array of things you should be aware of before starting. Rockstar has opted not to hold your hand with many features in the game, leaving it to you to either discover them or find them hidden away in menus. We'll also be taking a look at some of these examples to ensure you're aware of everything the game has to offer.We've got plenty of other guides and tips on the way, and we'll continue to update the list below with all of them. While you wait to actually get your hands on the game, be sure to check out our RDR 2 review.CheatsOne potentially big aspect of the new game is cheat codes. Like GTA V before it, RDR 2 allows you to use cheats and even has an entire menu available for the feature. However, at this early stage, we don't actually know what all of them are; at least some are cleverly hidden in newspapers in-game. We'll be doing our best to hunt these down and will report back as they are uncovered--you can see those we've been able to confirm in our list of all the Red Dead 2 cheats. In the meantime, we've also got a rundown on the best RDR2 cheats that are worth a try.Do You Need To Play Red Dead Redemption First?Red Dead Redemption 2 is the third game in the Red Dead series, though it's only closely connected to its direct predecessor. However, RDR 2 is a prequel, taking place years before the events of the first RDR. If you've played the previous game, you'll recognize the names and faces of many of its characters, including RDR protagonist John Marston. We dive into whether you should play RDR first in our feature, but whatever choice you make, you should give our Red Dead Redemption story recap a look to refresh your memory--or fill in the holes for the first time.Tips To Know Before StartingAs with any game, it can be useful to start with certain knowledge in hand. That's certainly true of RDR 2, which is a dense game full of various systems that interact with each other. With that in mind, we've put together a list of key tips you should know before booting up the game for the first time. We've kept spoilers to a minimum, but you'll want to be aware, for instance, that side missions can expire if you don't get to them quickly enough.How To Make Money FastAs an outlaw, you're after money, but not necessarily out of sheer greed. Whether your motivation is the betterment of your gang and its members or because you simply want a new gun and horse, you're going to want to get your hands on as much money as possible. With that in mind, we've put together a guide on how to make money quickly.Outfits And ClimatesAmong the ways Red Dead 2 tries to immerse you in its world is with its climates. You'll have to account for temperatures if you want to maximize your performance, wearing appropriate clothing depending on where in the world you are. We've rounded up all of the outfits we've come across so far to give you an idea of what you can find.Things The Game Doesn't Tell YouAs you play and share stories with friends, you may come to realize there are any number of things the game doesn't tell you. There are various interesting details and tidbits you could miss because Rockstar isn't throwing them in your face, so we've done our best to round up a number of these so you don't miss out on some opportunities during the course of your adventures.How Do Morality And Honor Work?Among the many systems you'll find in Red Dead 2 is honor. Arthur Morgan may be a criminal no matter what choices you make, but there are degrees to which he is a bad guy. That comes into play with morality and honor, as your actions will either boost or lower your honor. Pressing down on the D-pad allows you to see this at any time, and something as simple as greeting a passerby will allow you to build it up. Aside from how people react to you, it's worth being aware of the implications of your honor--Good Guy Arthur will get discounts at stores, which is one way to save some cash.Some Side Missions Can ExpireIf you're a completionist, the thought of optional missions disappearing is downright awful. But whatever your approach to playing games like Red Dead 2, you should absolutely engage with some of the optional content involving your gang. These sequences feature some of the best character moment in the game, but if you advance far enough in the story, some of these missions will go away whether or not you've done them. You can find out more about how this works in our PSA on side missions expiring.How Do I Fast Travel?Fast travel does exist in RDR2, although it's not something you'll do by selecting a point on your map and warping there. The means for quickly moving around involve using actual modes of transportation, such as stagecoaches. Provided you have the patience, you're much better off running or taking your horse, because you'll encounter some of the game's most interesting content that way. But if speed is of the essence, consult our explanation of how fast travel works.All The GunsAs noted above, money is at a premium, so you don't necessarily want to buy every weapon you lay your eyes on. You may want to plan ahead, so we've rounded up all of the guns we've discovered so far in order to give you a sense of what awaits.Health, Stamina, Dead Eye, And Horse Cores And Bars ExplainedOne of the many new wrinkles in Red Dead 2 is the Core system, which dictates a variety of aspects of your character. It can be a bit complex to wrap your head around, with Cores influencing bars but bars being used before Cores, among other thing. Do yourself a favor and get a good grasp on this key system by checking out our guide to how Cores work.Fishing TipsEarly in the game, you'll gain the ability to fish, which can be a fun mini-game to kill some time with. You can get by without much strategy, but if you're interested in getting the biggest, legendary fish that existing in Red Dead's world, you should consult our fishing guide for tips and legendary fish locations.How To Find The Legendary Animals And PeltsDuring Chapter 2, you'll encounter your first Legendary Animal--an enormous Grizzly Bear. From here, you'll be able to track and hunt the game's rarest animals, some of which will require added firepower. If you want to know the location of every single elusive animal in Red Dead 2's world, go check out our Legendary animal sand pets guide for guidance on how to find them, and what to do with that legendary bear pelt.Perks Guide: Trinkets, Talismans, And The Crafting Components You NeedPerks offer improvements to Arthur's overall abilities that are unlocked by obtaining Talismans and Trinkets, which are primarily crafted at Fences. You'll need parts from Legendary Animals to craft them. Others are rewarded to you by completing specific missions under special conditions. Check out our Perks guide offering a detailed run down all of the Talismans we've found so far, what they do, and what you need to unlock them.The Best Horses And Where To Find ThemThere is no singular "best horse" in the game. There are only strong breeds that fair much better than the standard breeds you encounter early on. Speaking on the different types: the Arabian, Turkoman, and Missouri Fox Trotter breeds stand out as the most well-rounded and top-tier. Here's our best horses guide offering details on each.Hidden Weapons You May Have MissedThere are a number of weapons to find in the massive world of Red Dead 2. However, some of these can't be bought from weapon shops, and they can be easily missed if you aren't paying attention. With this in mind, we pulled together a list of weapons that can take some extra effort to find, but are among the game's most interesting tools for combat. In addition to personalized six-shooters from legendary Gunslingers, there are also melee weapons that can be traced back to ancient cultures lost to time. Go check out our guide on how to find these hidden weapons.Where To Sell Stolen Items: Every Fence Location In Red Dead Redemption 2Fences--merchants, not boundary markers--in Red Dead Redemption 2 are the only businesses that will buy goods you've found while looting strangers and rifling through private property, and by gum, they sure are hard to find. Considering the size of RDR2's map, and that there are only four fences in all the land, odds are you may be wondering where they're hiding. We've got a handy reference guide to help locate the black-market traders that peddle in illicit goods.How To Start All The ChallengesAs you play Red Dead 2, you'll start to see notifications informing you that you've completed a challenge. Now this all sounds fine and dandy, but you're likely asking yourself: "What does completing challenges do? Heck, why should I even bother completing them?" That's a fair question, and we're here to answer it. Here's our challenge guide containing details our each, as well as specifics on what you earn.Info from Gamespot.com
2018-11-20
While Red Dead Redemption 2 for PlayStation 4 and Xbox One takes place in a very realistic world where many dynamic, and engrossing systems play off one another, this is a Rockstar game. As such, there are plenty of opportunities to engage in dumb and ridiculous fun. Beyond what you can make happen on your own, much like the original game, you can access a variety of cheat codes in the game to enhance and fundamentally alter aspects of your to suit your needs. Though we strongly recommend finishing the main story and seeing all the key events before trying out these codes out, you're free to use those to your liking at any time (though some codes do require advancing to a certain point in the story first).In order to start messing around with these codes, you'll need to input the key phrases into the Cheats menu--which is accessible in the Settings option in the pause menu. While many of these codes can be used at any time, many of these options will require some extra effort to unlock. As of now, we haven't discovered all of them, and several of them will needed to be unlocked after acquiring specific newspapers from the various towns throughout the game. However, before you activate these cheats, you'll need to know that doing so will deactivate all Achievements and Trophies for your save game after the initial use. So before you go crazy with these codes, be sure to make a separate save file.And with that, here's our quick list of some of the best codes to use. Though if you want to know more about Rockstar's open world western, go check out our Red Dead Redemption 2 review. Though if you're looking for tips and other details to learn, check our essential guide for newcomers, and along with our round up of interesting details that the game doesn't tell you about.Drunk On CommandBy inputting the phrase "A fool on command" in the cheats menu, you'll unlock the Drunk option. This will instantly make Arthur intoxicated, resulting in him wobble about as he struggles to stand up straight. You'll even get an occasional odd comment from him as he wanders down the street or insolation while in the wilderness. While enabled, this will keep the main character perpetually drunk. But if you've had enough, you can deselect the option to return Arthur to his sober self--and all without the nasty hangover.A Horse Ride Is Only A Whistle AwayAs you're gradually building a bond with your new steed, you'll notice that whistling for your horse will only work within fairly short distances. If you don't have time to invest in building up your bond to increase the distance, you can input the code "Better than my dog" to get it to come to you at anytime, regardless of where you are on the map. This can be quite handy when you're traveling the great distances and you can't be bothered to backtrack to where you last left them.That New Horse SmellHowever, if you feel you deserve a stronger and more able-bodied stallion to help you cover great distances, the code "Run! Run! Run!" will do just the trick. After activating this code, you'll instantly spawn a prized race horse for Arthur to ride. As Red Dead Redemption 2 features a large variety of different horses, this particular mare is naturally adept at getting from A to B quickly.A New, Rejuvenated YouAfter spending so much time traveling in the wilderness and getting into dangerous scrapes with many of the gangs roaming the land, you'll often find yourself in rough shape. If you need a pick-me-up fast, then enter the cheat "You flourish before you die" to fully restore Arthur's main cores. Once you're top shape, you'll be able to dive right back into your adventure in no time.Guns, Lots Of GunsWhen you're living life as a bandit, the difference between seeing another day and laying face-first in the dirt could down to what weapon you're holding in your hand. So if you want to upgrade your own hardware to even the odds, use the code "Greed is American Virtue" to unlock a new set of weapons for the traveling outlaw. Once activated you'll find the Pump-Action Shotgun, Mauser Pistol, Semi-Automatic Pistol, and Bolt-Action Rifle sitting in your inventory. To unlock this cheat for use, you'll need to finish the Advertising, the New American Art mission in Chapter 3, and then acquire a newspaper in the town of Rhodes.All The Ammo You NeedRed Dead Redemption 2 prides itself on on offering semi-realistic world where survival is dependent on the resources you have. However, there may come a time where you wish that ammo was in more plentiful supply. If that ever happens, all you'll need to do is use the cheat "Abundance is the dullest desire" in the menu, which is unlocked after picking up the newspaper in Valentine during Chapter 2. Once activated, all ammo will come in unlimited supply, and you can keep firing off your weapons without worrying to count your bullets.Info from Gamespot.com
2018-11-20

In Red Dead Redemption 2, hunting is an important part of exploration and survival in the vast open world. In addition to finding food and other necessary supplies, you'll be able to use materials taken from fallen prey to craft outfits and talismans, which unlock special perks that amplify Arthur's main attributes. As you travel, you may even stumble upon an elusive animal that other explorers have rarely seen. Your first encounter with such a beast will be the Legendary Grizzly Bear, which can offer up a legendary bear pelt if you're able take it down.These Legendary Animals can be found across the many regions of the map and take some extra effort to hunt. While some of these are small in stature, there are many that tower in size over Arthur and are quite dangerous in a fight. But if you're able to take them out, you'll acquire the means to craft some of the game's most valuable accessories and outfits. These particular animals offer the rarest pelts and materials you can find, which can be turned in to the local Trappers and Fences--those shady, black market dealers offering up some of the rarest goods. But rest assured, any materials that can't fit in your bags will be sent straight to the respective merchants.In this feature, we're giving you all the details you need in order to track and hunt each of the game's Legendary Animals. If you want some extra tips for general survival and even fishing--which has its own set of Legendary Fish--be sure to check out our guides and features relating to each of Red Dead 2's most involved gameplay systems. Furthermore, be sure to check out our new weekly series QuickDraw, which focuses on the game's numerous gameplay features and along with a broader look on the impact of the Red Dead series.Table of Contents [hide]Legendary Bharati Grizzly BearLegendary BeaverLegendary Bighorn RamLegendary BoarLegendary BuckLegendary BullgatorLegendary CougarLegendary CoyoteLegendary ElkLegendary FoxLegendary Giaguaro PantherLegendary MooseLegendary Tatanka BisonLegendary White BisonLegendary WolfLegendary Bharati Grizzly BearLocation: During the Chapter 2 story mission Exit Pursued By A Bruised Ego, you'll encounter your first Legendary Animal. While it's possible to take down the bear at this time, you can return later if you want better firepower. You can find it in Grizzlies East, north of the lake O'creah's Run.Crafting:Fence: Bear Claw Talisman (Decreases health core drain by 10%) -- Legendary Bear Claw, Silver Chain Bracelet, Quartz ChunkLegendary BeaverLocation: This rare beaver is known to wander southwest of Butcher Creek, which is directly to the west of Van Horn Trading Post.Crafting:Fence: Beaver Tooth Trinket (Slows weapon degradation by 10%) -- Legendary Beaver ToothLegendary Bighorn RamLocation: Living up to its name, this unusual ram can be found at Cattail Pond, just west of Valentine--the first town you come across in Chapter 2.Crafting:Fence: Ram Horn Trinket (Doubles amount of Creeping Thyme, Oregano, and Wild Mint collected): Legendary Ram HornLegendary BoarLocation: The rare boar can be found in Bluewater Marsh, north of Lagras in the Lemoyne region.Crafting:Fence: Boar Tusk Talisman (Decreases drain speed of horse health and stamina by 10%) -- Legendary Boar Tusk, Cobalt Petrified Wood, Gold EarringLegendary BuckLocation: In the mountains northwest of Strawberry, you'll encounter this large buck.Crafting:Fence: Buck Antler Trinket (Receive higher quality parts when skinning animals) -- Legendary Buck AntlerLegendary BullgatorLocation: First, you'll need to complete the Chapter 4 story mission Country Pursuits, which introduces you to the beast while showing you why it's so dangerous. Afterwards, you'll be able to encounter the massive gator in Bayou Nwa, west of Lakay--which is north of Saint Denis.Crafting:Fence: Alligator Tooth Talisman (Decrease dead eye drain speed by 10%) -- Legendary Alligator Tooth, Gold Jointed Bracelet, Vintage Civil War HandcuffsLegendary CougarLocation: This fearsome feline can be found in Gaptooth Ridge, west of Tumbleweed.Crafting:Fence: Cougar Fang Trinket (Increase stamina XP by 10%) -- Legendary Cougar FangLegendary CoyoteLocation: The hunting grounds for this dangerous coyote can be found in Scarlett Meadows, northwest of Northwest of Rhodes and Southeast of the Old Mill.Crafting:Fence: Coyote Fang Trinket (Increase dead eye XP by 10%) -- Legendary Coyote FangLegendary ElkLocation: You can find this animal east of Bacchus Station in the Ambarino region--the northern section of the map.Crafting:Fence: Elk Antler Trinket (Increase money from looting by 10%) -- Legendary Elk AntlerLegendary FoxLocation: The fox can be found near Mattock Pond, just north of Rhodes in the Lemoyne region.Crafting:Fence: Fox Claw Trinket (Increases eagle eye duration by five seconds) -- Legendary Fox ClawLegendary Giaguaro PantherLocation: To encounter this incredibly dangerous animal, you'll first need to prove yourself as hunter by reaching the rank 9 challenge for Master Hunter. Afterwards, you'll find it roaming west of Shady Belle in Lemoyne. This is directly east of Braithwaite Manor.Crafting:Fence: Panther's Eye Trinket (Decreases dead eye drain speed by 10% for three seconds) -- Legendary Panther EyeLegendary MooseLocation: This massive moose can be seen in the area of Roanoke Ridge, which is near the northeastern corner of the map. Legendary Pronghorn Location: This rare antelope is found wandering in Rio Del Lobo Rock, just east of Fort Mercer in New Austin.Crafting:Fence: Moose Antler Trinket (Increases health exp by 10%) -- Legendary Moose AntlerLegendary Tatanka BisonLocation: In New Austin, you can find this rare bison just southeast of the MacFarlane ranch at Hennigan's Stead.Crafting:Fence: Tatanka Bison Horn Trinket (Decreases received melee damage by 10%) -- Legendary Tatanka Bison HornLegendary White BisonLocation: You can find another rare bison at Lake Isabella, just north of Mount Hagen in Grizzlies West.Crafting:Fence: Bison Horn Talisman (Decreases the speed stamina drains by 10%) -- Legendary Bison HornLegendary WolfLocation: This elusive wolf can be found in Cotorra Springs, west of Bacchus Bridge in Ambarino.Crafting:Fence: Wolf Heart Trinket (Doubles resistance to alcohol) -- Legendary Wolf HeartInfo from Gamespot.com
2018-11-20
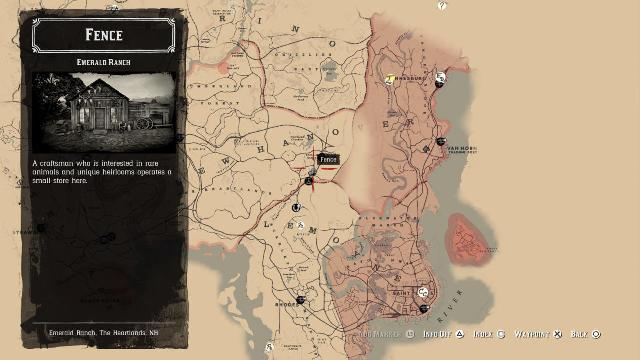
Fences--merchants, not boundary markers--in Red Dead Redemption 2 are the only businesses that will buy goods you've found while looting strangers and rifling through private property, and by gum, they sure are hard to find. Considering the size of RDR2's map, and that there are only four fences in all the land, odds are you may be wondering where they're hiding. We've got a handy reference guide to help locate the black-market traders that peddle in illicit goods.Fair warning: you have to first complete Chapter 2's 'The Spines of America' mission before you can use any fence, and you won't be able to access either of the specialized fences--for horses or wagons--until you reach certain progress milestones in the game's main story.Let's start off with the first location you're likely to find: Emerald RanchFence #1: Emerald Ranch (Unlocks after Chapter 2, Pouring Fourth Oil)The first fence location you might stumble across during the natural trajectory of the story's early mission is located on the south-west edge of Emerald Ranch, on the backside of a massive barn. In additional to its usual services, this is also the only fence that will pay you for turning in stolen stagecoaches and carriages.The same time that you unlock the standard fence at Emerald Ranch, you will also unlock the ability to trade in stolen carriages; simply ride them up to the barn doors to engage the wagon fence. Fence #2: Van Horn Trading PostOn the far-east edge of New Hanover (practically due east of Emerald Ranch) lies Van Horn Trading Post. The fence at this location is tucked away within the rear of building along the docks.Fence #3: RhodesDue south of Emerald Ranch lies Rhodes, a small town with a small trailer park to the north. There you will find a bright red trailer, and on the backside you'll find a counter and a window where the local fence awaits your business.Fence #4: Saint DenisThe far-off bustling streets of Saint Denis are where you'll find the most well-hidden fence of them all. Tucked under the busy market square, it's easy to spot if you keep an eye out for the brick archways, or the green building with bright green shudders. This is also the only fence that will purchase gold bars, valued at a whopping $500 a piece.Horse Fence, North Of Rhodes (Unlocks after Chapter 3, Horse Flesh For Dinner)After completing the gruesomely titled mission mentioned above, you can speak to a pair of strangers northwest of Rhodes, along the waterside, to turn in stolen horses. Info from Gamespot.com
2018-11-20
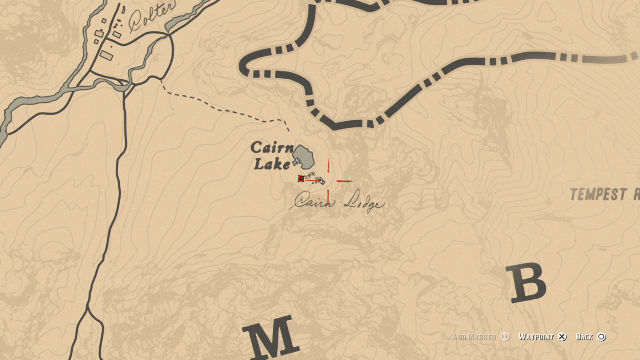
If you're going to survive in Red Dead Redemption 2's world, you're going to need cash. Previously we've highlighted several ways to earn money relatively quickly by working many of the game's core systems and mechanics, but there exists a secret method that can give a significant bump to your wallet without much effort.The method in question is none other than the Poisonous Trail treasure map side mission, which by its end rewards you with four gold bars that equate to about $2,000 when sold. As you explore, you'll often find treasure maps that lead you to all manner of valuable items, but none are as lucrative as the Poisonous Trail maps, which you can complete early on. Of course, if you're more into cheating the system, you can try out this newly discovered glitch that can net you 30 gold bars. But we all know that's nowhere near as fun!Below are directions leading you to all the treasure maps in the Poisonous Trail side mission. We've also included screenshots to aid you in your journey. It's worth noting that you cannot simply head to the final location to cash in on the gold. You need to find every single treasure map first before the gold appears in its associated location.If this guide was helpful to you, be sure to check out our features highlighting all the tips you should know before playing and things the game doesn't tell you. We also have guides on more specific subjects, like top horse breeds and fishing. Though, if you want to have some extra fun instead, be sure to read our feature detailing the game's cheat codes.Treasure Map 1: Cairn Lake CabinThe first map is found at Cairn Lake, which is located north of Valentine up in the mountains. It's snowy up there, so make sure to bring a thick jacket with you before heading up that direction. If you've triggered "The Noblest of Men, and a Woman" Stranger mission, you'll notice that this is the exact location of legendary gunslinger Flaco Hernandez.Once you make it to Cairn Lake, you should find a small abandoned cabin--the one that Hernandez is staying in. Approach the bed to the right and uncover the lock box underneath it, which holds the first treasure map along some extra valuables.Treasure Map 2: Face Rock and an Unassuming Tree TrunkThe first treasure map is attempting to clue you in on a location with a rock that seemingly resembles a face. If you haven't spent much time exploring, this natural formation may seem a mystery to you. Fortunately, we know exactly where it is. Simply proceed down to the Lemoyne region, which is located just South of New Hanover. You can find the rock just north of the "E" in "Scarlett" on the map; check the screenshot in the gallery above for visual clarification.You'll spot Face Rock on a hill. To find the map, go past the tree directly next to Face Rock. You'll want to run further back to the hill's rear where there's a thin tree trunk right beside a fallen tree. The map is located in this thin tree trunk.Final Treasure Map: The Mysterious Snake MoundThe second treasure map has you searching for a snake-like land formation. Yet again, an oddity that you're likely to have missed if you haven't spent significant time taking note of every curiosity out in the world. This bizarre mound is located southeast of Van Horn, a reasonable distance south of the "R" in "New Hanover" on the map.As the treasure map indicates, you're going to want to search for a pile of rocks near the snake-like mound. It's pretty easy to spot as it's literally just a clumped-up pile of rocks with a hole at the center. Search the hole to find the final treasure map. Onward to the treasure!The Treasure: Gold! Gold! Gold!The final treasure map points to a waterfall and what appears to be a pathway in a cave. You'll find this waterfall at the Elysian Pond, which is located directly northeast of the "E" in "Hanover" on the map. When you arrive, walk through the waterfall to discover the entrance of a hidden cave.It's dark in the cave, so bust out your lantern. Proceed through the cave until you find a section in the path where you can drop down. When you land, proceed through the crawl space on the right, which will lead you to the fork in the road pictured on the map. Take the right path, but before you do hug right to find a makeshift camp with a lockbox containing a Large Jewelry Bag.Continue the path forward until you reach what appears to be a pit into certain doom. Instead of falling to your death, proceed left until you reach another edge. If you look closely, your lantern will illuminate some solid ground below that you can land on. But take a few steps back; you're going to want a running start in order to make this jump. If you're acrobatics are sufficient, head down the slope to the left. You'll slip down into some water; once you gain your balance, look to your left for a rock platform to climb up. Search this area and you'll be rewarded with four bars of gold.If this is the first time you've obtained gold, know that you can sell them at Fences for direct profit. Though, if you're feeling particularly generous, it's possible to donate it directly to your camp.Info from Gamespot.com
2018-11-20
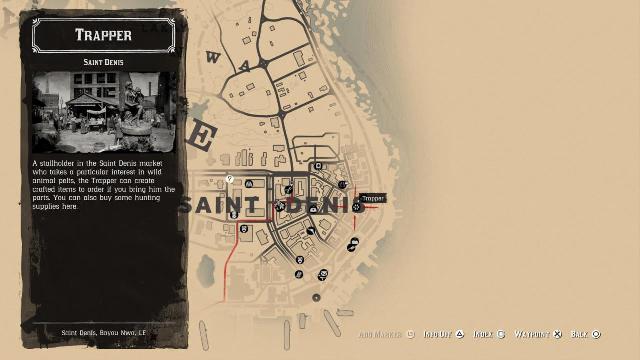
One of the first things you learn in Red Dead Redemption 2 is how to hunt. It's a survival skill that can help you sustain your cores while out in the wild, and it's a reliable source of cash if you're able to quickly gather and turn around animal pelts--the better the condition, the more valuable, of course.While it can take time to spot high-quality animals and even longer to learn how to hunt them efficiently, without making a mess of their pelt, the hardest piece of the puzzle to figure out early on is where to go to sell fur for cash once it's in your hands. You need a trapper, and we've got an easy-to-follow guide that shows you exactly where Read Dead 2's wandering Trapper can be found; five locations in all. Saint DenisThe main location is in Saint Denis, the bustling city to the south. You can go there at any point after the game sets you free. The trapper is located within a busy market, under the giant brick wall painted red with an advertisement for biscuits. This is this only trapper location within a town or city; the rest are scattered throughout the wilderness. Roanoke Ridge Woods, New HanoverTucked away in the woods, around the northeast quadrant of the map, lies a shady outpost for our industrious trapper. Big Valley (East), West ElizabethSlightly Northeast from the nearby Riggs Station lies our man, setup in the middle of a small clearing. Big Valley (North), West ElizabethWith lots of great hunting opportunities nearby, the convenience of the trapper's spot in the northwest corner of the map is worth taking advantage of. Endgame TrapperWe don't want to get into too many specifics here, but know that this trapper spot won't be available until the final chapter in the game.Info from Gamespot.com